Quantcast
Channel: Rick Strahl's FoxPro and Web Connection Weblog
Viewing all 133 articles
Browse latest View live

Figuring out Web Connection Versions

$
0
0

On various occasions I’ve gotten questions regarding how to figure out what version of Web Connection is running on the server. ‘Web Connection’ has several components so the version numbers may be separate and while it’s not absolutely critical that all components are on the same versions it’s a good idea to keep them in sync.

Connector Versions

Web Connection has three different connector versions:

  • Web Connection .NET Module (recommended for IIS 7 and later)
  • Web Connection ISAPI Module
  • Web Connection Apache Plug in

For most applications I’d recommend using the .NET module as it has the most features and is the most reliable, especially when running under COM since it has a high performance managed threadpool for managing the COM instances.

Each of these components has their own signature, but there are several ways you can check for versions:

  • Check the actual DLLs
  • Check the Status Form after a Request
  • Check the Admin ISAPI Admin Form

Check the actual DLLs

The DLLs are stamped with a Version attribute that indicates the actual version. To check the version you can right click the file and use Properties | File Details to get to the embedded resource data that’ll contain the version number. The .NET module and ISAPI modules are updated regularly. You can find the version numbers in either dll right clicking and using File | Details:

WebConnectionModuleFileVersion

Check Web Connection Status After a Request was fired

You can also check the version after at least one request was fired by using the Status form and then reviewing the request data.DllVersion

This is a good way to see if you’re getting the right DLL file. It’s also a good place to check the wcConfig path, which will tell you which configuration is being read which indirectly also tells you where the DLL lives (in the same folder for wc.dll or the bin folder for webconnectionmodule.dll).

Check the Web Connection Module Administration Page

The Web Connection Module page also shows the full version of the active DLL. The module screens looks slightly different depending which version of the DLL you are running – the .NET Module or the ISAPI component. But both contain the version number and status information. For the module it looks like this:

WebConnectionStatusVersion

For the ISAPI page the DLL version shows (ISAPI) in parenthesis instead.

FoxPro Server Version

Note that the Module page also displays the compiled server’s EXE version number. This is useful to let you know what version your own code is. Note this is only avaiable with the module and not with the ISAPI component.

FoxPro Code Versions

To figure out the Web Connection code versions you can easily check the version number in wconnect.h. The version number in there shows up like this:

#DEFINE WWVERSION "Version 5.69"#DEFINE WWVERSION_NUMBER 5.69#DEFINE WWVERSIONDATE "September 26th, 2014"

This is the only FoxPro code based version that Web Connection provides – individual components are not versioned directly, so if you make changes to any of the Web Connection code these version numbers may not be accurate.

Keeping Versions Straight

These days I get a lot of email in regards to old versions that still float around and lots of people are asking what versions they are running and how various components can interact and work with newer version framework code.

The short answer is that the update from .NET 4.x to 5.x is not major, but does require some changes. Updates from Version 5.0 to 5.50+ is almost seamless. There are very few changes on the latter upgrade path.

Smaller version changes are generally just small maintenance releases and I would recommend that from time to time you update to the latest version just to keep up to date. Newer versions tend to fix reported bugs, improve performance for some operations and are maintained for security and other critical changes that might be required. It’s probably not necessary to update to every new version that comes along but I suggest that at least once or twice a year you update your code to the latest. Partial version updates are free (5.50+ versions) and it’s a good idea to keep your code up to date to minimize future update pain. It’s easier to fix one or two minor items at a time, the 20.

I hope this addresses some of the questions that have come my way regarding versioning and on how to best keep your Web Connection version up to date.


SSL Vulnerabilities and West Wind Products

$
0
0

Several people have sent me frantic email messages today in light of the latest POODLE SSL vulnerability and whether it affects West Wind products.

The vulnerability essentially deals with older SSL protocol bugs and the concern is especially on the server that protocol fallback from TLS to SSL can cause problems. Current protocols are TLS vs. the older SSL technology. Only the older SSL stacks are vulnerable. This is most critical on Web Servers, and you'll want to disable the older SSL protocols on IIS and leave only TLS enabled. TLS is the newer standard that superseded  SSL, although we still talk about SSL certificates – most modern certificates are actually TLS certificates and have support for SSL for fallback validation.

You can check your server’s SSL certificate status here:
https://www.ssllabs.com/ssltest/index.html

You’ll want to see that all versions of SSL are either disabled or at the very least that the server doesn’t support protocol fallback to SSL protocols.

When I ran this for my site running Server 2008 (IIS 7.0) I found SSL3 enabled, but the server not supporting automatic protocol fallback which avoids the main POODLE issue. I’ve since disabled SSL V3 on the server. The good news is, that while the certificate isn’t using maximum strength, the server was not found to be vulnerable from this issue even with the default settings in place.

Disabling SSL on IIS

If you see that SSL versions are enabled even if you have TLS certificates (which just about all of them should be by now) you can disable specific protocols. This is done through registry keys, but be aware that this is global for the entire machine. You can disable/enable protocols for both the client and server.

Here's a KB article from Microsoft to check out that tells you how to disable older SSL protocols.
http://support.microsoft.com/kb/187498

SSL and WinInet

The West Wind Client Tools and specifically the wwHTTP class rely on the Windows WinInet library to provide HTTP services. The POODLE issue is much less critical for the client as the client is the actually attacking entity. But I double checked here on my local machine and I can see that WinInet uses TLS 1.2 on my Windows 8.1 when connecting to a certificate on the server.

Capturing an https:// session from Fiddler shows the following request header signature on the CONNECT call:

Version: 3.3 (TLS/1.2)
Random: 54 3F 15 D6 B5 3E 6B F5 AD 71 41 FB 4C 39 B9 30 C5 21 04 A4 76 7F 87 A5 1A BA D6 83 19 B3 10 3B
SessionID: empty

which suggests TLS/1.2 as the initial request sent.

I don’t know what older versions of Windows – XP in particular use – but I suspect even XP will be using TLS/1.0 at the very least at this point. Maybe somebody can check (Use Fiddler, disable Decrypt HTTPS connections option, then capture HTTPS requests and look at the raw request/response headers.

Nothing to see here

From the West Wind perspective this issue is not specific to the tools, but to the operating system. So make sure the latest patches are installed and that if you have to remove the server SSL certificates. Client software is not really at risk, since the attack vector is a receiving Web Server. Regardless even the client tools appear to be using the latest safer protocols and so any West Wind tools are good to go.

Visual Studio Community Edition–Visual Studio for Web Connection

$
0
0

A couple of months ago Microsoft announced the release of a new Visual Studio Community version to replace all the Express versions. As you probably know the Express versions of Visual Studio were severely trimmed down and specialized versions of Visual Studio  – essentially a core version of Visual Studio with only certain packages enabled. While these versions were functional and certainly provided a lot of value, each of the Express versions had some major features missing. The Visual Studio Community edition is a full version of Visual Studio Professional and is available to most non-large enterprise developers free of charge.

Web Express Limitations for Web Connection

In the past I’ve recommended using Visual Studio Express for Web, especially for developers that were taking advantage of the Web Control Framework. It provides the excellent HTML, CSS and JavaScript editors, and explicit support for WebForms which is what the Web Connection Web Control Framework uses to provide it’s designer support in Visual Studio. Express version had some limitations that definitely impacted Web Connection, namely lack of support for the Web Connection Add-in which provides the ability to bring up Visual FoxPro and your favorite browser directly from a Web Connection page.

With the intro of Visual Studio Community edition, that limitation – and many others are gone.

Visual Studio Community Edition is Visual Studio Professional

The new Community edition is essentially a free version of Visual Studio Professional for most individuals and small organizations. It provides the full feature set of Visual Studio Pro which includes the support for plug-ins, multiple projects and the whole gamut of projects that Visual Studio supports. There are no limitations or disablements – it’s a full version of Visual Studio Pro.

If you are a Web Connection developer and you’ve been using the Web Express Edition you should definitely go ahead and download and install Community Edition to get support for the Web Connection Add-in. This version also allows you to open multiple projects in the same solution so you can have multiple Web sites open in one project, as well as open the Web Connection Web Controls design time control project for creating your own components.

You can download the Community Edition from the Visual Studio Download site

Who can use the Community Edition

As mentioned the Community Edition is free to most small to medium sized organizations. With a few exceptions of larger organizations you can use Visual Studio Community edition for free. Here’s what the Community Edition site shows for who can use the Community Edition:

  • Any individual developer can use Visual Studio Community to create their own free or paid apps.

Here’s how Visual Studio Community can be used in organizations:

  • An unlimited number of users within an organization can use Visual Studio Community for the following scenarios: in a classroom learning environment, for academic research, or for contributing to open source projects.
  • For all other usage scenarios: In non-enterprise organizations, up to 5 users can use Visual Studio Community. In enterprise organizations (meaning those with >250 PCs or > $1 Million US Dollars in annual revenue), no use is permitted beyond the open source, academic research, and classroom learning environment scenarios described above.

What’s the Downside?

I think that the Community Edition is a huge step in the right direction for Microsoft. Developer tools are becoming more and more of a commodity item and are used more to sell a platform than anything else, and this edition at least provides a full featured development tool for those that want to work with Microsoft technologies. The fact that the HTML, CSS and JavaScript editors are top notch for any kind of Web development is an additional bonus.

The one downside is that Visual Studio is large. It uses a fair amount of system resources so you need a reasonably fast machine to run it. However, it’s nothing like older versions of Visual Studio that were. If it’s been few years since you’ve last tried Visual Studio you really should give it another shot as performance and especially editor performance and load times have improved significantly.

As a Web Connection Developer Should you care?

If you’re using the Web Control Framework you will definitely want to use the Community Edition as it gives you full support for the designer integration and the Web Connection Add-in to load your WCF pages. If you’re using any other edition, go make the jump – it’s totally worth it.

But even if you’re not using the Web Control Framework that provides integration with the WebForms designer, there are many features in Visual Studio’s HTML, CSS and JavaScript editors that are top notch if not the best compared to just about anything out there. The only other tool I would put even close in comparison is Jetbrains WebStorm which is an excellent tool for pure HTML5 and JavaScript (including Node) based applications.

If you are using any version of Visual Studio 2012 or 2013 (including the Community Edition) make sure you install Web Essentials which provides additional HTML, CSS and JavaScript features including support for LESS, SASS, Zen Coding support (very efficient HTML shortcut template language), automatic JS and CSS minification and much more. As the name implies it’s essential and I don’t consider this an optional add-in.

Regardless of whether you do Web Connection development, or raw HTML coding, here are some features in Visual Studio that I wouldn’t want to live without:

  • HTML Element and Attribute IntelliSense
  • HTML and CSS Formatting (as you type or explicit)
  • CSS IntelliSense (CSS properties, reference props in docs)
  • F12 Navigation to CSS classes
  • Automatic LESS parsing and saving
  • Excellent JavaScript IntelliSense (especially with _references.js file)
  • Basic JavaScript Refactoring

Web Essentials:

  • Zen Code
  • Script and CSS Compression
  • HTML Color Picker, Darken/Lighten
  • CSS Browser Support Preview
  • CSS Vendor Prefix injection
  • Font and Image Previewers

There’s lots more but those are some of the highlights for me. If you haven’t tried Visual Studio in a long while or where put off by the pricing of the full versions, give the community edition a try…

Use wwJsonSerializer to create Sample Data

$
0
0

I frequently create demos for various applications and components and quite frequently I create objects on the fly using EMPTY objects using ADDPROPERTY(). The code that does is a bit verbose and looks something like this:

*** Note objects are serialized as lower case
loCustomer = CREATEOBJECT("EMPTY")*** Recommend you assign your own ids for easier queryingADDPROPERTY(loCustomer,"_id",SYS(2015))ADDPROPERTY(loCustomer,"FirstName","Markus")ADDPROPERTY(loCustomer,"LastName","Egger")ADDPROPERTY(loCustomer,"Company","EPS Software")ADDPROPERTY(loCustomer,"Entered", DATETIME())
loAddress = CREATEOBJECT("EMPTY")ADDPROPERTY(loAddress,"Street","32 Kaiea")ADDPROPERTY(loAddress,"City","Paia")ADDPROPERTY(loCustomer,"Address",loAddress)
loOrders = CREATEOBJECT("Collection")ADDPROPERTY(loCustomer,"Orders",loOrders)
loOrder = CREATEOBJECT("Empty")ADDPROPERTY(loOrder,"Date",DATETIME())ADDPROPERTY(loOrder,"OrderId",SUBSTR(SYS(2015),2))ADDPROPERTY(loOrder,"OrderTotal",120.00)
loOrders.Add(loOrder)
loOrder = CREATEOBJECT("Empty")ADDPROPERTY(loOrder,"Date",DATETIME())ADDPROPERTY(loOrder,"OrderId",SUBSTR(SYS(2015),2))ADDPROPERTY(loOrder,"OrderTotal",120.00)
loOrders.Add(loOrder)

While this works, it’s pretty verbose and a little hard to read with all the nesting and relationships. It’s still a lot less code than explicitly creating a class and then assigning properties but even so, it’s hard to see the relationship between the nested objects. The more nesting there is the more nasty this sort of code gets regardless of whether you use AddProperty() or CREATEOBJECT() with assignments.

Given that Json Serialization is readily available now, it’s actually pretty easy to replace this code with something that’s a little easier to visualize.

Take the following code which produces a very similar object by using a JSON string serialized to an object:

DO wwJsonSerializer*** Create a sample objectTEXTTO lcJson TEXTMERGE NOSHOW
{
_id: "<< loMongo.GenerateId() >>", FirstName: "Rick", LastName: "Strahl", Company: "West Wind", Entered: "<<TTOC(DateTime(),3)>>Z", Address: { Street: "32 Kaiea", City: "Paia" }, Orders: [ { OrderId: "ar431211", OrderTotal: 125.44 }, { OrderId: "fe134341", OrderTotal: 95.12 } ] }
ENDTEXT
loSer = CREATEOBJECT("wwJsonSerializer") loCustomer = loSer.DeserializeJson(lcJson) ? loCustomer.LastName ? loCustomer.Entered ? loCustomer.Address.City loOrder = loCustomer.Orders[1] ? loOrder.OrderTotal

The data is created in string format and embedded inside of a TEXTMERGE statement to produce a JSON string. The JSON string is then sent through a JSON deserializer which in turn produces a FoxPro object (created from EMPTY objects and Collections).

Note that you can also inject data into this structure because of the TEXTMERGE clause that allows merging FoxPro expressions. again this works well to essentially ‘script’ your object definition.

Caveats

I use this mostly for demos and other scenarios where I need to create some static data quickly and for that it works very well because I can control the content exactly with the values I push into the object.

However, keep in mind that JSON requires data to be encoded to a certain degree. Strings need to escape extended characters, quotes and a host of other things. If you’re using Web Connection you can use the JsonString() and JsonDate() functions in the wwUtils library.

TEXTTO lcJson TEXTMERGE NOSHOW
{   
_id: "<< loMongo.GenerateId()" >>, FirstName: << JsonString(lcFirstName) >>, LastName: <<JsonString(lcLastName) >>, Entered: << JsonDate(DateTime()>>,
… }

Although this gets a little more verbose as well, it’s still easier to read than the pure FoxPro object syntax.

Visualize

Anyway – something to keep in mind. When you need more expressive syntax to construct objects – and especially complex objects – a JSON Serializer might just do the trick and provide you complex structure in a more visual way.

Access-Control-Allow-Origin Header in West Wind Web Connection

$
0
0

Over the last few weeks I’ve gotten a ton of questions for applications that need to support cross-site script access in relation to West Wind Web Connection. This typically a requirement for service applications that are accessed from mobile devices or other devices that don’t load the actual site content from the origin Web site. Typically this means you are building a HTTP or REST service that communicates with the client via JSON.

Web Connection 5.70 and later has introduced a host of new features – including the powerful and easy to use wwRestProcess Process class– to make it super easy to create HTTP based JSON services, and it looks like quite a number of users are taking advantage of these new features to integrate their Web Connection backends with various mobile device applications.

So not surprising that these requests for Access-Control-Allow-Origin header questions are coming up more frequently now. When you’re building mobile or distributed services that are called from multiple origin sites or devices you will have to address the CORS issues to enable the cross-domain Web service access.

Luckily making that happen is pretty easy.

What is CORS?

By default Web browsers (and Web browser controls) allow access of data retrieved via AJAX/XHR requests only to come from the same origin server as the originating request. This means that if I’m running on http://west-wind.com/ all of my HTTP requests using XHR have to come from the same west-wind.com domain.

The reason for this restrictive behavior is to prevent cross-site scripting attacks – if your site’s has user input that can be corrupted to include <script> tags that execute it’s possible for an attacker to potentially send sensitive information, like cookie data or anything else contained on a page to another server. The XHR restrictions are in place to supposedly prevent this.

CORS is a simple protocol allows a way to get around this by a server specifying an Access-Control-Allow-Origin header on the server to specify which domains (or all domains) that are allowed access to the site.

Setting the Access-Control-Allow-Origin Header in Web Connection

It’s easy to set this header in Web Connection:

Response.AppendHeader("Access-Control-Allow-Origin","*")

on any request that happens. Here I’m allowing any source domain to access the site. You can also specify specific domains as a comma delimited list in the format of http://west-wind.com,http://weblog.west-wind.com for example.

Alternately you can also add this globally for an entire process class by setting the value in the OnProcessInit() method:

FUNCTION OnProcessInit
Response.GzipCompression = .T.
Request.lUtf8Encoding = .T.
Response.AppendHeader("Access-Control-Allow-Origin","*")RETURN .T.

Finally you can also use IIS to set this header globally for the entire site assuming your using IIS 7 or later:

<configuration>
<
system.webServer><httpProtocol><customHeaders><clear/><add name="Access-Control-Allow-Origin" value="*" /></customHeaders></httpProtocol></system.webServer></configuration>

And voila that’s all it should take to make your site able to serve remote requests from mobile devices or from pages served off a remote domain.

Things that make you go Hmmm.

Alas, I’ve never really understood the value of this CORS implementation. Cross site scripting is a big problem no doubt, but I don’t really see how CORS helps this if the *server* can specify the domain it wants to allow. If somebody is attacking your site and trying to steal information and they want to use XHR to post the data somewhere it’s trivial for the user to set up a server that adds the above header. Nothing’s been prevented at that point. This just seems like yet another useless security protocol that makes things a little bit more inconvenient for developers, but adds very little of security safeguards. Just like JSONP and hidden iFrames have been able to get around XHR cross-site limitations for years, CORS doesn’t really provide anything that prevents that.

The point of CORS is more to let the server decide of whether it wants to serve content to the client, but CORS is often billed as cross site scripting prevention which it really isn’t.

Single File Image Uploads with plUpload and Web Connection

$
0
0

I get a lot of questions about uploading files in regards to Web Connection. Uploading is a thorny problem especially if you need to upload multiple files or if you want to use asynchronous uploads using AJAX rather than submitting files through standard <input type=”file”> elements which suffer from many problems. Using asynchronous upload components allow getting around the 16 meg string limit in FoxPro and Web Connection and they allow you to do the uploads in the background while you can display progress information and keep your UI otherwise active.

Web Connection has had support for plUpload for some time now. There’s a plUpload server handler that allows you to use the plUpload Queue component which is a visual UI component that’s provided by the plUpload library. Web Connection provides a generic plUploadHandler class that can be used on the server side to capture uploaded files.

The examples show how to do this using the plUpload Queue component which is bulky UI control. Here’s what the full UI that you can drop on any form looks like:

You can check out this example and the following single file upload example on the Web Connection Samples page:

http://west-wind.com/wconnect/webcontrols/plUploadSample.htm

Single File Uploads

The full component is useful for batch uploads, but sometimes you don’t want or need this rather bulky UI to handle file uploads. For example I recently needed to add image uploads to the West Wind Message Board and in order to do this I really wanted a much simpler UI that simply triggers the image upload from a button:

ImageUpload

There’s a simple button that when clicked allows you to pick a single file (although you can also have it pick multiples) and then immediately starts uploading the image to the server. When done the image URL returned is then embedded into the user’s message at the current cursor position.

Let’s see how we can do this using the simpler plUpload base API.

Using the base plUpload API

plUpload includes a number of different upload components but behind it all sits a base uploader API which doesn’t have any UI components associated with it. For my image uploader I don’t want any extraneous UI – I only want to upload the file and provide some basic progress information.

To do this we can use the core plUpload API. Here’s how this works.

Let’s start with the Add Image Dialog HTML which displays the modal dialog above:

<div id="InsertImageDialog" class="dialog" style="display: none; min-width: 320px; width: 80%"><div class="dialog-header">Insert Image</div><div class="dialog-content"><label>Web Image Url: <small>(external source ie.Flickr,Imgur, DropBox etc.)</small></label><input type="url" id="txtImageLink" style="width: 98%" /><button type="button" id="btnImageSelection" class="bigbutton" style="margin-top: 5px;">Insert Web Image</button> <div id="container" style="margin-top: 30px;"><label>Upload an Image:</label><button id="btnUploadFile" onclick="return false;" class="bigbutton">Select file to Upload</button> </div></div></div>

Next we need to add the relevant plUpload script to the page.

<script src="scripts/plUpload/plupload.full.min.js"></script>    

Then we need to configure the plUpload Javascript code which can live in a script tag on the bottom of the page or as is the case here inside of a page level JavaScript file.

var uploader = new plupload.Uploader({browse_button: 'btnUploadFile', // you can pass in id...
url: "ImageUpload.wwt",


runtimes: 'html5,flash,html4',
container: document.getElementById('container'), // ... or DOM Element itselfurl: "ImageUpload.wwt", chunk_size: '64kb',// Resize (downsize really) images on clientside if we canresize: { width: 1024, height: 768, quality: 85 }, filters: { max_file_size: '4mb', mime_types: [ { title: "Image files", extensions: "jpg,gif,png" } ] },// Flash settingsflash_swf_url: 'scripts/plupload/js/Moxie.swf', init: { PostInit: function () { }, FilesAdded: function (up, files) {// start uploading - we only accept one fileuploader.start(); }, UploadProgress: function (up, file) { showStatus("Upload Progress: " + file.percent + "% complete",3000); }, Error: function (up, err) { showStatus("Upload failed: " + err.code + ": " + err.message); },

FileUploaded: function(up, file, response) { uploader.removeFile(file);var imageUrl = response.response;if (imageUrl) { markupSelection("<<img src=\"" + imageUrl + "\" />>"); $("#InsertImageDialog").modalDialog("hide"); } }, UploadComplete: function(up, files) { } } }); uploader.init();

The plUpload script code is pretty descriptive so not much explanation is needed. The most important propertie here is the browse_button property which is an id pointing at a button or link that when clicked triggers the image upload and the url property which points at the server target URL that will response to the plUpload file chunks that are sent to the server.

The interesting stuff happens in the event handlers.

Since I’m only dealing with a single file selection, I can use the FilesAdded event to immediately start the file upload under program control. This event fires whenever you select one or more files, and if you use a single button it makes sense to just kick off the upload without further user confirmation.

For progress and error information I use the ww.jquery.js showStatus()  function which is a quick and easy way to display status information on a status bar on the bottom of the form.

The most important piece though is the FileUploaded event which is used to actually confirm the file upload and capture the generated filename that the server saved. The function receives the upload component, the individual file object and and HTTP response object. The main thing we’re interested in the response property of the response object which provides a fully qualified image URL that points at the image that the server saved. This value is captured, an <img> tag created and then pasted into the text control at the current cursor position.

Handling the Image plUpload on the Server Side

As mentioned earlier Web Connection includes a plUploadHandler class that makes it pretty straight forward to handle uploads. The class basically works in conjunction with a wwProcess class and handles the plUpload file transfer chunks and puts the files together on the server in small chunks. This makes it possible for example to post files larger than 16 megs to the server as well as the file is sent in small chunks that are progressively appended to a file on the server.

To implement the server side you’ll create two methods:

  • A standard wwProcess EndPoint Method
  • An OnUploadComplete Event that is fired when the upload is complete

The first is the actual endpoint method that is referenced by the plUpload component. If you look back on the JavaScript configuration you see that it points at ImageUpload.wwt which translates to the following method in my wwThreads Process class:

FUNCTION ImageUpload()*** Make sure plUploadHandler is loadedSETPROCEDURETO plUploadHandler ADDITIVE LOCAL loUpload as plUploadHandler
loUpload = CREATEOBJECT("plUploadHandler")*** Upload to temp folder
loUpload.cUploadPath = ADDBS(THIS.oConfig.cHtmlPagePath) + "temp"IF(!IsDir(loUpload.cUploadPath))MD (loUpload.cUploadPath)ENDIFBINDEVENT(loUpload,"OnUploadComplete",THIS,"OnImageUploadComplete",1)*** Constrain the extensions allowed on the server
loUpload.cAllowedExtensions = "jpg,jpeg,png,gif"*** Process the file or chunk
loUpload.ProcessRequest()
ENDFUNC

This code creates a plUploadHandler component and tells it to store files uploaded in a temp subfolder. This is a temporary folder where files are uploaded to and then discarded before getting copied to a permanent location.

We then need to map the OnUploadComplete event by mapping it to another function OnImageUploadComplete() that will do the post processing and moving of our file. Finally we can specify the file extensions that are allowed for the image and then we’re ready to Process the current request with loUpload.ProcessRequest().

This method is called multiple times for each file uploaded. Files are uploaded in chunks so a 2meg file is broken into many smaller chunks that are sent and processed one at a time. When a file is completed the OnImageUploadComplete event is fired. Here’s what that looks like:

FUNCTION OnImageUploadComplete(lcFilename, loUpload)LOCAL lcUrl, lcFile
lcUrl = this.ResolveUrl("~/temp/" + lcFileName)*** Resize the image
lcFile = ADDBS(loUpload.cUploadPath) + lcFileName*** Delete expired files - only for 10 minutes
DeleteFiles(ADDBS(JUSTPATH(lcFile)) + "*.*",600)
lcNewFile =  SYS(2015) + "." + JUSTEXT(lcFile)
lcNewPath = this.cHtmlPagePath + "PostImages\" + TRANSFORM(YEAR(DATETIME())) + "\"IF !ISDIR(lcNewPath)MD (lcNewPath)ENDIF
lcFileName = lcNewPath + lcNewFile*ResizeImage(lcFile,lcFileName,1024,768)COPYFILE (lcFile) TO (lcFileName)DELETEFILE (lcFile)
lcUrl = this.ResolveUrl("~/PostImages/" + + TRANSFORM(YEAR(DATETIME())) + "/" + lcNewFile)
lcUrl = "http://" + Request.GetServerName() + lcUrl*** Write out the response for the client (if any)*** In this case the URL to the uploaded image
loUpload.WriteCompletionResponse(lcUrl)ENDFUNC

The handler is passed the original file name (just the filename without a path) and the loUpload component.

For the message board I want to capture the file uploaded, rename it with a random name and then move it a more permanent folder – in this case PostImages/YEAR/. Once the file has been copied the original uploaded file in the temp folder can be deleted.

Finally the OnImageUploadComplete() method has to return the new URL to the client so that the client can link to the image. If you recall in the JavaScript we were sent a response object with a response property. The response property holds whatever we write out into the WriteCompletionResponse(). The most useful thing here almost always is the full URL to the resource that was uploaded if the client allows using that resource in some way. In the client application the URL is used to embed an image link into the user’s message text.

Quite a bit of Code, but easy to do

What’s described above is the entire process involved, which is not entirely trivial. There are a fair amount of moving parts in this code both on the client and on the server, but between plUpload and Web Connection’s plUploadHandler the actual code you have to write is pretty minimal. Most of what you see above is boiler-plate code that you can cut and paste into place and then only customize the actual result handlers when uploads are complete both on the server and client. Although it’s a fair bit of code overall the non boiler-plate code is minimal.

A Preview of Features for Web Connection 6.0

$
0
0

I've set some time aside to start working new functionality for Web Connection 6.0. I've been really on the fence on whether I wanted to go down this path due to the ever declining FoxPro market. However, there is still a fairly large contingency of developers out there using Web Connection and even a fair amount of users that are coming into Web Connection as new users. The existing version works fine and has most of the features that most developers need, but the truth is that a lot of the samples, documentation and content have gotten really dated. We do build Web apps differently these days and while Web Connection still works fine for all the development scenarios with the updates I've provided over the years, the demos and documentation really don't reflect that very well any more.

So for Web Connection 6.0 I've been planning a few things to make using Web Connection a bit easier. I still work with a lot of customers building Web Connection applications and there are a few things that I think will really improve the usability of the product. While I plan on adding some new features and revamp the default Wizards and configuration, I also want to ensure that there's minimal to no impact on existing applications. While I expect the new project experience and layout to be different, the core engine and functionality won't change much so that existing applications will continue to run just fine on the new version.

Planned Feature Enhancements

There are 4 key areas that I'm planning on addressing with Web Connection 6:

  • Simplified Project Configuration and Management (and documentation)
  • Improved Templating and Scripting
  • Improved support for Mobile Web development (REST Services and Mobile friendly default templates)
  • Overhaul the default templates for new projects and the samples

These are only 4 bullets, but they are actually quite significant in terms of work that needs to be done, especially the latter two, which are mostly redoing the existing examples, as well as reworking the documentation to match. Some of the work fo the third item has already been done in Version 5.70 and forward, but there are additional improvements to be done and integrated.

Let's look at each of these.

Improved Project Setup

One thing that I've heard over the years is that it's a pain to manage Web Connection projects. In the past I've built the library in such a way to make it as easy as possible to create a project and ensure that the code 'just runs' out of the box. The result was that Web Connection generates new projects into the install folder, along with any other projects. If you manage multiple projects this gets messy – it's hard to separate your actual project code from other projects and from the framework code.

So last week I built a new New Project Wizard that creates projects in a much more self contained fashion. When you create a new project with Web Connection now you create a new Project folder that contains both the Code, and Web Folders underneath the new project root. The code folder contains only your own code and Web Connection is referenced via SET PATH. The new Wizard generates the necessary pathing and a shortcut to make it easy to get set up properly so that your project just builds. This was tricky to get right, and in fact has been the reason I did not want to actually implement this in the past.

The New Project Wizard has been whittled down to 2 simple  pages now:

NewProject1

NewProject2

Gone are are most of the choices for file locations and IIS configurations beyond picking the site so this is much less intimidating for new users.

This is possible because with the new project structure we can create new projects with a known location and all of the paths for the Web site and configuration file locations can be determined based on the project path.

The default configuration settings are now also using relative paths for most paths, so that configurations are much more portable. In many cases you can just push up your project folder to a server and other than setting up the IIS ApplicationPool and Virtual directory the application should just work.

Here's what the project layout looks like:

Projectdisklayout

There's a project root folder (DevDemo) and deploy and web folders. Deploy is the 'code' or 'binary' (or both) folder for your project – this is where your application starts from. The web folder holds all the Web content and that's what's mapped in IIS to the Web site or Virtual directory.

The deploy folder contains your server and process classes, the project file, the compiled EXE and INI configuration file. The project wizard also generates a config.fpw file that has paths pointing back to the Web Connection install folder (or whereever Console.exe was run from) and a desktop shortcut for the project was also created that points at that web.config file.There's also a SetPaths.prg which does the same thing if you just change path to the folder as a lot of you do.

Also notice that the temp path has now moved into the Deploy folder by default. This is a known application in this project – for the executable it's just ".\temp", for the Web app it's "~/../deploy/temp" – a relative location. Again if you move this app to the server with this same folder structure, things just work without reconfiguring paths in your config files.

Note that this is just a new default setup. Nothing has changed in the way you configure Web Connection itself meaning that if you still want to put your Web folder into inetpub/wwwroot you can do that as well. You can move the code folder, web folder – anything at all. You just have to manually adjust the configuration settings in IIS and your configuration files to match.

Better late than never right? :-)

Templating and Scripting Improvements

When I released Web Connection 5.50 a few years back, that release paid lip service to the fact that the Web Control framework that was introduced in Web Connection 5.0 didn't really take off. While there are a number of you that are using that framework heavily most developers are continuing to use the templating and scripting features. 5.50 introduced the wwHtmlHelpers set of helpers that provide a lot of the functionality that many of the Web Controls provide for the simpler scripting and templating applications.

For Version 6.0 I plan on adding a couple of important features to templates and scripts:

  • Integrated Partial Rendering
  • Support for Layout/Master Pages

If you've used any sort of server side MVC (Model/View/Controller) framework before you've probably noticed that Web Connection's ProcessClass/Script/Template mechanism essentially was an early MVC implementation. However, most modern MVC implementations support nested views in a variety of ways. Having an easy way to pull in nested content or Partials makes life a lot easier. Web Connection has always had support for this but the syntax for it was nasty and it's very difficult to discover.

Likewise there's the concept of 'Layout' pages that are sort of a master view container. Most applications have a 'base' layout into which other content is added. So you have a Layout page into which you render you actual page content. The page content then in turn can have Partials to render additional reusable components into the page.

In the last couple of days I implemented both Partials and Layout pages for both the template and script engines in Web Connection.

Here's how this will work.

Templates

Web Connection templates are typically rendered with Response.ExpandTemplate() or by using .wc pages through the default script map handler. Templates are basically evaluation only templates that are loaded and executed by parsing the document and replacing FoxPro code expressions and script blocks. Templates only support self-contained code blocks, but don't support structured code that mixes HTML and code.

The new Partial and Layout features fit well with templates however since these operations are basically just expressions calling out to other templates. Here's an example of a set of templates that can interact with each other:

<%Layout="~/LayoutPage.wc" %><div><h3>This is my rendered content</h3><p>    Time is: <%= DateTime() %>
</p><%= RenderPartial("~/PartialPage2.wc") %><%= RenderPartial("~/PartialPage2.wc") %></div>

RenderPartial() delegates out to another script page, which simply contains more script content just like this page. The partial page in turn can contain additionally nested content.

The syntax is:

<%= RenderPartial("~/PartialPage.wc") %>

and has to be used with this exact spacing and syntax in order to work properly. The ~/ denotes the root of the Site/Virtual so this expects a PartialPage.wc to exist at the root of the site. The ~\ syntax is required!

This content on this page is meant to be rendered into a Layout page. You'll notice that this page is really just an HTML fragment, not a full document. There's no <html> or <body> tag – that's meant to be provided by the layout page specified by this syntax:

<%Layout="~/LayoutPage.wc" %>

Again the ~/ is required and points at the root of the site/virtual.

The actual layout page in turn looks like this:

<!DOCTYPE html><html xmlns="http://www.w3.org/1999/xhtml"><head><title></title></head><body><h1>This is my LAYOUT PAGE Header</h1><%= RenderContent() %><hr />LAYOUT PAGE Footer</body></html>

This page has the HTML header and it pulls in the  content from the previous page we looked at via:

<%= RenderContent() %>

Layout pages are great for creating a basic shell of a layout – that includes the HTML header and other content that ends up on just about every page of your application. It's great for pulling in css and scripts and base layout for pages.

Scripts

Web Connection scripts are typically called using Response.ExpandScript() or by using scripts on disk with a .wcs extension. Scripts are parsed into full PRG based programs that are executed as compiled FoxPro code. Scripts support most of the same features that templates support, but additionally can also run structured statements that mix HTML and code. Because scripts are compiled FoxPro, a compilation step is required by Web Connection and it's not quite as straight forward updating script files if multiple instances are running and have the compiled FXP files locked.

The new Partial and Layout rendering in scripts uses the same syntax I showed with templates.

<%Layout="~/LayoutPage.wcs" %><div><h3>This is my CONTENT PAGE</h3><p>    Time is: <%= DateTime() %></p><% for x = 1 to 10 %><h3>Partial Content below</h3> <hr /><%= RenderPartial("~/PartialPage.wcs") %><%endfor %></div>  

In this example a partial is rendered 10 times in a loop which demonstrates the structured mixing of code and HTML that you can't do in templates.

As in the template example, the layout page has to include a call to RenderContent() to force the content page that referenced the Layout page to be rendered.

<!DOCTYPE html><html xmlns="http://www.w3.org/1999/xhtml"><head><title></title></head><body><h1>This is my LAYOUT PAGE Header</h1><%= RenderContent() %><hr />LAYOUT PAGE Footer</body></html>

Layout Sections

You can also create layout sections in the master that are 'filled' from the content page. A typical example for this is when you want to add scripts or css stylesheets to a page from the Content page. Or if you have some other area of the page that you want to fill with content from the content page. Essentially this let's you embed content outside of the content rendering area from the content page.

Start by setting up your layout page:

<!DOCTYPE html><html xmlns="http://www.w3.org/1999/xhtml"><head><%= RenderSection("headers") %></head><body>    <h1>HEADER FROM LAYOUT PAGE</h1>    <%= RenderContent() %><hr />    LAYOUT FOOTER<%= RenderSection("scripts") %></body></html>

This designates two sections for headers and scripts. The string is a label of your choice – you can have as many section as you like.

In the content page you can then create sections that will essentially fill these sections in the layout page:

<%Layout="~/LayoutPage.wcs" %><%section="headers" %><title>My Content Page</title>
<link href="css/MyPage.css" rel
="stylesheet" /><%endsection %><div><h3>This is my CONTENT PAGE</h3><p>Time is: <%= DateTime() %></p> <h3>Partial Content below (10x)</h3> <hr /> <% for x = 1 to 10 %><%= RenderPartial("~/PartialPage.wcs") %><%endfor %><hr /></div> <%section="scripts" %><script src="bower_components/lodash/lodash.js"></script><%endsection %>

You can also use script expressions (but not code blocks) inside of sections. Sections can fill parts of a document such as a user status widget perhaps that displays user login information. Lots of options here.

At this point sections only work in scripts, not templates. It took some extremely ugly recursive and generator style code to make this work, and I'm not sure at this time whether it'll be possible to make this work with the current template engine. But then again, if you are doing stuff complex enough to require sections and layout pages you probably should be using scripts anyway.

Finicky Tags

In order to keep the parsing overhead to a minimum when dealing with these new 'directive' tags, the tag names have to match exactly – including spacing inside of the tags. This allows quick searches for these tags in the page rather than traversing the document to find them which dramatically speeds up the performance. All of the new tags are not directly executed by FoxPro – the various expressions were chosen for easy to remember and logical names in order to make it easy to use them in the page. They are translated into actual executable script code when the page is parsed – they expand into something different. Sections in particular turn into some real ugly code with literal strings, but that's the price for this level of complexity. As before you'll be able to see the underlying code that makes the pages actually run in the codebehind PRG files that are generated.

Partials and Layout should make building complex apps quite a little less repetitive as you can do away with a lot of boiler plate code and simply put it into a Layout page.

Although you could do at least partials before, these new features standardize the behavior significantly and make it more transparent.

Improved support for REST/API Services and Mobile Web

Mobile applications are becoming more important by the day as more people are relying on mobile devices of various sizes to access their data and applications. Building mobile applications is quite different than building 'classic' Web applications that they need simpler user interfaces and handle display more effectively. As a result we've seen a big move towards client centric applications that use HTML/CSS and JavaScript to handle the user interface, using the server to serve static resources and server based services to feed data.

In the last releases of Web Connection (5.65 and later) there have been steady improvements to provide for that REST/API Service layer via the new wwRestProcess class that can facilitate consuming and serving of JSON data from your FoxPro business objects. There are a number of additional improvements that can be made here in terms of performance and simplifying the interface even more. This will be mostly an incremental change but it's an important piece in the overall Web Connection 6 package.

The other piece of that is the client side. This isn't directly related to Web Connection other than providing improved examples that demonstrate how to build these type of applications that use an all browser based client side user interface and that works well both on mobile devices as well as full sized applications. The Music Store sample was the start of that. Again some of the functionality it there already but it's part of the packaging for 6.0

Updated Samples And Default Templates

As mentioned at the beginning of this post, the main reason to consider all of this work is to make it easier to get started with and set up new projects that are ready to go. This is for my own work as I still work with a host of customers both to showcase specific functionality as well as creating actual new projects.

The goal is to build new templates that default to using Bootstrap for user interface layout. I plan on providing a default theme based on bootstrap that provides a basic customized bootstrap setup that can be easily customized (or go back to stock bootstrap if you choose).

This seems like a minor thing but there are a number issues related to this. All of the samples in Web Connection are based on old custom CSS that don't use any special CSS or other dependencies. While that worked in the old days, it's now to really look like crap and dated. This involves going through all the existing samples, all the existing admin features etc. and starter templates. This will take some time unfortunately and most of this is tedious boring work :-)

Along the same lines a lot of the simple feature samples in Web Connection need to be updated – some just need a visual refresh, others need a complete logic rebuild to work the way you'd do things today. Some of these samples are nearly 20 years old, so yes there's some room for improvement I suppose.

Likewise the Web Control Framework functionality uses all the old styling, so I'm not sure that I will be updating these controls to use the new layouts. THere's too much baggage there to make that work – that might be a 6.1 feature.

Dropping Visual FoxPro 8 Support

One thing that has made maintenance of Web Connection more problematic over the years is support for Visual FoxPro 8. With version 6 I will be dropping support for VFP8. There's no good reason for anybody to be running VFP8 these days, given that VFP8 and VFP9 have very, very little in the way of feature differences. This was not the case for earlier versions of 7 and 6, but those haven't been supported for some time.

I know some of you will howl at this (I still get frequent requests for 'does this tool work with VFP 6?'). There's no excuse to be running anything but VFP 9 if you are running FoxPro applications. Maintaining VFP 8 support has been an issue as it requires extra testing, extra files to distribute to keep in sync and having to remember what we can and can't use in the latest versions of our tools.

Other Odds and Ends

There are a few other things that need attention as well. The authentication features in Web Connection are reasonably functional, but hooking them up currently is both badly documented and could be easier by providing a few additional hooks. It also would be nice to set up a default login page template that is easy to customize as part of a new application – this way you can simply modify a Web page to get the look that you want without having to override a bunch of process class methods as you have to do now to essentially do the same thing.

The various Wizards also will need some updating to reflect the changes to the new templates. For the most part the updates will be minor except for the new Process Wizard which will also need a similar overhaul as the new project Wizard does.

What else?

If you're using Web Connection, what's on your wishlist? What features do you want to see that I've missed that are within the realm of the core framework? I know there are tons of request to build this or that vertical functionality but I can tell that's not going to happen from me – that's what you guys can build ontop of Web Connection :-) But if you have core framework features or utilities that you think would make your life easier, I'd love to hear about it.

Visual FoxPro and Multi-Threading

$
0
0

A few days ago somebody asked a question on the Universal Thread on whether it’s possible to run a Visual FoxPro COM component as a free threaded component. Questions like this come up frequently, because there is a general sense of confusion on how Visual FoxPro’s multi-threading actually works, so lets break this down in very simple terms.

Visual FoxPro is not Multi-threaded

The first thing to understand is that Visual FoxPro is not actually multi-threaded in the sense that say a native C++ component is multi-threaded.

Visual FoxPro is based on a very old and mostly single threaded code base. Your FoxPro code that runs as part of your application always runs on a single thread. This is true whether you are running a standalone EXE, inside of the VFP IDE or inside of an MTDLL. Behind the scenes there are a few things that Visual FoxPro does that are truly multi-threaded, but even those operations converge back onto a single thread before they return to your user executed code in your application. For example, some queries and query optimization that use Rushmore are executed on multiple threads as do some ActiveX interactions that involve events. The FoxPro IDE also does a few things interactively in the background. You can also call from FoxPro into a native DLL or a .NET Component and start new threads outside of the actual Visual FoxPro runtime environment. But when we’re talking about the actual code executing in your mainline programs – they are single threaded. 1 instance of your executing FoxPro code == 1 thread essentially.

Keep this in mind – Visual FoxPro code is single threaded and it can’t and won’t natively branch off to new threads. Further FoxPro code assumes pretty much it’s the only thing running on the machine so it’s not a particularly good citizen when it comes to giving up processor cycles for other things running on the same machine. This means Visual FoxPro will often hog the CPU compared to other more multithread aware applications do. Essentially VFP will only yield when the OS forces it to yield.

Visual FoxPro supports running inside of some multi-threaded applications by way of a mechanism called STA – Single Threaded Apartment threading. VFP9T is not thread safe internally. It is thread safe only when running in STA mode called from a multi-threaded COM client that supports STA threading.

So what is a Multi-Threaded VFP COM DLL?

If you create VFP component with BUILD DLL MTDLL you are creating an STA DLL. STA stands for Single Threaded Apartment and it stands for a special COM threading model that essentially isolates the DLL in it’s own separate operating container. STA components are meant for components that essentially are otherwise not thread-safe. A thread safe component is a component that can use a single instance to get instantiated from multiple threads and run without corrupting memory. Essentially this means that a free threaded component needs to be able to have no shared state or if it does have shared state that shared state has to be isolated and blocked behind sequential access (Critical Sections or Mutexes etc.) to essentially serialize the access to any shared state.

Visual FoxPro DLL – MTDLL or otherwise  - do not qualify as thread safe. FoxPro has tons of shared state internally and if that shared state were to be accessed simultaneously from multiple threads – BOOOM! So FoxPro is not a true multi-threaded component.

This answers the original question: Visual FoxPro cannot run as a Free Threaded component directly as a DLL.

However, there are several ways that you can run VFP COM components in free threaded mode but not directly as a DLL. I’ll talk about that a bit later on.

STA For Multi-Threading

Ok so Free Threading is out for a DLL. But you can build MTDLL components which are STA components that can be used in multi-threaded environments that support STA components. For example, you can use ASP or ASP.NET pages to call FoxPro COM components and these components will effectively be able to run multiple simultaneous requests side by side.

This works by way of COM’s Apartment Threading model which essentially creates isolated apartments and caches fully self contained instances of the COM DLL in a separate storage space – the apartment. What this means is that when you create a new VFP COM component COM creates a new COM apartment and loads your DLL and the VFP runtime DLLs into it. COM leaves that apartment up and running. When the next request comes in it activates the same apartment with the already running runtimes inside of it, reattaches the component and thread state and then executes the request in the same apartment. If multiple requests come in simultaneously while all other apartments are busy a new one is created, so effectively you end up with multiple copies of the Visual FoxPro runtime running simultaneously, side by side. As requests come in they are routed to each of these existing apartments and the COM scheduler decides how long the apartments persist.

All of this happens as part of the COM runtime with some logic as part of the STA component in the VFP runtime that makes it possible to launch your VFP COM component and link the VFP runtime which is doing the heavy lifting. Behind the scenes each apartment then has its own thread local storage address space, which can hold what otherwise would be global shared data. A FoxPro MTDLL essentially maps your VFP component to a separate VFP9T runtime that stores all of its shared stated in thread local storage, rather than on the global shared memory. This is why there are a few things that don’t properly work in MTDLL components – the memory usage is different and in fact a bit less inefficient as all shared state and buffers are stored in TLS.

What all this means is that in STA mode when simultaneous requests come in and process at the same time, the VFP runtime effectively runs multiple instances of the runtime side by side and thus ensures that there’s no memory corruption between what would otherwise be shared data.

If you want to understand how this works, try setting up a COM component that runs a lengthy query. Then first create a DLL Component (not MTDLL) then load this into an ASP or ASP.NET application and hit the page with multiple browsers (or a tool like West Wind Web Surge for load testing). After a few hits you’ll like see errors popping up in IIS finding that your COM component crashed. This is due to the memory corruption that occurs when your are not using the STA optimized DLL compilation.

Then recompile in MTDLL mode and try the same exercise again – you’ll find that now you don’t get a crash because the shared state is protected by multiple instances of VFP9T.DLL. If you want to look at this even deeper fire up Process Explorer and open the host process (w3wp.exe for the IIS Application Pool), then drill into the properties and loaded DLL dependencies. You’ll see multiple instances of your DLL and the VFP9T.dll and your application DLL loaded (assuming you’ve loaded the app hard enough to require multiple instances to run simultaneously).

There's no reason not to use MTDLL COM components using STA if you can. STA is effective in isolating instances and that's as efficient as you are going to get. For do nothing requests it's possible to easily get around 2000+ req/sec on mid-range quad core i7 system. However, things get A LOT slower quickly as soon as you add data access and returning object data to the COM client, so the actual raw throughput you can achieve with STA is far outweighed by the CPU overhead of doing anything actual useful inside of your FoxPro code. Running a query and returning a collection of objects of about 80 records for example drops the results down to about 8 req/sec. Call overhead is a nearly useless statistic when it comes to VFP COM objects, so even if free threading were possible and even if it were 10x faster than STA threading, it would have next no effect at all on throughput for most requests that take more than a few milliseconds. STA is the most effective way to get safe and efficient performance.

Where STA and MTDLLs fall short is error recovery. If an STA component fails with a C5 error or anything that hangs a component, the component will remain loaded but won’t respond to further requests. The COM STA scheduler still thinks that component is active and running which results in potentially confusing intermittent errors where say every 3rd request results in an error. There’s no good way to recover from that, short of shutting down the host process (IIS application pool). There’s no way to shut down COM DLLs for maintenance tasks either – short of shutting down the Host process. So if you need to run tasks like reindexing or packing of your data you need to really think ahead about how to do this as you have to kill all instances and then ensure only a single instance (ie. 1 not overeager user) is doing the administration tasks in order not to trigger multiple instances that have files open.

Bottom Line: STA components provide a good simulation of multi-threading and this is the best way for getting multi-threaded components into a multi-threaded host like IIS typically – assuming the host supports STA threading and provided you don’t have very frequent admin tasks that require exclusive access you need to run against the server.

STA Support – not always available

STA is a good option for multi-threaded FoxPro code, but it’s not always available. In fact, more and more STA support is going away because the era of legacy COM components like FoxPro and VB6 has pretty much disappeared for high level development and is relegated now to system components which typically can support free threading. For example, the only ASP.NET technology that officially supports STA components is ASP.NET WebForms. ASP.NET MVC, ASMX Web Services, WCF, Web API and vNext all don’t have native support for STA built in.

There are ways to hack around this and I have a blog post that covers how to get STA components into various technologies:

Creating STA COM compatible ASP.NET Applications

which lets you use FoxPro components in different .NET technologies.

Free Threading – You Can Do It, but…

Earlier I said that it’s not possible to use VFP DLL COM components directly to run in Free Threaded environments. However, there are a couple of options available if you step outside of the box and use some component technology:

  • Use a COM+ Component
  • Use an EXE Server

Both of these technologies essentially create fully self contained objects. COM+ provides a host wrapper that can run either in process or out of process, while an EXE server is on its own a fully self contained instance. Both technologies have one big drawback: They are slow to create and dispose of instances.

COM+

COM+ is a wrapper technology that you can access on Windows using the Component Services plugin (make sure you run the 32 bit version of it for Fox components). COM+ allows you to register a VFP MTDLL COM component which essentially creates a registry redirect to instantiate your COM component through the COM+ runtime. The COM+ runtime creates a host container that essentially provides the STA Apartment that VFP expects and every access of the COM component is then routed through this HOST container. The actual ClassID points at COM+ with special keys that actually point at the ClassID for your component. The container loads itself then loads and executes the actual COM component inside of it.

COM+ supports both In Process and Out of Process activation modes but even the in-process mode tends to be fairly slow adding a lot of overhead for each call made to the container.

COM+ is also a bit of a pain to work with for debugging and updating of components. In order to update a COM component you have to unload the COM+ container and if the interface of the COM object changes you have to reregister the component in the COM+ manager which is fairly painful during development.

EXE Server

You can also use an EXE server to run as a Free Threaded component. Because an EXE server is effectively an out of process component there’s no overlap in shared memory or buffers and so launching an EXE server is an option for executing in a free threaded environment. The limitation with this is that the calling server has to support IDispatch invokation of COM objects.

Like COM+ loading up an EXE component is slow because each time it’s instantiated a new instance of the VFP runtime is required. While the runtime disk images cache it’s still pretty slow to load up and shutdown full processes. However, if performance is not critical and you have to support free-threaded environments this is one of the easiest ways to make it work!

There other alternatives in how to run EXE servers – like running a pool manager of instances so that instances are loaded and then cached rather than having to be restarted each time. I use this approach in West Wind Web Connection, and by removing the overhead of loading a VFP instance each time and keeping VFP’s running state active, raw request throughput performance actually rivals that of DLL server with this approach. However, this sort of thing only works if you can control actual activation as part of the application you are building (as I do in Web Connection).

Summary

Multi-threading in FoxPro is a tenous thing. It’s possible due to some very creative hackery that was done on the VFP runtime to effectively make a single threaded application run in a multi-threaded environment. STA threading is a reasonable solution to make FoxPro work in those environments that support it. Unfortunately STA support is getting less and less implemented by new technologies so it’s harder to find places where STA components will actually work anymore. When STA doesn’t work there are alternatives: Using COM+ or if performance doesn’t matter much EXE servers can be used as well and both of these technologies work in fully free threaded environments at the cost of some performance.

Today if you’re starting with any sort of new project, the recommendation for multi-threaded applications is to look elsewhere than FoxPro. Most other environments have native support for multi-threading so it’s much easier to integrate into multi-threaded environments.


Drive Mapping in Web Applications

$
0
0

Over the last couple of weeks a number of questions came up in regards to getting access to network drives from within your Web Connection applications. Drive mapping errors can be really insidious because you often don't know what's actually causing the problem as the problems usually occur right during application startup where it's difficult to debug. Additionally it's not obvious that the error is drive mapping vs. some other issue like permissions or some other failure in the application.

This may seem trivial but when you are developing applications and when you are deploying applications often provides a very different runtime environment, which can cause problems when it comes to mapping drives. The reason is that Web applications usually run under a system context, rather than a user context.

IIS User Context

So in IIS a Web Connection COM Server or IIS launched standalone EXE file are typically running inside of the security context of an Application Pool. The security context is determined by the Application Pool Identity which is set in the Application Pool's Advanced settings in the IIS Management Console:

ApplicationPoolIdenity

We recommend that you set the Application Pool identity and if you're running the server as a COM Server leave the DCOM settings as the Launching user which inherits these settings into the COM server. This way configuration is left in a single place as the security flows from IIS into the COM object.

Regardless of whether you use a system account like SYSTEM or Network Service, or a full local or domain account, the accounts loaded by default do not have a user profile (although you can enabled that but I don't recommend it) which means standard mechanisms of loading common startup and system settings are not applied. One thing that this means is that drive mappings are never persisted across multiple logins as that's part of a user profile.

So while you may have mapped a network drive with your user account that network drive – even if persistently mapped – will not be visible by a different account, or even the same account when loaded under IIS. This means you need to make sure that either your application, or the Windows subsystem that the account runs under loads up any drive mappings.

Mapping Drives Or UNC Paths?

There are a couple of ways you can access network drives: You can use mapped drives where a network share and path are mapped to a drive letter, or you can use the raw UNC paths to access the resources directly.

UNC Paths

UNC paths appear to be simpler at a glance because they are a direct connection to a remote resource. A UNC path looks like this:

\\Server\Share\Path\file.dbf

and allows you to directly reference a folder or file using a somewhat verbose syntax.

But there are a few problems with UNC paths. First and foremost permissions are often an issue – if you are not referencing the remote path with the same credentials that you are logged on under on the remote machine, a UNC path won't work as you can't easily attach authentication with your file access request.

The other issue is that performance often is not very good. There are mixed reports on this – some people have found that UNC paths work quickly and as fast as mapped drives, but in my experience over slower connections UNC paths tend to be drastically slower in connecting to remote resources. Actual tranfer speeds tend to be find, but connection speeds can often be slow and it appears the the name resolutions are not cached resulting in slow connection delays.

Mappded Drives

Mapped drives let you map a drive letter to remote network resources. Typically you map a drive letter to a share on  a remote server. In Windows this is done using the NET USE command:

net use i:  \\server\cdrive "password" /User:"username" /persistent:yes

This maps a i: drive to a remote resource.

As mentioned the tricky part with Drive mappings is to know where they are visible. When net use is issued it's valid only for that specific user's context. This is why if you map a drive to your desktop user while logged is not going to be visible to the SYSTEM account or even your own account when running in the non-interactive console.

What this means is that if you want to map drives you have to map the drives from within the correct context. For a Web application running in IIS this means setting up the mapping either as part of the startup code of the application or as part of Windows startup scripts that are fired when a Windows session is started.

Mapping from within an Application

Personally I prefer to handle drive mapping as part of the application to keep the drive dependecies configured in the same place as many other configuration settings. The key is to do the configuration before you access any resources that require these drives.

Using Web Connection it's easy to do this in the OnInit() or OnLoad() of the server code:

PROTECTEDFUNCTION OnInit
...
MapNetworkDrive("i:","\\wwserver\data","username","password")*** Check whether it worked by looking at some resourceIF !DIRECTORY("i:\")this.Trace("i: drive couldn't be mapped")    ENDIF
ENDFUNC

MapNetworkDrive() is a helper function from wwApi.prg that essentially shells out to Windows and calls the net use command. It runs in the context of your application so assuming you have rights to map a drive you should be able to map the drive here. It's a good idea to check for some known resource afterwards to see if the drive mapping worked since the function itself gives no feedback. If it fails call the Trace() function to log the info into wwTraceLog.txt so you can see the failure if it occurs and potentially stop loading the application by erroring out with an ERROR() call.

The function is pretty simple:

*************************************************************************  MapNetworkDrive*******************************************  Function: Maps a network drive***    Assume:***      Pass: lcDrive     - i:***            lcSharePath - UNC path to map \\server\share***            lcUsername  - user name (if empty uses current creds)***            lcPassword  - password***    Return: .T. if the drive exists after mapping************************************************************************FUNCTION MapNetworkDrive(lcDrive, lcSharePath, lcUsername, lcPassword)IFRIGHT(lcDrive,1) != ":"
   lcDrive = lcDrive + ":"ENDIF
lcRun = [net use ] + lcDrive + [ "] + lcSharePath + [" ]IF !EMPTY(lcUsername)
  lcUserName = ["]  + lcPassword + [" /USER:"] + lcUsername + ["]ELSE
  lcUserName = ""ENDIF
lcUsername = lcUserName + " /persistent:yes"
lcRun = lcRun + lcUsernameRUN&lcRun *** Check to see if the folder exists nowRETURNDIRECTORY(lcDrive)ENDFUNC

Using System Policy Startup Scripts

One problem with the application mapping is that the drive is mapped everytime the application starts. While it doesn't hurt to remap drives, there is some overhead in this process as it's slow and if you have multiple instances firing up at the same time there may be some interference causing the map to fail.

Another potentially safer way is to use System Policy to create a startup script that runs a batch file that creates the maps. These scritpts are fired once per Windows session so there's less overhead and no potential for multiple applications trying to map drives simultaneously.

To do this:

  • Open Edit Group Policy
  • Go to Computer Configuration/Windows Settings/Startup
  • Point at a Batch file that includes the net use commands to map your drives

PolicyStartupScript

Summary

Drive mapping can be a major headache in Web applications if you are not careful and plan ahead for the custom execution environment in which system hosted applications run. Essentially make sure you explicitly map your drives either as part of the application's startup or as part of the console system startup whenever a Windows session is started. I hope this short post clarifies some of the issues you might have to deal with in the context of Web Connection applications.

Clicks not working in Internet Explorer Automation from FoxPro

$
0
0

A few days ago, somebody posted a question on our message board mentioning that when using Internet Explorer Automation (using COM and InternetExplorer.Application) fails to automate click events in recent versions of Internet Explorer. A quick check with my own code confirmed that indeed clicks are not properly triggering when running code like the following:

o = CREATEOBJECT('InternetExplorer.Application') o.visible = .t. o.Navigate('http://west-wind.com/wconnect/webcontrols/ControlBasics.wcsx')DOWHILE o.ReadyState != 4WAITWINDOW"" TIMEOUT .1ENDDO loWindow = o.document.ParentWindow ? loWindow*loWindow.execScript([alert('hello')]) oLinks = o.Document.getElementsByTagName('a') oLink = oLinks.item(0) ? oLink.href
oLink.click() && doesn’t work o.document.getElementById('txtName').value = 'Rick' oButton = o.document.getElementById('btnSubmit') ? oButtonoButton.Click() &&doesn’t work

Note the link and button clicks – when this code is run with Internet Explorer 10 or later the page navigates but the clicks are never registered in the control. Now this used to work just fine in IE 9 and older, but something has clearly changed.

IE 10 – DOM Compliance comes with Changes

Internet Explorer 10 was the first version of IE that supports the standard W3C DOM model, which is different than IE’s older custom DOM implementation. If you’re working with IE COM Automation you will find there are number of small issues that have changed and that can cause major issues in applications. In Html Help Builder which extensively uses IE automation to provide HTML and Markdown editors, I ran into major issues at the time when IE was updated. There both actual DOM changes to deal with the w3C compliance, as well as some behavior changes in the actual COM interface to accessing the DOM from external applications.

The issue in this case is the latter. The problem is that IE is exposing DOM elements natively which means the DOM elements are exposed using the native JavaScript objects as COM objects. Specifically JavaScript always have at least one parameter which is the arguments array and that’s reflected in the dynamic COM interface.

JavaScript Method Calls Require a Parameter

The workaround for this is very simple – instead of calling

.Click()

you can call

.Click(.F.)

Passing the single parameter matches the COM signature and that makes it all work. Thanks to Tore Bleken who reminded me of this issue that I’ve run into myself countless times before in a few other scenarios.

So the updated code is:

o = CREATEOBJECT('InternetExplorer.Application')
o.visible = .t.
o.Navigate('http://west-wind.com/wconnect/webcontrols/ControlBasics.wcsx')DOWHILE o.ReadyState != 4WAITWINDOW"" TIMEOUT .1ENDDO* Target object has no id so navigate DOM to get object reference
oLinks = o.Document.getElementsByTagName('a')
oLink = oLinks.item(0)* oLine.Click(.F.)
o.document.getElementById('txtName').value = 'Rick'
oButton = o.document.getElementById('btnSubmit')
? oButtonoButton.Click(.F.)

The hardest part about this is to remember that sometimes this is required other times it is not – it depends on the particular implementation of the element you’re dealing with. In general if you are dealing with an actual element of the DOM this rule applies. I’ve also run into this with global functions called from FoxPro.

The rule is this: Whenever you call into the actual HTML DOM’s native interface, you need to do this. For example, if you define public functions and call them from FoxPro (o.document.parentWindow.myfunction(.F.)) you also need to ensure at least one parameter is passed. As a side note, functions have to be all lower case in order for FoxPro to be able to call them, due to FoxPro forcing COM calls to lower case and the functions being case sensitive in JavaScript. 

These are silly issues that if FoxPro were still supported would probably be fairly easy to fix. Alas, since it’s done, we’ll have to live with these oddball COM behaviors. Luckily there are reasonably easy solutions to work around some of the issues like the simple parameter trick above.

An Updated Web Connection Add-in for Visual Studio 2015

$
0
0

Visual Studio 2015 shipped a couple of weeks ago and it brings many great enhancements for Web developers with many improvements in the HTML, CSS and JavaScript editors. It  provides improved IntelliSense support that makes Web Connection and also general HTML development easier. Even if you’re not using the Web Control Framework which is geared directly at using the Visual Studio tools, there are many benefits to using Visual Studio 2015 even if you using Scripts and Templates in Web Connection, especially now that Visual Studio is essentially free for most developers via the fully functional Community Edition that has feature parity with the full Professional version of Visual Studio.

One important update that the Community addition has over the earlier Express additions is that it has full support for plug-ins. In, Visual Studio 2013 you can use the existing Web Connection add-in that was shipped with recent versions of Web Connection.

Unfortunately in Visual Studio 2015 Microsoft broke the way that Add-ins can be installed in Visual Studio. They remove community installed add-in support in the Documents Visual Studio folder, which used to be by simply copying an addin-definition into a folder and then reference the add-in from there. This is no longer support in VS2015 and so the shipped Web Connection add-in no longer works in Visual Studio 2015.

A new VSIX based Visual Studio Add-in

However – I’m happy to announce that I’ve created a new add-in that does work in Visual Studio 2015 (and beyond hopefully). You can download it  from here:

To install the VSIX, simply double click it in Explorer and the installation dialog will come up. Once installed the Web Connection add-in will show up in the Installed Extensions in Visual Studio:

InstalledExtension

To get there go to Tools | Extensions and Updates.

Building a proper VSIX Extension

The Web Connection add-in was build in the VS2008 timeframe, which is a long time ago and the code that was required to build that plug-in and the hook up code has always been a major nightmare. Hooking up commands to buttons, mapping icons and just getting the buttons bootstrapped took hundreds of lines of nasty, mostly undocumented COM code in the old add-in API and every time I wanted to make a change to the actual plug-in I dreaded having to delve into that code.

The new VSIX model is still complex, but it’s a lot easier to configure the actual hook up and integration pieces to get the add-in bootstrapped. Instead of that nasty COM code there’s now nasty XML configuration rather than code which is a bit easier. It took me only a full day to port my existing plug-in and add a bunch of useful enhancements that simplify use of the plug-in and provide some additional functionality beyond the Web Control Framework. In the process configuration has also gotten simpler and if you’re just after the quick browsing features you may not have to configure anything at all.

Features

The Web Connection Add-in provides these features:

  • View In Browser
  • View FoxPro Source Code
  • Web Connection Web Controls Toolbox Items

Here’s what the add-in looks like when you bring it up on a Web Control Framework page:

WebConnectionAddin

The Web Connection menu options are available on the context menu in the text editor as well as on the Tools menu, and they are now context sensitive and only show when they are actually accessible – otherwise the options are hidden. So the Show FoxPro Code options only show when you are in a Web Control Framework page for example and either option only shows when a document with HTML tags is actually open.

View In Browser

Visual Studio has a native View in Browser feature, but unfortunately it’s not supported on custom extensions, like your typical Web Connection requests are. WCSX, WCS, WC and any of your custom scriptmaps are all custom extensions and Visual Studio doesn’t provide the View in Browser feature in this view, even in the HTML or WebForm editors.

So the Web Connection add-in provides this functionality for any page that has HTML tags in the document. For Web Connection users this means you can now browse Web Control Framework pages as well as script and template pages, the latter of which is new and improved.

This sounds like a small feature, but to me having this simple option on the menu really improves my workflow with any script-mapped pages considerably, as opposed to manually switching to the browser and refreshing.

New and Improved

The new version of the plug-in is a bit smarter about configuration for figuring out which browser and server path to use. It gets this information from the active Visual Studio configuration if you don’t configure the Web Connection Configuration settings explicitly. The add-in uses the configured Visual Studio browser that is selected on the standard toolbar, and if you are using a Web Site project (as you will with Web Connection projects) it will automatically discover the project’s Web path that Visual Studio uses to start the project.

Note that Visual Studio uses IIS Express by default to start a project and you need to ensure that IIS is started. You can start IIS Express in Visual Studio by using View In Browser in the Solution Explorer once on an HTML file which launches IIS Express and then leaves it running until Visual Studio is shut down – or you can start the project in debug mode by clicking the run button. This however, shuts down IIS Express after the debug session is done. Better to start with View In Browser of any .htm page.

Another and perhaps cleaner way to do this is by using a full version of IIS instead of IIS Express which gives the project a permanent URL that always works and you then don’t have to worry about whether IIS Express is running or not.

Show FoxPro Code

If you’re using the Web Control Framework one of the things you frequently need to do is switch back and forth between the HTML Markup code and the code behind FoxPro code that drives the actual coded logic for the page. The Show FoxPro Code option lets you do that by opening a new instance of Visual FoxPro with the appropriate PRG file opened. Here’s what you see after you click on the Show in FoxPro menu item.

VSFoxProOpen

Show in external editor does the same thing but uses an external editor that you can configure in web.config. I like to use Sublime Text 3 which is an excellent editor with many plug-ins for all sorts of languages. Matt Slay kindly built a FoxPro language extension for Sublime, which works great for editing FoxPro files. Here’s what you see after clicking on the Show FoxPro Code in External Editor.

VsSublime

Sublime is great because it’s extensible and has tons of plug-ins, is very fast, is cross platform (Windows, Mac, Linux using the same plug-ins) and has support for multiple layout windows which makes it easy to edit HTML and code in the same view.

Why use an external editor at all rather than FoxPro? One big reason is that you can keep the editor open with the file loaded unlike FoxPro which requires you to close the file in order for FoxPro to be able to compile the file (FoxPro opens the file exclusively and the FoxPro editor keeps the file open when you edit because it uses virtual editing). The end result is that the FoxPro Editor has a nasty tendency of locking the PRG file that is being edited. With an external editor you can leave the source file open and FoxPro can still compile the file. It’s very convenient for making quick edits and keeping your place between edit sessions.

Sublime is not free, but I’ve grown very fond of it and use it extensively these days for all sorts of editing and my general system editor. You can configure any editor you like though by using the configuration settings in the web.config file.

Configuration

The Web Connection Add-in uses a number of configuration settings that tell it where to find files. You basically provide the paths to your FoxPro code, to the the Web folder, and the virtual/site URL to start the Web Browser.

Here’s what a typical configuration looks like:

<?xml version="1.0"?><configuration><configSections><section name="webConnectionVisualStudio" type="System.Configuration.NameValueSectionHandler,System, Version=4.0.0.0, Culture=neutral, PublicKeyToken=b77a5c561934e089"/></configSections><webConnectionVisualStudio><!-- Configuration Settings for the Web Connection Visual Studio Add-in Not used at runtime, only at the design time --><add key="FoxProjectBasePath" value="c:\WebConnection\Fox\"/><add key="WebProjectBasePath" value="c:\WebConnection\Web\wconnect60\"/><add key="WebProjectVirtual" value="http://localhost/wconnect60"/>
<!--
Optional PRG launched when VFP IDE launches --><add key="IdeOnLoadPrg" value=""/>

<add key="WebBrowser" value="C:\Program Files (x86)\Google\Chrome\Application\chrome.exe" /> <!-- The editor used to edit FoxPro code - blank means FoxPro Editor is used --><add key="FoxProEditor" value=""/><add key="FoxProEditorAlternate" value="C:\Program Files\Sublime Text 3\sublime_text.exe"/></webConnectionVisualStudio>

</configuration>

The good news is that the Add-in doesn’t need any configuration in a Web Site Project (which is typically what you’ll use for Web Connection projects) for the View in Browser functionality, as it can determine the default browser used by Visual Studio (on the Debug button drop down) and the Web path configured for the Web site project. If you provide the values in the configuration those values take precedence, but if you leave the WebProjectVirtual and WebBrowser keys empty View in WebBrowser still works in most cases (if you’re using IIS Express just make sure IIS Express is started first as discussed above).

The Show Fox Code options require that you set the FoxProProjectBasePath and WebProjectBasePath keys and – if you want to use an alternate editor – the path to the alternate editor exe. Note that Sublime is set up by default – if you don’t want it you can blank out the value.

When Web Connection creates a new project for you, it automatically creates the relevant configuration information for you, so on new projects the configuration settings you specified during the setup process are automatically applied above.

Web Connection Web Controls Toolbox Items

The VSIX now also contains the Web Connection Web Controls which are required in order to get the Web Connection controls onto the Visual Studio Toolbox. In the past there was a registration service that allowed registration of components from a special location but again that feature has been discontinued in Visual Studio 2013 and later. The VSIX now contains the controls embedded in the Add-in DLL and they are properly and quickly installed as part of the VSIX registration.

Toolbox

The good news is that this is much more reliable than the past mechanism and much quicker. On the downside the location of the DLL is a deep path inside of your user settings so it’s not so obvious where the file is loaded from.

Just as a reminder – the WebConnection-addin.dll and also the old WebConnectionControls.dll, although added to your project are not used at runtime. These DLLs merely provide the placeholder controls for design time properties and configuration.

Uninstall – Reinstall

Because VSIX are essentially installers specific for Visual Studio you can easily uninstall and reinstall everything. If something breaks or the connection breaks its very quick to uninstall the VSIX and simply reinstall it.

To uninstall go to Tools | Extensions and Updates, find the Web Connection Add-in and click the Uninstall button. The add-in and toolbox controls will be removed. To reinstall simply download or find the VSIX installation file in your Web Connection installation.

The VSIX will be located in this location in Web Connection 6.0 (note this is not available yet since 6.0 hasn’t shipped yet):

<WebConnectionInstallFolder>\VisualStudio\WebConnection-addin.vsix

Or you will also be able to download it from:

Web Connection Visual Studio Add-in for Visual Studio 2015

Going forward

For Web Connection 6.0 the configuration Wizard will continue to install the old style Add-in for Visual Studio 2013-2010, and the new VSIX based wizard for Visual Studio 2015 and later. If you’re using Visual Studio primarily for Web Connection work I highly recommend you look at using Visual Studio 2015 Community because it provides the most functionality that’s useful for Web development.

The VSIX works and I’ve been using it for the last week in development of a bunch of the new stuff for Web Connection 6.0 and creation of some of the demos for the Web Connection Training at Southwest Fox in October and for my sessions there.

But it is still a beta, so there may be a few rough spots. If you find any of them please let me know on the message board in the Web Connection section.

Web Connection 6.0 Feature: New Project Server Configuration Script

$
0
0

In Web Connection 6.0 there's an updated project Wizard that creates a new 'project' for you that is self contained. Web Connection 6.0 projects copy all files into a single folder hierarchy where both the Web folder and the Deploy (code) folder are under the same root. The result of this structure is that we can now more easily move projects around, and just as importantly configure various folder paths using relative paths that won't have to change when a project is moved.

All of this makes it much easier to deploy projects by simply copying the entire structure to a new deployment location.  The idea is to make it easier to configure a Web Connection application on the server by automating the server configuration with a few simple steps that you can perform before you deploy your application on the server.

A Server Configuration Script

When a new project is generated Web Connection creates among other files a YourApp_ServerConfig.prg file. This plain FoxPro code file contains a small bit of code that uses server configuration code provided with Web Connection to:

  • Create a Virtual Directory for your Application
  • Add to an Application Pool (Web Connection by default)
  • Add Basic and Windows Authentication
  • Create Script Maps for your Application
  • Set Windows Permissions for your Application

Because the new project layout uses a known folder structure,  Web Connection can use relative paths to find the Web folder, temp folder and script paths, so it's easy to pregenerate a configuration script. I chose to generate a separate PRG file rather than generate a pre-compiled EXE file simply because it makes it possible to add additional configuration tasks to this script. Rather than pre-compiling this allows you the option to build a custom build script that can perform much more sophisticated tasks (like create multiple virtuals or add additional users to the ACL list etc.).

A typical generated XXXXX_ServerConfig.prg file looks like this (generated for a project called WebTest2):

*************************************************************************  Webtest2_ServerConfig*******************************************  Function: Templated Installation routine that can configure the***            Web Server for you from this file.******            You can modify this script to fit your exact needs***            ***    Assume: Build this into an EXE file OR***            add as a command line option to your***            main application EXE (MyApp.exe "Configure")***      Pass: lcIISPath  -  IIS Configuration Path (optional)***                          http://localhost/w3svc/1/root************************************************************************LPARAMETERS lcIISPathDO wwUtils    SETCLASSTO WebServer ADDITSETCLASSLIBTO wwXML ADdit*** Configurable settings
lcVirtual = "WebTest2"
lcScriptMaps = "wc,wcsx,wt2"
lcVirtualPath = LOWER(FULLPATH("..\Web"))
lcScriptPath = lcVirtualPath + "\bin\wc.dll"
lcTempPath = LOWER(FULLPATH(".\temp"))
lcApplicationPool = "WebConnection"
lcServerMode = "IIS7HANDLER"&& "IIS7" (ISAPI)IFEMPTY(lcIISPath)*** Typically this is the root site path
   lcIISPath = "IIS://localhost/w3svc/1/root"ENDIF
loWebServer = CREATEOBJECT("wwWebServer")
loWebServer.cServerType = UPPER(lcServerMode)
loWebServer.cApplicationPool = lcApplicationPoolIF !EMPTY(lcIISPath)
   loWebServer.cIISVirtualPath = lcIISPathENDIFWAITWINDOW NOWAIT "Creating virtual directory " + lcVirtual + "..."*** Create the virtual directoryIF !loWebServer.CreateVirtual(lcVirtual,lcVirtualPath)RETURNENDIF*** Create the Script Maps
lnMaps = ALINES(laMaps,lcScriptMaps,1 + 4,",")FOR lnx=1 TO lnMaps
    lcMap = laMaps[lnX]WAITWINDOW NOWAIT "Creating Scriptmap " + lcMap + "..."
    llResult = loWebServer.CreateScriptMap(lcMap, lcScriptPath)        ENDFORWAITWINDOW NOWAIT "Setting folder permissions..."
lcAnonymousUserName = ""
loVirtual = GETOBJECT(lcIISPath)
lcAnonymousUserName = loVirtual.AnonymousUserName
loVirtual = .f.*** Set access on the Web directory
SetAcl(lcVirtualPath,"SYSTEM","F",.t.)
SetAcl(lcVirtualPath,"Administrators","F",.t.)
SetAcl(lcVirtualPath,"NETWORKSERVICE","F",.T.)*** IUSR Anonymous AccessIF !EMPTY(lcAnonymousUserName)
   llResult = SetAcl(lcVirtualPath,lcAnonymousUserName,"R",.t.)ENDIF*** Set access on the Temp directory
SetAcl(lcTempPath,"SYSTEM","F",.t.)
SetAcl(lcTempPath,"Administrators","F",.t.)
SetAcl(lcTempPath,"NETWORK SERVICE","F",.T.)WAITWINDOW Nowait "Configuration completed..."

It's pretty easy to see what's going on in this file, right? The configuration section is just a set of values specified at the top. The code then generates the virtual and scriptmaps and sets permissions.

This is a generated PRG file that gets created in your project root. Because it's just a PRG you can modify it and add additional configuration steps to this file. You can add additional folders to configure, addition accounts to add to the security or even do other configuration tasks like copy files from a network location or download some related dependency into the deploy folder. It's entire open to you.

If you're using older projects you can still use this file and modify it to reflect your file locations explicitly in the configuration section.

Requires that IIS is installed and you have Admin Privileges

To be clear, this functionality configures IIS for your application, but you need to make sure that IIS is installed with the proper components first.

Note: IIS has to be installed and configured properly
The base IIS install has to be up and running on the machine and configured properly before this will work. You can find out more on how to configure IIS on recent versions of Windows.

Note: Admin Privileges requires
In order to configure IIS you have to be a full Administrator so you need to run a compiled EXE or the VFP IDE as an administrator in order for IIS configuration to work.

Running the Setup script

You can run this script from the FoxPro dev environment (make sure the Web Connection libraries are referenced):

DO WebTest2_SetupConfig.prg

remember if you do this inside of VFP's IDE make sure you started it as an Admin.

Embedded into your Server

The generated script however is also embedded into your Web Connection server via a command line parameter.  When you create a new project now your MAIN prg file is generated with a few parameters at the top and a little added code that calls out to the _SetupConfig file when a 'config' command argument is passed to the EXE:

*************************************************************************FUNCTION Webtest2Main*********************************   Created: 10/09/2015***  Function: Web Connection Mainline program. Responsible for setting***            up the Web Connection Server and get it ready to***            receive requests in file messaging mode.************************************************************************LPARAMETERS lcAction, lvParm1, lvParm2*** This is the file based start up code that gets*** the server form up and running#INCLUDE WCONNECT.H*** PUBLIC flag allows server to never quit*** - unless EXIT button code is executedRELEASE goWCServerSETTALKOFFSETNOTIFYOFF*** Load the Web Connection class librariesIFFILE("WCONNECT.APP")DO ("WCONNECT.APP")ELSEDO WCONNECTENDIFIFVARTYPE(lcAction) = "C" AND StartsWith(LOWER(lcAction),"config")do WebTest2_ServerConfig.prg with lvParm1RETURNENDIF*** Load the server - wc3DemoServer class below
   goWCServer = CREATE("Webtest2Server")IF !goWCServer.lDebugMode   SETDEBUGOFFSETSTATUSBAROFFSET DEVELOP OFFSETSYSMENUOFFENDIFIFTYPE("goWCServer")#"O"
      =MessageBox("Unable to load Web Connection Server",48,;"Web Connection Error")RETURNENDIF*** Make the server live - Show puts the server online and in polling modeREADEVENTS

When you now compile your Web Connection server into an EXE you'll have an option 'Config' command line switch that you can use to trigger the configuration process:

WebTest2.exe config

This will also trigger the configuration code to run.

There's a second commanline option you can apply providing an IIS meta base path (if you're configuring non-default Web site or virtual as a base):

WebTest2.exe config "IIS://localhost/w3svc/2/root"

which configures a different Web site (site with the ID of 2).

Running the utility should be very quick and only take a few seconds. You should see a couple WAIT WINDOWs flash by and then you're done.

If you want to double check whether things worked check:

  • Whether the virtual was created in IIS Manager
  • Whether the Script Maps were created in IIS Manager
  • Permissions in the Web and Temp folders

It's the little Things!

Configuration of the Web server continues to be a struggle for a lot of Web Connection developers and I hope this feature makes it a little easier to get your server configured in a repeatable way. I think this  script generation accomplishes two things: It makes the process easier to apply and maintain, but it also takes some of the mystery out of the Web server configuration. You now have a piece of code that actually tells you what it's doing and you can control and modify the behavior as you see fit.

With the new project changes it's gotten vastly easier to copy project files by simply 'xcopy deploying' your application. This setup script can then take a standard installation and create all the basic Web server specific configuration settings and create them for you.

The Web Connection 6.0 beta is available now to registered users of Web Connection 5.5 and later, or you can purchase an upgrade from our Web store. During the beta period we have 15% discount on upgrades.

Conference Materials from Southwest Fox

$
0
0

It's been a fun, but very busy week for me at Southwest Fox last week with 2 very long days of Web Connection training and then 3 more days of sessions at Southwest Fox.

There seemed to be a lot more excitement than in past years around alternate technologies and Web functionality than I have seen in recent years which I find refreshing. This seemed especially related to client centric, JavaScript based front end applications and in particular Angular Js for building your front end application code. There also continues to be a lot of pent up demand for building mobile friendly Web applications and even though I only briefly showed the hybrid Cordova application that seemed to get a lot of people very excited about the possibilities.

Anyway, if you were attending the conference or not, here are the links the for the materials for the main Southwest Fox sessions which are hosted in BitBucket repositories.

Building Mobile Web Applications with AngularJs, Bootstrap and Web Connection

This session demonstrated how to build a mobile friendly Web application that can scale from desktop down to a mobile phone and work well in all display sizes by way of a sample AlbumViewer application. This application showcases a number of mobile features such as mobile first design, rearranging user interface elements depending on device width and using a pure client centric JavaScript application to drive the front end with AngularJS. Angular JS provides the modularization, two-way databinding and a number of support features for driving the entire user interface from browser. A Web Connection wwRestService based backend rounds out this example to provide the service JSON data that the front end consumes, retrieving FoxPro objects and cursors and serving them as JSON responses. Finally there's also an example, of the same mobile Web application ported to Cordova (with very minimal changes) and running as a native application on iOS using the Visual Studio Tools for Apache Cordova Cordova.

Online Sample Application

Source Code for the AlbumViewer and related Code Samples

Slides and Session Notes

Creating and Consuming Web Services with Visual FoxPro and .NET

This session demonstrated how to build SOAP 1.x based Web Services, using .NET ASMX services as the intermediary to both create Web Services and also consume them using .NET. For the server side the samples demonstrate how to use OleDb for direct data access to FoxPro data, as well as using MTDLL COM objects for calling FoxPro business logic to return objects for consumption by .NET code. Both styles rely on some connecting .NET code to provide the service front end. For the client side the examples, demonstrate importing a Web Service from WSDL and generating a .NET class, then using wwDotnetBridge to call the generated .NET proxy.

Conference White Paper

Sample Projects and Slides on BitBucket

Web Connection Training TimeTrakker Server Side MVC Sample

During the two day training we focused on server side application development during the first day of the training. The example is a small time tracking application that is mobile friendly using Responsive Design and takes advantage of some of the new features in Web Connection 6.0 including Layout Pages, partials and sections.

Time Trakker Web Connection 6.0 Server Sample Application

West Wind Web Store Discount for SW Fox Attendees

I also want to remind those of you that attended SW Fox that there's a 10% discount available on all West Wind products. You can use the discount code SWFOX_2015 on the shopping cart to apply the 10% discount. Please provide your SW Fox badge number with your purchase to qualify.

Next Year's Southwest Fox

Dates for next year's Southwest Fox conference were announced for late September next year. If you haven't come before it's a great place to see people catch up with new ideas on how you can extend the life of FoxPro just a little longer while at the same time gaining new skills. Mark your calendar.

String Tokenizing based on StrExtract()

$
0
0

I've been building a number of solutions lately that relied heavily on parsing text. One thing that seems to come up repeatedly is the need to split strings but making sure that certain string tokens are excluded. For example, a recent MarkDown parser I've built for Help Builder needs to make sure it first excludes all code snippets, then performs standard parsing then puts the code snippets back for custom parsing.

Another scenario is when Help Builder imports .NET classes and it has to deal with generic parameters. Typically parameters are parsed via commas to separate them, but .NET generics may add commas as part of generic parameter lists.

Both of those scenarios require that code be parsed by first pulling out a token from a string and replacing it with a placeholder, then performing some other operation and then putting the the original value back.

For me this has become common enough that I decided I could really use a couple helpers for this. Here are two functions that help with this:

*************************************************************************  TokenizeString*******************************************  Function: Tokenizes a string based on an extraction string and***            returns the tokens as a collection. ***    Assume: Pass the source string by reference to update it***            with token delimiters.***            Extraction is done with case insensitivity***      Pass:  @lcSource   -  Source string - pass by reference***             lcStart     -  Extract start string***             lcEnd       -  Extract End String***             lcDelimiter -  Delimiter embedded into string***                            #@# (default) produces:***                            #@#<sequence Number>#@#   ***    Return: Collection of tokens************************************************************************FUNCTION TokenizeString(lcSource,lcStart,lcEnd,lcDelimiter)LOCAL loTokens, lcExtractIFEMPTY(lcDelimiter)
   lcDelimiter = "#@#"ENDIF
loTokens = CREATEOBJECT("Collection")
lnX = 1DOWHILE .T.
    lcExtract = STREXTRACT(lcSource,"<",">",1,1+4)IFEMPTY(lcExtract)EXITENDIF
    loTokens.Add(lcExtract)
    lcSource = STRTRAN(lcSource,lcExtract,lcDelimiter + TRANSFORM(lnx) + lcDelimiter)
    lnx = lnx + 1 ENDDORETURN loTokensENDFUNC*   TokenizeString*************************************************************************  DetokenizeString*******************************************  Function: Detokenizes an individual value of the string***    Assume:***      Pass:  lcString    - Value that contains a token***             loTokens    - Collection of tokens***             lcDelimiter - Delimiter for token id***    Return: detokenized string or original value if no token************************************************************************FUNCTION DetokenizeString(lcString,loTokens,lcDelimiter)LOCAL lnId, loTokens as CollectionIFEMPTY(lcDelimiter)
  lcDelimiter = "#@#"ENDIFDOWHILE .T.
    lnId = VAL(STREXTRACT(lcString,lcDelimiter,lcDelimiter))IF lnId < 1EXITENDIF
    lcString = STRTRAN(lcString,lcDelimiter + TRANSFORM(lnId) + lcDelimiter,loTokens.Item(lnId))ENDDORETURN lcStringENDFUNC*   DetokenizeString

TokenizeString() basically picks out anything between one or more start and end delimiter and returns a collection of these values (tokens). If you pass the source string in by reference the source is modified to embed token place holders into the the passed string replacing the extracted values.

You can then use DetokenizeString() to detokenize either individual string values or the entire tokenized string.

This allows you to basically work on the string without the tokenized values contained in it which can be useful if the tokenized text requires separate processing or interferes with the string processing of the original string.

An Example – .NET Parameter Parsing

Here's an example of the comma delimited list of parameters I mentioned above. Assum I have a list of comma delimited parameters that needs to be parsed:

DO wwutilsCLEAR
lcParameters = "IEnumerable<Field,bool> List, Field field, List<Field,int> fieldList"
? "Original: "
? lcParameters
?*** Creates tokens in the lcSource String and returns a collection of the *** tokens.
loTokens = TokenizeString(@lcParameters,"<",">")
? lcParameters* IEnumerable#@#1#@# List, Field field, List#@#2#@# fieldListFOR lnX = 1 TO loTokens.Count
   ? loTokens[lnX]ENDFOR
?
? "Tokenized string: " + lcParameters
?
? "Parsed parameters:"*** Now parse the parameters
lnCount = ALINES(laParms,lcParameters,",")FOR lnX = 1 TO lnCount*** Detokenize indvidual parameters
   laParms[lnX] = DetokenizeString(laParms[lnX],loTokens)
   ? laParms[lnX]ENDFOR
?
? "Detokenized String (should be same as original):"*** or you can detokenize the entire string at once
? DetokenizeString(lcParameters,loTokens)

IEnumerable<Field,bool> List, Field field, List<Field,int> fieldList

Notice that this list contains generic parameters embedded in the < > brackets so I can't just run ALINES() on this list. The following code strips out the generic parameters first, then parses the list then adds the token back in.

Specialized Use Case

This isn't the sort of thing you run into all the time, but for me it's been surprisingly frequent that I've had to do  stuff like this and while this isn't terribly difficult to do manually, it's very verbose code that is shrunk to a couple of simple helper functions. Maybe some of you will find this useful though…

Outlook Email Automation–Watch out for Administrator Access

$
0
0

I was looking into creating prefilled emails using Outlook Automation earlier today and ran into an unexpected snag. The requirement was to display a pre-filled email that contains recipient, subject, body and one or more attachments and then display the prefilled email in Outlook.

This is fairly straightforward to do using COM Automation:

TRY*** NOTE: This fails if you run as Administrator (rather than the active user)
    loOutlook = GETOBJECT(,"Outlook.Application")CATCHENDTRYIFVARTYPE(loOutlook) != "O"
   loOutlook = CREATEOBJECT("Outlook.Application")ENDIFIFVARTYPE(loOutlook) != "O"MESSAGEBOX("Couldn't create Outlook instance")RETURNENDIF
loItem = loOutlook.CreateItem(0)
loItem.Body = "Hello World"
loItem.Subject = "New Test Message"
loItem.Recipients.Add("rstrahl@west-wind.com")*** Add you files to attach here
loItem.Attachments.Add("c:\sailbig.jpg")
loItem.Display()RETURN

Note that Outlook – as most Office Applications – is a Singleton object that expects to run only one instance. So if Outlook is already running you can use CREATEOBJECT() to create a new instance. Instead, you have to attach to an already running instance using GETOBJECT().

Gotcha: Running as Administrator makes GETOBJECT() fail

I typically run FoxPro as an Administrator because I frequently build COM objects, which requires that you run as a full administrator in order to write COM registration to the registry.

However, when running the above code, it turns out the GETOBJECT() call to capture Outlook.Application fails. It works fine when you run as a non-admin user or even as an Admin user when User Account Control (UAC) is enabled on the machine and your account is effectively running as a non Admin account.

But when you explicitly run as an Administrator either using Run As Administrator when you start the app, or from ShortCut properties, or if you have UAC disabled on the machine, you'll find that the GETOBJECT() call fails with:

OLE error code 0x800401e3: Operation unavailable.

The reason for this is that when you run as Administrator you are actually running a different user account (Administrator – duh) and that account can't actually access the running instance of Outlook that is already running on your desktop. The only workaround I could find is to ensure both Outlook and your application run in the same execution context. So it works if you run your app without administrative rights, or if you run your app as administrator as well as Outlook.

As you might expect it took me a long time to figure out WTF was going on here. According to all examples I've seen Outlook should be accessible with GETOBJECT(). It wasn't until I tried using wwDotnetBridge and COM Interop doing the same thing with .NET and getting the same response in FoxPro but not in LinqPad when I realized it must have something to do with the actual runtime environment. Sure enough – once I started VFP without Run as Administrator option, the code works.


Web Connection 6.0 RTM is here

$
0
0

It's been a long journey but I'm happy to announce that Web Connection 6.0 RTM is finally here.

To be honest it's taken a lot longer than I anticipated to do all the things I had set out to do with this release. The main brunt was to clean up the rough edges of the framework and the tooling and to make it much easier to build, deploy, update and manage Web Connection applications, which traditionally has been one of its weak points. Because there are lots of externalities in this process, it took a long time to fine tune and test and re-rest to make sure that these processes are streamlined as much as possible.

Functionally, most of the features I set out to provide were complete at the Southwest Fox conference last October, but all the plumbing around the UI updates and documentation updates and some of the infrastructure features ended up taking a long time to get just right and baked, and then run through some extensive testing in a few live applications. So here we are 5 months later…

But now that time is past and Web Connection 6.0 RTM is now available:

Web Connection 6.0 is a paid upgrade from previous versions unless you purchased Web Connection 5.x after April 1st, 2015 in which case you get to upgrade for free. If you previously purchased an upgrade to the full version of Web Connection 6.0, you should have received an update download notice via email – if not contact me privately. If you own any previous version of Web Connection (yes – all the way back to v1 in 1995!) you can take advantage of upgrading to the latest version of Web Connection. And if you hurry and purchase an upgrade before the end of the week you can still save 10% from the Beta discount that we offered during the pre-release cycle.

What's New?

Web Connection 6.0 is a major update to Web Connection. There are many, many new features and enhancements in this release. But at the same time, the new version has very little impact on backwards compatibility. There are very few, and very minor breaking changes between v5 and v6, so existing 5.x application will run under 6.0 with just about no changes which you can find in a section on breaking changes (look for the yellow box at the end of the change list) of the What's new topic in the documentation.

If you check out the What's New list in the documentation, you'll find that Web Connection 6.0 has a lot of new features and enhancements. There are a handful of big features like the new project system, the administration features and the new Scripting enhancements that I'll cover below. The rest are mostly API enhancements or extensions that are small enhancement to address very specific needs.

New Project System

Probably the most noticeable new feature is the new project system in 6.0. In the past Web Connection didn't really have the concept of 'project' as you simply worked out of the Web Connection folder or you come up with your own strategy for isolating your application specific code. While you could always structure your projects any way you wanted, Web Connection itself never imposed any structure to a project. It still doesn't force you into a particular structure but newly created projects now create a very specific and repeatable folder structure that builds a self-contained and portable structure that I call a 'project' (which is simply files and folders).

In the past I've always shied away from making this particular change, because managing paths in a development environment is difficult and because Web Connection apps depend on finding the the Web Connection code there were always issues. In this release I've overcome my reservations about this and addressed the pathing issues with generated configuration and startup files that can ensure proper dependency discovery. If you leave things in default locations things will just work – otherwise making a path change in config.fpw or setpaths.prg will get you on your way.

So in Web Connection 6.0 there's the concept of a project layout, where a new project is created into a self-contained folder structure. The project gets a top level folder, and subfolders for \web, \deploy and optionally \data. A related feature allows use of relative paths in the server configuration files so that you can basically set up your dependencies entirely based on relative paths. Because projects have a known structure the New Project and New Process Wizards can make assumptions where related files live and automatically and without user interaction create a fully portable application layout.

FolderStructure

By default new projects are created under a WebConnectionProjects folder, but that's not really important. Each project has its own self contained folder hierarchy that includes both the source code (Deploy) and Web directories (Web). Upon configuration the Web folder is configured as a Web virtual folder or root site, in place right in this folder.

There are few huge benefits to this:

  • Portable Application Structure
    This means you can copy your project to a new location and simply recreate/configure the virtual in the new folder and the application should simply work. This also means that you can take an project folder and push it to the server and with very minimal configuration make it work.
  • Easier Configurability
    Because the default project structure is known, the configuration Wizards can be much simpler and not ask a bunch of previously confusing (to new users) questions. For example for a new project you now specify the path to the main project folder and any script maps you want to create and that's it. No more pointing at DLLs, temp folder location or web paths – files just get copied and associations created.
  • Automated Configuration
    Because of the known dependency locations, it's now possible to auto-generate a configuration script that can completely auto-configure a typical Web Connection project. When you create a new project now Web Connection creates a PRG based script file that automatically compiles into your server EXE that creates the virtual directory, Application Pool, Scriptmap(s) and sets folder permissions for your project. When you deploy your application to a live server you can now do MyApp.exe CONFIG and this automated script will automagically configure your application. The script can be customizes as it's just a PRG file and based on the project relative default settings. You can customize this script if you want to use non-default paths, or add to it and handle application specific install features (creating data folders, mapping drives, copying data etc.).

To me personally this has been a big win. Over the weekend I moved over my Web Connection servers to Version 6.0 and in the process I moved the folder structures of several applications to the this model. I was able to take a generated configuration script and modify 3 lines of code to make it work against my new setup. I was able to let the script configure my Web and security setup in minutes rather than the typical 15-30 minutes.

Automatic Configuration Scripts

When you create a new Web Connection application, an automated Web server configuration script is generated as part of the creation process. The script creates configures IIS, creates scriptmaps, sets application paths and folder permissions. The script is generated as a PRG file called MyApp_ServerConfig.prg which also gets added to your project and can be invoked when you run the main application with a CONFIG parameter. Because it's a PRG file you can look at it, modify it and add functionality to it if you want.

The script is compiled into your server, so from a command prompt you can do:

MyApp.exe CONFIG

and that configuration script is fired.

The script can be configured interactively via MyApp.ini and the [ServerConfig] which allows you to specify the IIS instance to configure on, the virtual directory and scriptmaps to create:

[ServerConfig]
Virtual=testproject
ScriptMaps=wc,wcs,wcsx,wwd,tp1
IISPath=IIS://localhost/w3svc/1/root

The IIS path is the IIS Web site instance which above is 1 or the default instance. If you configure another site, you can look up the instance ID and replace it.

The configuration script is just FoxPro code, that you can look at and if you choose modify. The default implementation uses the default project structure to assume where things need to go.

A typical configuration script looks like this:

*************************************************************************  Testproject_ServerConfig*******************************************  Function: Templated Installation routine that can configure the***            Web Server for you from this file.******            You can modify this script to fit your exact needs***            ***    Assume: Called from TestprojectMain.prg startup code***            with CONFGI parameter******            Launch with from the Windows Command Line***            Testproject.exe config***            or with a specific IIS site/virtual***            Testproject.exe config "IIS://localhost/w3svc/2/root"***      Pass: lcIISPath  -  IIS Configuration Path (optional)***                          IIS://localhost/w3svc/1/root************************************************************************LPARAMETERS lcIISPathDO wwUtils    SETCLASSLIBTO WebServer ADDITIVESETCLASSLIBTO wwXML ADDITIVEIF !IsAdmin() MESSAGEBOX("Admin privileges are required to configure the Web Server." + CHR(13) +;"Please make sure you run this exe using 'Run As Administrator'",;
              48,"Testproject Server Configuration")RETURNENDIF*** Try to read from Testproject.ini [ServerConfig] section
loApi = CREATEOBJECT("wwAPI")
lcIniPath = FULLPATH("Testproject.ini")
lcVirtual = loApi.GetProfileString(lcIniPath,"ServerConfig","Virtual")IFISNULL(lcVirtual)
  lcVirtual = "TestProject"ENDIF
lcScriptMaps = loApi.GetProfileString(lcIniPath,"ServerConfig","ScriptMaps")IF ISNULLOREMPTY(lcScriptMaps)
  lcScriptMaps = "wc,wcs,wcsx,tp1"ENDIFIFEMPTY(lcIISPath)
  lcIISPath = loApi.GetProfileString(lcIniPath,"ServerConfig","IISPath")IF ISNULLOREMPTY(lcIISPath)*** Typically this is the root site path
    lcIISPath = "IIS://localhost/w3svc/1/root"ENDIFENDIF*** Other relative configurable settings
lcVirtualPath = LOWER(FULLPATH("..\Web"))
lcScriptPath = lcVirtualPath + "\bin\wc.dll"
lcTempPath = LOWER(FULLPATH(".\temp"))
lcApplicationPool = "WebConnection"
lcServerMode = "IIS7HANDLER"&& "IIS7" (ISAPI) / IISEXPRESS
loWebServer = CREATEOBJECT("wwWebServer")
loWebServer.cServerType = UPPER(lcServerMode)
loWebServer.cApplicationPool = lcApplicationPoolIF !EMPTY(lcIISPath)
   loWebServer.cIISVirtualPath = lcIISPathENDIFWAITWINDOW NOWAIT "Creating virtual directory " + lcVirtual + "..."*** Create the virtual directoryIF !loWebServer.CreateVirtual(lcVirtual,lcVirtualPath)   WAITWINDOW TIMEOUT 5 "Couldn't create virtual."RETURNENDIF*** Create the Script Maps
lnMaps = ALINES(laMaps,lcScriptMaps,1 + 4,",")FOR lnx=1 TO lnMaps
    lcMap = laMaps[lnX]WAITWINDOW NOWAIT "Creating Scriptmap " + lcMap + "..."
      llResult = loWebServer.CreateScriptMap(lcMap, lcScriptPath)        IF !llResultWAITWINDOW TIMEOUT 2 "Failed to create scriptmap " + lcMapENDIFENDFORWAITWINDOW NOWAIT "Setting folder permissions..."
lcAnonymousUserName = ""
loVirtual = GETOBJECT(lcIISPath)
lcAnonymousUserName = loVirtual.AnonymousUserName
loVirtual = .NULL.*** Set access on the Web directory -  should match Application Pool identity
SetAcl(lcVirtualPath,"Administrators","F",.T.)
SetAcl(lcVirtualPath,"Interactive","F",.T.)
SetAcl(lcVirtualPath,"NETWORKSERVICE","F",.T.)* SetAcl(lcVirtualPath,"OtherUser","F",.T.,"username","password")*** IUSR Anonymous AccessIF !EMPTY(lcAnonymousUserName)
    llResult = SetAcl(lcVirtualPath,lcAnonymousUserName,"R",.T.)*** No unauthorized access to admin folder
    lcAdminPath = ADDBS(lcVirtualPath) + "Admin"IFDIRECTORY(lcAdminPath)
          llResult = SetAcl(lcAdminPath,lcAnonymousUserName,"N",.t.)ENDIFENDIF*** Set access on the Temp directory - should match Application Pool Identity
SetAcl(lcTempPath,"Administrators","F",.T.)
SetAcl(lcVirtualPath,"Interactive","F",.T.)
SetAcl(lcTempPath,"NETWORK SERVICE","F",.T.)* SetAcl(lcTempPath,"OtherUser","F",.T.,"username","password")*** COM Server RegistrationIFFILE("Testproject.exe")RUN /n4 "Testproject.exe" /regserver*** Optionally set DCOM permission - only set if needed*** requires that DComLaunchPermissions.exe is available* DCOMLaunchPermissions("Testproject.TestprojectServer","INTERACTIVE")* DCOMLaunchPermissions("Testproject.TestprojectServer","username","password")ENDIFWAITWINDOW Nowait "Configuration completed..."

As you can see Web Connection includes all the features needed to configure servers via code and the default generated PRG file just uses these features and applies it to the default project structure using the relative paths to figure out where things need to be configured.

The bottom line is this: You can move your project to a new location and run this script and your application will simply run. Likewise you can deploy an application to the server and assuming the Web Server is installed and has the base configuration required, you can run MyApp.exe CONFIG and your application is configured and ready to go.

This is a big change from previous versions were you either had to manually configure or else run the confusing Configuration Wizard. Best of all you can review the script above and get a good idea what configuration settings are made to get your application to run and you can modify the script to make changes or add additional configuration options.

Seeing this work for the first is almost magical – the script just runs for a few seconds and once done you can start your server, browser your site and you're off to the races.

Deploying Applications

Web Connection 6.0 can also help you deploy applications. Configuration is one thing but if you need to deploy and update applications you still have to get your files to the server.

Build.bat

First a new Web Connection project includes a build.bat file that creates a \build folder that contains all the project dependencies that a Web Connection application typically needs to deploy. The script picks up all dependent binary DLLs, the main binary file (your exe) and configuration file (.ini) and dumps those files into a the \build folder and zips everything up (if 7zip is in your path).

Here's what the build folder looks like:

BuildFolder

You can then push that file to the server and unpack it there for installation. You might have to add additional files for your installation, but this is a quick way to get all the dependencies that Web Connection typically needs in one quick swoop.
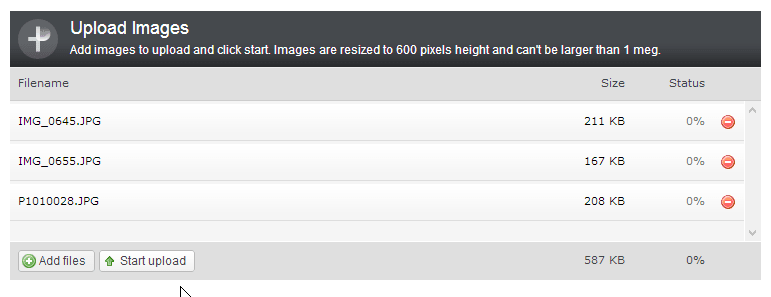
File Upload

The Web Connection .NET Handler includes a new feature to upload files into the application's \temp path on the server. Which is a poor man's way of copying files to the server if RDP file transfer is too slow (as it usually is) or you don't have an FTP server running on your site:

UploadFile

Just make sure you set the appropriate request limits in web.config to allow your Web server to accept large file uploads– temporarily if necessary (you can bump it back down after you're done uploading).

This is very useful if you need to upload say the Visual FoxPro runtimes, or your application or application data.

Updating Applications

Web Connection has always included tools to allow you to hotswap running applications by uploading new binary files and swapping them while the application is running. In the screen shot above the Upload Server Exe and Update Server Exe links accomplish this using the ExeFile and UpdateExeFile configuration keys. The way this works is that you can upload a new binary with the Upload link, which uploads the file to the file name specfied in UpdateExeFile. The Update Server link then shuts down all running servers and copies the new EXE file and restarts all servers.

This functionality is not new but it has been streamlined in Web Connection 6.0. The feature now works both with COM and file based Messaging. Additionally the hotswapping routine now gives you detailed info on the uploaded file including file size and version number so you can validate that the file made it and got swapped out. The upload process is now integrated into the Web Connection .NET Handler so you don't have to have a Web Connection server running in order to upload the file. This means you can use this feature to push an initial EXE to the server.

Finally new projects generate a bld_MyApp.prg file that automates this process. This bld file can be used to compile your project and show errors but if you do:

DO BLD_MyApp with .T.

The script will try to upload your binary file to your server. For this to work you have set a couple of values in the PRG file to point at the server where your application will be updated.

This is a great way to update the binaries in your application in a few minutes, causing a mere few seconds of downtime on your server only as your servers are hotswapped. I use this feature all the time to update my code online and it takes all but a minute to get new bianaries uploaded and hotswapped on my live server.

All of the features I've highlighted so far are administrative features meant to make it easier to manage Web Connection applications. For my own workflows I can tell you that these simple improvements have made the process of managing a Web Connection application considerably easier and more predictable. I hope you find these lifecycle features as useful as I have.

Modern Styling and Mobile Friendly Layout

Web Connection's existing base styling in Web Connection 5.0 was getting a bit - quaint. Initially created in the early 2000's the styling is showing it's date – it's looking decidedly old school. Not only that but the existing styling was completely custom, designed by a non-UI person (me) as best I could. The CSS and base markup was pretty stable, but by now the style is definitely very dated looking.

Web Connection 6.0 takes a different approach by relying – by default – on a popular, external CSS libraries designed by real designers and used widely by many developers for building Web applications.  Web Connection 6.0 uses Bootstrap with a somewhat customized base theme and FontAwesome for its default theming to provide a more consistent and much more popular design.

Web Connection uses these base libraries and then layers a relatively small customized UI on top of it. So when you create new pages in Visual Studio or use the default script templates, you get this base customized Bootstrap UI.

To be clear, this is just a default to get you started with. As before you can still build completely custom CSS and use it with your Web Connection applications, but if you are not graphically inclined you can build reasonably nice looking and mobile friendly applications relatively easily. Although Web Connection provides a slightly customized Bootstrap layout, all the default Bootstrap styles and components are available to you to use so it's possible to completely override our custom styling with your own.

Web Connection's customization essentially throws out Bootstraps default nav header,  which doesn't work very well on mobile and provides a slide in side menu via the bars on the left in the screen shot below:

TimetrakkerDesktop 

The default styling is mobile friendly as long as you stick to the general bootstrap design guidelines (using content containers and the grid layout). Here's the same form displayed on my iPhone 6. The first picture is plain the second with the animated slide in menu opened.

TimetrakkerMobileTimetrakkerMobileMenu

(this Web Connection sample is available on BitBucket if you want to check out a more comprehensive Web Connection sample app).

Visual Studio Page Templates

This sample, uses mostly the default styling that comes out of the box with Web Connection. If you are using Visual Studio, there a number of templates you can use to create various types of pages that include this default styling:

PageTemplates 

Use of Visual Studio is completely optional – you can use any editor you chose, but you do get a few benefits in Visual Studio. One are the templates above which make it really easy to create new pages that have all the standard styling and base page layout applied.

There's also a Web Connection Visual Studio Add-in that allows you to preview script and template pages  in your browser and that optionally allows you to show FoxPro code (if you have SourceFile="<file>" tag in your source file)

If you want to use other editors you totally can – I personally use Sublime Text with Matt Slay's Sublime FoxPro extension quite frequently, but any HTML editor like WebStorm, Atom, VS Code, Notepad++ will work as well. You won't get automatic templates, but if you want to cut and paste you can find the Visual Studio templates in the \VisualStudio\PageTemplates folder. If you drill into the various template folders you can find the default.* pages that contain the template and you can cut and paste from there.

As a side note you can also create your own Visual Studio templates – simply create a new zip file and use one of the other templates as a base and simply rename the manifest and final file names to create your own custom templates you can load in Visual Studio. Along the same lines if you're ambitious you can also create custom templates for Sublime, Atom or VS Code in much the same way.

MVC Style Development Improvements

Web Connection has long supported MVC style development using code based logic that can drive scripts or templates. This was one of the big features in Web Connection 2.0 in 1998. Nowadays MVC style frameworks like ASP.NET MVC, Ruby on Rails or Express on Node are the norm for server side Web development. In version 6.0 Web Connection gets a major updates for the Script and Template engines which now support master Layout pages that let you create a top level page template into which other content pages load, partial pages, which allow you to break large and complex pages into smaller pages and sections, which allow you to inject content from content pages into the master pages. These concepts are common in other MVC frameworks and they make it much easier to build complex applications as you don't have to repeat the same markup code on each page. Instead layout pages can take the brunt of page 'chrome' with various content areas that are filled by the content pages.

For those of you not familiar with scripts and templates in Web Connection, scripts and templates allow you to mix HTML markup and FoxPro code. The following demonstrates using a FoxPro SCAN to run through a cursor created by a controller method in the application's Process class:

ScriptPage

MVC style development is the most popular mechanism of development with Web Connection from what I've observed what people are using and so this is why there has been renewed focus on this development style.

JSON Service Improvements

Web Connection 6.0 now has a dedicated RestProcess class that makes it super easy to create JSON REST services that can take JSON input and generate JSON output. To create JSON endpoints you simply add methods to the RestProcess subclass and the methods simply accept a single parameter (which can be a complex object) and returns back a result value. The input parameter is parsed from JSON to a FoxPro object and the result value, object, collection or cursor is turned into an JSON (or XML) document.

The New Project and New Process Wizards now give you options to explicitly create a standard Web application or a REST service.

NewRestProcessClass2

wwJsonService now also includes .cPropertyNameOverrides which gets around FoxPro's limitation of reflecting property names only in lower case. Using a comma delimited list of property names you can override properties with proper case so you can create JSON objects that match a specific signature. wwJsonSerializer has been improved to handle collections better and has been updated to deal better deal with illegal FoxPro property names that are supported in JavaScript.

JSON Client Features

There's also a new wwJsonServiceClient class that makes it much easier to call JSON services. Using this class you can create methods for each service call and the methods can call a CallService base class helper method to actually call the Web based REST service method. You specify a URL and a single value or object parameter which is serialized and sent as JSON to the server. The JSON result that comes back is automatically parsed back into a FoxPro value or object. wwJsonSerializer now has a .FormattedOutput  flag to create pretty printed JSON output.

New wwHtmlHelpers

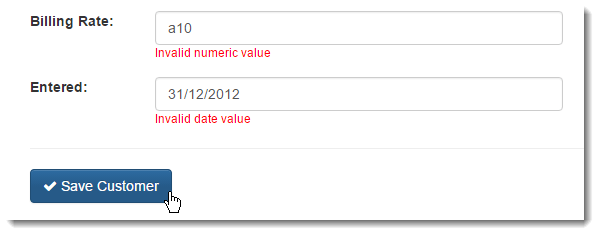
In Web Connection 5.50 Web Connection introduced a new library of HtmlHelpers that provide rich control functionality by way to of functions that can render certain controls and control values. These 'control' functions can be used with MVC style scripts or in code to generate HTML. The various input controls like textbox, textarea, checkbox, radio etc. all support databinding making it easier to bind data to these controls.

For example, here are the HtmlTextArea and HtmlBindingError helpers handling databinding for bound business object entity:

htmlhelper

While  the code is a bit verbose this code provides two way databinding support – the control is smart enough to display values from the model on a GET operation and display the posted back values when a POST/PUT operation is active. Likewise the checkbox and radio helpers know how to deal with the undermined state issue you run into with this painful HTML controls that don't differentiate between unchecked and not set values.

There are a number of new Html Helpers:

  • HtmlBindingError
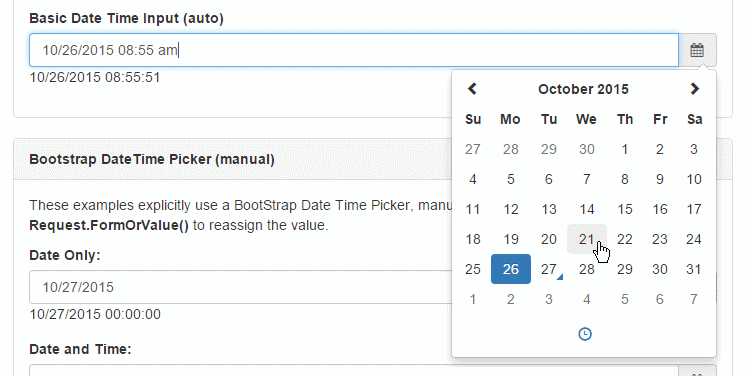
  • HtmlDataTextBox (bootstrap datepicker)
  • HtmlErrorDisplay (bootstrap alert box)

There are also a number of updates to the HtmlDataGrid component.

Markdown Support

Markdown has become massively popular as an easy data entry format for HTML that can be written without actually writing HTML markup. Basically the text format uses very simple technical editing style markup directives using plain characters to describe common markup operations. This markdown text can then be parsed down to HTML. For most free form text data entry operations using plain text like this is much more efficient than using a rich HTML editor. If you're new to Markdown check out my Markdown Basics document I publish in West Wind Html Help Builder.

Web Connection now includes a markdown parser that can turn Markdown into HTML very quickly, using a .NET Markdown component (CommonMark). A new Markdownparser class provides for parsing Markdown to html and there's also an easy Markdown() function that can be easily used in templates (assuming you've loaded Markdownparser.prg).

For scripts and templates you can also directly write markdown text into the document markup using <markdown>This is **Markdown Text**</markdown> syntax in templates and scripts which is automatically expanded.

Web Connection .NET Handler Updates

The Web Connection Handler also has a number of big updates. The most noticable is that the UI now uses an _AdminTemplate that allows for styling of the admin page. Rather than the bland generic page you now get a branded page like the rest of the application:

Likewise error and status messages use the same _AdminTemplate.html to display their content. You can customize this template with your own branding in your applications if you choose.

Hot Swapping of Live Servers for both COM and File Based

The .NET Handler now also internally handles hot-swapping of both COM and File Based servers (previously this worked only with COM). The handler can shut down all servers, put requests on hold and hot-swap server exes, then restart instances. The upload operation is now part of the .NET Handler, rather than the Web Connection server which means you can actually do first time uploads to the server of a new server and you're not dependent on a functioning EXE server to make the actual copy operation.

Updated Documentation

The Web Connection documentation has been overhauled significantly.  Web Connection's docs are very big but a lot of the general purpose and intro content has been updated for version 6.0. A lot of old stuff has either been cleaned up and updated, or thrown out when irrelevant.

documentation

New Walk through Tutorials

There are also several new walk through tutorials and I recommend if you're new that you go through these to understand how Web Connection works.

Fast and Mobile Friendly

The online documentation and Help file has been re-built with the latest version of West Wind Html Help Builder and provides a much more modern,  livelier, interactive browsing experience. Topics load much faster and the new search feature is nearly instant, simply filtering the topic list. The new design has responsive layout that is mobile friendly, and no longer uses ugly frames.

Quick Search

The search is feature is a key improvement and I really recommend you take advantage of it.

The topic search box is very fast in looking up topics, as is all client side and simply filters the list of topcis based on your search terms. This means you can type partial text and it will match. Typing IIS for example quickly shows you the IIS and IIS Express configuration topics as well as a few knowledge base topics. Typing Expand will bring up ExpandTemplate(),ExpandScript() and ExpandPage() topics you can then jump to directly. This sounds pretty ordinary, but the search is nearly instant which makes it very efficient to browse the documentation quickly and find what you need.

If you use Web Connection, create a browser shortcut to the help file nowand use it whenever you need to look up any Web Connection related function or feature. I guarentee you, it'll make you more productive – I know it has done that for me!

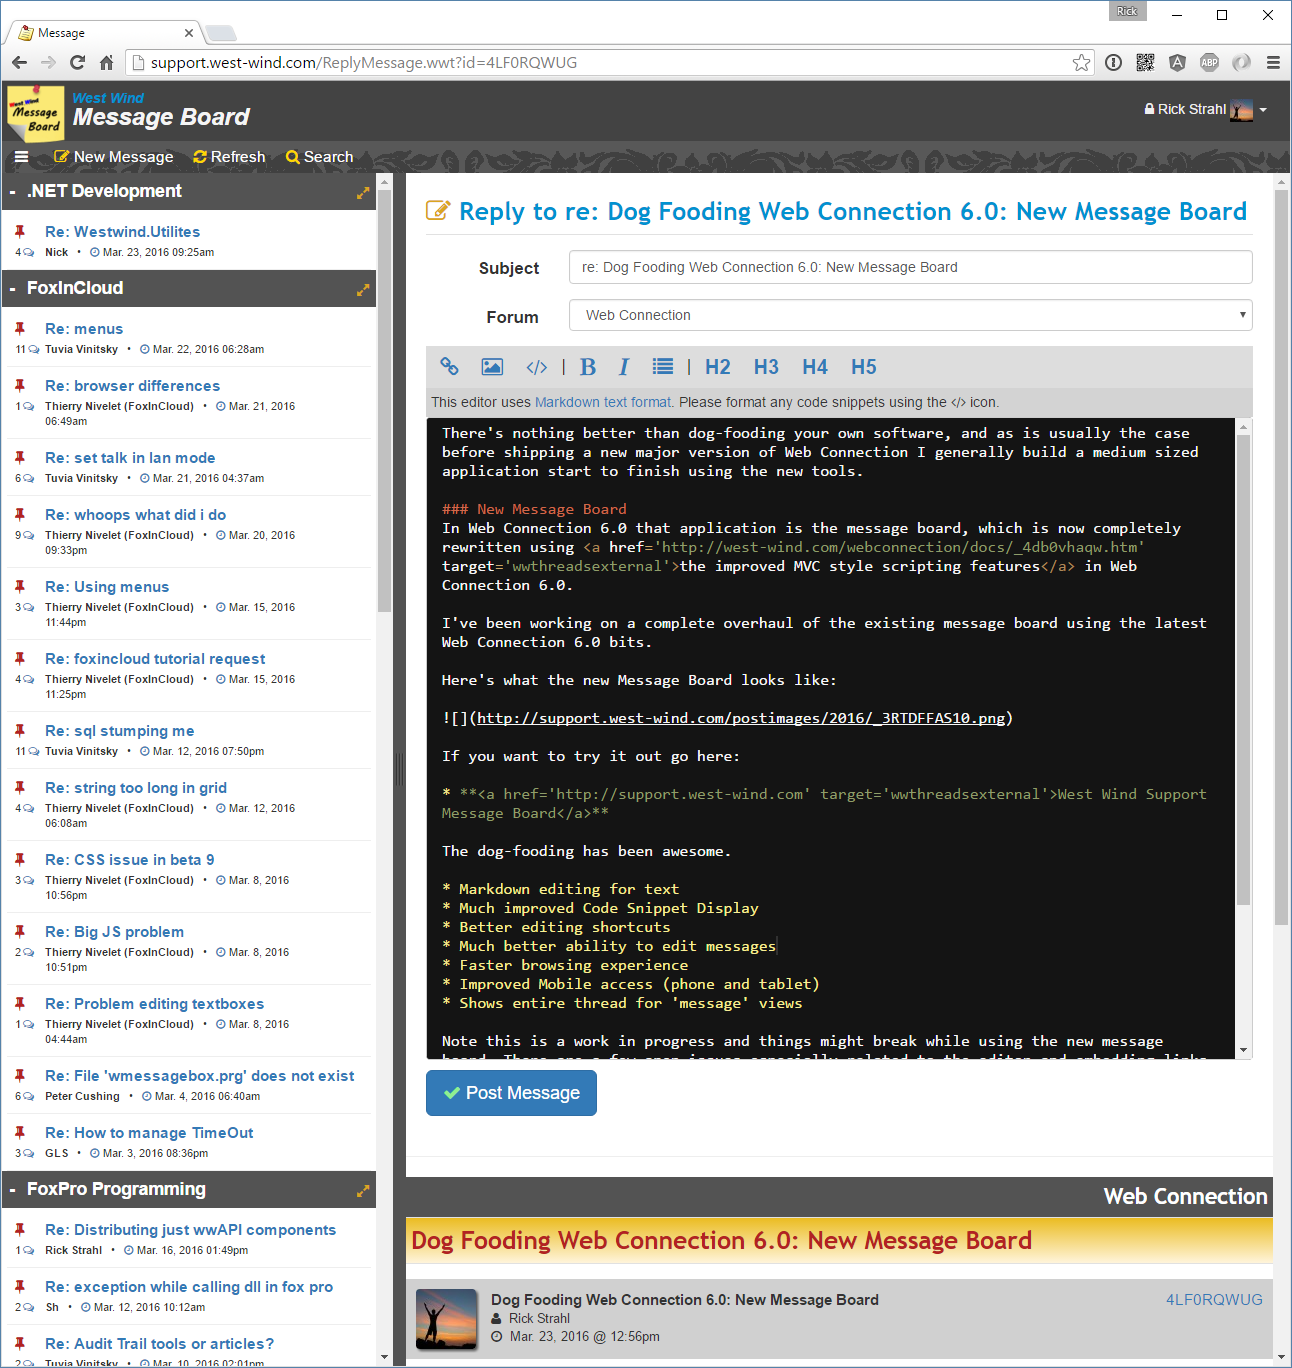
New Message Board Sample

With all the new MVC and scripting features in Web Connection 6.0 I needed to build another full featured sample, and this version's target was the Message Board which has been completely re-written from the ground up using business objects and MVC style development using Process/Controller classes and Scripts. The result is a is a much cleaner implementation that is mobile friendly and much smoother and faster compared to the old frames based implementation. The new message board includes support for the popular Markdown text format for writing messages and includes a rich editor that makes it easy to create messages with attached images and nicely formatted code snippets.

If you haven't stopped by the message board recently, check it out to see all the changes and please join the conversation – I hope to make this place more active and get more people involved to keep this community alive.

The message board is a sample application that ships with all of its source code in the Web Connection package and you're free to run this message board on your own site.

I've also made the source code available on Github to allow people to get involved and get access to the latest versions and potentially add features or submit pull requests.

And so much more

There is much more of course, but here are a few more small tidbits:

There's now better support for extensionless urls, which are common for REST services that use 'noun' based URL endpoints (like customer, order etc). There are a number of new jQuery plugins: jQuery-resizable, jQuery-watcher, a generic debounce() function that lets you throttle event handling on a timed basis. The .NET Handler's COM loading has been drastically improved. COM servers should now load up twice as fast as before.

The Request object has many new functions that provide better access to file uploads with multiple files, collecting form variables into a collection,  Request.UnbindFormVars() lets you unbind form variables to an object and provides you a collection of validation errors (if any). Response.ExpandScript/ExpandTemplate() now default to the current script if no template path is provided. You can also use ~\ virtual paths to specify a web relative script name (ie. ~\admin\CustomerAdmin.wcs).

wwDotnetBridge has many, many improvements to allow accessing more and more features of the .NET type system from Visual FoxPro. There's now support for calling any .NET method asynchronously including the ability to be called back when the method completes.

If you're interested in everything new check the large What's New Topic link:

There are tons of small enhancements. New support functions, small improvements to others and a lot of updates.

Summary

It's been a long journey involving a lot of very tedious work, but it's been worth it even if these changes end up being mostly for my own use of Web Connection. The vast majority of the changes in this release address very specific usability scenarios that I think will be beneficial to just about anybody using Web Connection today and the new version is bound to make the development and especially the administration process much easier overall.

I know in my own work with several customers and also with the Web Connection sample app and the message board, it's noticeably easier to build and deploy applications with confidence. Because of the automated scripts the process of getting applications online and keep them updated is simply quicker and easier.

The new HTML Scripting features – Layout Pages in particular - make HTML development so much easier than previously because you can reuse so much of the standard page chrome without having to repeat yourself. This greatly reduces HTML you have to write. Couple that with the default templates (in Visual Studio) and it's extremely quick and productive to get new pages into the application.

I haven't been this excited about Web Connection in years and I wish I had spent the time to do this a few years back, but I simply did not have the time and resources to do it. In the last year I've finally set aside the time to make these necessary changes happen and you're looking at the end result of it.

And I'm not done yet either. There are a still handful of improvements that didn't make the cut for the RTM release, but that will be showing up in updates in the near future, so stay tuned for more cool stuff coming down the line.

I hope you find these updates as useful as I have. Enjoy.

Aloha.

Calling JSON REST Services with FoxPro and wwJsonServiceClient

$
0
0

A few days ago I released version 6.0 of the West Wind Client Tools which includes a little gem of a class called wwJsonServiceClient that makes it super easy to call JSON REST services. This class is part of the West Wind Client Tools as well as West Wind Web Connection and it makes it a snap to call JSON services to receive and send data.

Calling REST Services

REST services are becoming more and more popular and are starting to crowd out SOAP based services as the vehicle to share raw data over the Internet. Where SOAP is a very heavy XML based protocol that requires a very strict format, REST generally uses much simpler structures to push data over the wire. Data is usually encoded as JSON rather than XML. JSON is essentially a way to express JavaScript values, objects and arrays as a literal string value, which is easy to create and parse using standard libraries. Like XML, JSON is a serialization format, but unlike XML it skips all the formality and provides just the data.

If you're retrieving data from online social services or 'new Web' companies, you're going to encounter REST and JSON APIs generally. The benefit of REST JSON services is that generally they are much simpler than SOAP counterparts as you don't have worry about XML data mapping descreprancies. You don't need any special software to access a REST service - there's no SOAP client that has to parse a SOAP message and call. You simply have a documented endpoint and a set structure of data to send in (if any) and a set structure of data that is returned. All you need to access a REST service is an HTTP client (like wwHttp) and if the data is in JSON format a JSON serializer (like wwJsonSerializer).

On the server side things are also easier because again there's not additional contract that needs to be created. To create a REST service you build plain HTTP endpoints and return a JSON value or object. If you're using FoxPro in Web Connection the wwRestProcess class makes it easy to create FoxPro based REST services by simply creating classes that take a single input parameter and return a single result value. The wwRestProcess class handles all the logistics of publishing that data.

What is wwJsonServiceClient?

You can think of wwJsonServiceClient as a simple way to call a REST service. At it's simplest it's a high level wrapper class that wraps the wwHttp and wwJsonSerializer to call JSON services via HTTP and handles the JSON serialization and deserialization.

In a nutshell it reduces calling a REST service to a single line of code.

Making a GET Request

Let's try it out. The following calls a sample site to retrieve a list of Music Albums from an online AlbumViewer sample I created for last year's Web Connection Training.

This first request is a simple GET command that retrieves the list of albums like so:

do wwhttp
do wwJsonSerializer

loProxy = CREATEOBJECT("wwJsonServiceClient")

*** Make the service call
loAlbums = loProxy.CallService("http://albumviewerswf.west-wind.com/api/albums","","GET")
? loProxy.cErrorMsg

lnCount = loAlbums.Count

* ? loAlbums.Item(1).Title

FOR EACH loAlbum in loAlbums 
   ? loAlbum.Title  + ;
     " by " + loAlbum.Artist.ArtistName + ;" (" +  TRANSFORM(loAlbum.Tracks.Count) + " tracks)"
   FOR EACH loTrack IN loAlbum.Tracks
		? "  " + loTrack.SongName
   ENDFOR
ENDFOR

The key is this line:

loAlbums = loProxy.CallService("http://albumviewerswf.west-wind.com/api/albums","","GET")

which makes an HTTP GET request to the server with not data to send to the server (empty second parameter). The last two parameters are actually not required - if no data is passed GET is assumed for the HTTP verb. You've just simplified a service call to single line of code.

POSTing data to a server

Along the same lines you can also post data to a server by passing a value, object or array to the server as the second parameter and changing the HTTP verb.

loArtist = CREATEOBJECT("Empty")
ADDPROPERTY(loArtist,"Id","2")
ADDPROPERTY(loArtist,"ArtistName","Accept")
ADDPROPERTY(loArtist,"Description","Old school German Metal band")
ADDPROPERTY(loArtist,"ImageUrl","http://cps-static.rovicorp.com/3/JPG_400/MI0001/389/MI0001389322.jpg?partner=allrovi.com")
ADDPROPERTY(loArtist,"AmazonUrl","")

loProxy = CREATEOBJECT("wwJsonServiceClient")
loArtist = loProxy.CallService("http://albumviewerswf.west-wind.com/api/artist",loArtist,"PUT")

IF  loProxy.lError
   ? loProxy.cErrorMsg
   RETURN
ENDIF

? loArtist.Albums.Count

Now in this case the call fails because you actually have to log in first, but if you hook up an HTTP proxy like Fiddler you you'll see the following was sent to the server:

PUT http://albumviewerswf.west-wind.com/api/artist HTTP/1.1
Content-Type: application/json
User-Agent: West Wind Internet Protocols 6
Host: albumviewerswf.west-wind.com
Content-Length: 194
Pragma: no-cache
Cookie: _ga=GA1.2.1516538738.1449808058; albv=C03E01F1F67F15336

{ 
 "amazonurl":"","artistname":"Accept","description":"Old school German Metal band","id":"2","imageurl":"http://cps-static.rovicorp.com/3/JPG_400/MI0001/389/MI0001389322.jpg?partner=allrovi.com"
}

So you can see that the service client is generating an HTTP request with a JSON payload from your method call.

Dealing with FoxPro Case Limitations

Now it turns out that the service actually expects all the property names to be proper case. FoxPro's property retrieval API unfortunately does not natively support preserving case (except if you use MemberData which is a pain in the ass) and so the serializer by default turns all property names into lower case.

If you need to communicate with a service that requires either proper or camel case (which is common for JSON services) you can override property names explicitly.

loProxy = CREATEOBJECT("wwJsonServiceClient")

*** Create a custom serializer that overrides property names
loSer = CREATEOBJECT("wwJsonSerializer")
loSer.PropertyNameOverrides = "Id,ArtistName,Description,ImageUrl,AmazonUrl"
loProxy.CreateSerializer(loSer)

loArtist = loProxy.CallService("http://albumviewerswf.west-wind.com/api/artist",loArtist,"PUT")

IF  loProxy.lError
   ? loProxy.cErrorMsg
   RETURN
ENDIF

? loArtist.Albums.Count

Now the data is sent with proper names:

{ "AmazonUrl":"","Artistname":"Accept","Description":"Old school German Metal band","Id":"2","ImageUrl":"http://cps-static.rovicorp.com/3/JPG_400/MI0001/389/MI0001389322.jpg?partner=allrovi.com"
}

These overrides are applied globally to all properties, child properties and array items so this addresses the FoxPro type name limitations.

HTTP Verbs

The above example used a PUT command to update an existing record. POST is typically used to add a new record, there's also DELETE and HEAD and a few other verbs. The verbs are usually determined by the service interface which should be provided by the documentation for the service.

Verbs can be used to differentiate operations on the same URL. For example, in the Item Service above I can use the Artist endpoint with GET and an ID to retrieve an artist. With POST a new artist is added, PUT updates an artist and DELETE removes an artist all from the same http://albumviewerswf.west-wind.com/api/artist Url. This is a common pattern and this approach lets you work with that.

Make it Better

Ok, so the above works, but you really don't want to scatter code like this into your application logic. It's a much better idea to abstract the service implementation into its own class with methods for each of the operations you want to perform.

Instead I recommend that when you access a service, you create a class that inherits from wwJsonServiceClient and then implement methods that make the service call. This can simply error handling and puts all the code related to the service - including any possible pre and post processing you might do for each call - into a single class.

So if we refactor our two service functions we might end up with a class like this:

******************************************************
DEFINE CLASS AlbumViewerService as wwJsonServiceClient
******************************************************

************************************************************************
*  Init
****************************************
FUNCTION Init()

DODEFAULT()

*** Ensure a serializer exists
this.CreateSerializer()

ENDFUNC

************************************************************************
*  GetAlbums
****************************************
FUNCTION GetAlbums()
LOCAL loAlbums

loAlbums = THIS.CallService("http://albumviewerswf.west-wind.com/api/albums","","GET")

*** Error message is already set
IF THIS.lError
   RETURN null
ENDIF   

RETURN loAlbums
ENDFUNC


************************************************************************
*  UpdateArtist
****************************************
FUNCTION UpdateArtist(loArtist)
LOCAL loArtist

this.oSerializer.PropertyNameOverrides = "Id,ArtistName,Description,ImageUrl,AmazonUrl"

loArtist = THIS.CallService("http://albumviewerswf.west-wind.com/api/artist",loArtist,"PUT")

*** Reset overridden properties
this.oSerializer.PropertyNameOverrides = ""

IF THIS.lError
   RETURN null
ENDIF   

RETURN loArtist
ENDFUNC


ENDDEFINE

By doing this you're abstracting all the logic required to deal with the service in this class, so the application doesn't need to see this low level interaction.

To use the service and call both methods the front end code you might use inside of your application looks like this:

*** Create our CUSTOM service
loProxy = CREATEOBJECT("AlbumViewerService")

*** call the wrapper method
loAlbums = loProxy.GetAlbums()

lnCount = loAlbums.Count
* Do something with the data


loArtist = CREATEOBJECT("Empty")
ADDPROPERTY(loArtist,"Id","2")
ADDPROPERTY(loArtist,"ArtistName","Accept")
ADDPROPERTY(loArtist,"Description","Old school German Metal band")
ADDPROPERTY(loArtist,"ImageUrl","http://cps-static.rovicorp.com/3/JPG_400/MI0001/389/MI0001389322.jpg?partner=allrovi.com")
ADDPROPERTY(loArtist,"AmazonUrl","")

loAlbum = loProxy.UpdateArtist(loArtist)
IF  loProxy.lError
   ? loProxy.cErrorMsg
   RETURN
ENDIF

? loArtist.Albums.Count

RETURN 

This is much cleaner as you are calling simple methods that describe what's happening. If something goes wrong, you have one place to go to look for the failures and the service becomes now reusable.

Summary

REST services are becoming much more common and although they are easy to call if you have an HTTP client and JSON serializer, wwJsonSerializer offers a more simpler, more abstracted and consistent way of doing it for you. Errors are caught and passed back to you and it reduces the service call to essentially a single line of code potentially with some extra configuration if you need to post data to the server that requires proper casing.

Give wwJsonSerializer a try. It's available in West Wind Client Tools 6.0 and West Wind Web Connection, but the Web Connection version is not quite up to date and is missing the CreateSerializer() method. This will be addressed in the forthcoming v6.05 release due out shortly.

Custom Row and Column Rendering in Web Connection with HtmlDataGrid()

$
0
0

DataGrids are popular use case for FoxPro developers who are obsessed with use data grids for data display. Personally I'm not a huge fan of grids, unless absolutely necessary, but for some use cases grids using HTML tables are the only way to go to display a lot of data on a form.

In this post I'll describe using the wwHtmlHelper HtmlDataGrid() function which makes it super easy to create grids, and specifically demonstrate how you can create customized displays for rows or columns to highlight content.

HtmlDataGrid() basics

HTMLDataGrid() is a wwHtmlHelper function that is used to render data from tables or collections/arrays into an HTML table. It uses the new Web Connection 6.0 Bootstrap styling to create attractive grid displays fairly easily.

The function supports a couple of different operational modes:

  • Auto-Column generation from a cursor
  • Custom Column Definitions

Auto Column Generation

The former is super easy - it simply takes a cursor and renders it.

SELECT albums.pk,albums.title, albums.year, ;
       artists.pk as artistpk, artists.artistName  ;
    FROM albums, artists ;
    ORDER BY albums.title ;
	WHERE albums.ArtistPk = artists.Pk AND ;
	      artists.ArtistName = ?lcFilter ;	
    INTO CURSOR TQuery

* ... other header rendering

*** Render the Grid
Response.Write( HtmlDataGrid("TQuery") )

* ... other page rendering

Alternately you can also capture the HTML in your controller code:

PRIVATE pcHtml
pcHtml = HtmlDataGrid("TQuery") 

and you can then render the HTML inside of a template or script page:

<div class="gridcontainer"><%= pcHtml %></div>

In either case, this produces a simple table list of all the records:

If you want a little more control you can add a HtmlDataGridConfig object to configure a few options like paging and styling of the table:

loConfig = CREATEOBJECT("HtmlDataGridConfig")
loConfig.PageSize = 10             && 10 items per page
loConfig.PagerButtonCount = 5      && Max page number buttons in pager

Response.Write( HtmlDataGrid("TQuery",loConfig) )

which turns the grid into a paged grid:

Auto-column generation is very easy but it's fairly limited. As you can see you can't easily control what fields are displayed (the pks are showing) unless you modify your query to return only the fields you want, and the titles are determined by the field names.

It works for quick and dirty stuff, but in most cases you'll want to use custom grid columns.

Custom Column Definitions

The better approach is to explicitly define your columns for the data grid which gives you a lot more control. When using columns you can add custom styling, apply formatting and even use code expressions to transform the content. For example, it's fairly easy to call other helpers for adding things like links or checkboxes, or use entire custom functions for rendering the content of individual columns.

The following example demonstrates a few custom features:

SELECT albums.pk,albums.title, albums.year, ;
       artists.pk as artistpk, artists.artistName ;
    FROM albums, artists ;
    ORDER BY albums.title ;
	WHERE albums.ArtistPk = artists.Pk AND ;
	      artists.ArtistName = ?lcFilter ;	
    INTO CURSOR TQuery

* ... other HTML generation
  
*** Use the HtmlDataGrid Helper function (easier)
loConfig = CREATEOBJECT("HtmlDataGridConfig")

*** Paging is a problem when you dynamically switch between the two modes
*** so leave out for now
loConfig.PageSize = 6

*** Add a column explicitly by craeating it first
*** Note this column uses an expression that is evaluated for each record
loColumn = loConfig.AddColumn([HtmlLink("ShowAlbum.wwd?id=" + TRANSFORM(Tquery.pk),Title)],"Album")
loColumn.Sortable = .T.
loColumn.SortExpression ="Upper(Title)"

loColumn = loConfig.AddColumn("ArtistName","Artist Name")
loColumn.Sortable = .T.
loColumn.SortExpression ="Upper(ArtistName)"
loConfig.AddColumn("Year","Year Released","N")

*** Add a checkbox column
loConfig.AddColumn("HtmlCheckBox([chkIsActive_] + TRANSFORM(Pk) ,[],Year > 2000)","Recently Produced")

lcHtml = HtmlDataGrid("Tquery",loConfig)

Response.Write(lcHtml)

which looks like this:

Notice that we have a link and a checkbox embedded into this display - using additional HTML helpers to render these items. You can embed any string expressions - including other HTML helpers which makes it easy to create more complex items in cells.

Additionally you can also create column output from expressions which can be either native FoxPro functions (for formatting for example), User Defined Functions, or class method calls.

To do this simply create the column expression with the function name:

loColumn = loConfig.AddColumn([Process.LinkAlbum()],"Album")

You can then implement this function on the Process class. Note it doesn't have to be a Process class method it just has to be something that's in scope called further down the call stack.

Customizing Column Display

In this function you can do whatever you want to do. So if you want to create a custom column that bolds the link you could do:

FUNCTION LinkAlbum()
LOCAL lcHtml
lcHtml = [<a href="ShowAlbum.wwd?id=] + TRANSFORM(TQuery.pk) + [" ]  +;
		 [  style="font-weight: bold; color: green;">] +;
         EncodeHtml(TQuery.Title) + [</a>]

RETURN lcHtml
ENDFUNC

Which now renders a bold green texted link.

Not very practical, but you get the idea - you can pretty much generate any HTML using a function that creates the HTML string output. It's very powerful.

Customizing the Column Styling

You can also access the Column's own styling and attributes using the ActiveColumnAttributeString property for the config object. For example to turn the Year column to a green background when the year is newer than 2000 you can use code like this:

loConfig.AddColumn("Process.YearColumn(loConfig)","Year Released","N")

Then create the handler:

FUNCTION YearColumn(loConfig)

IF (TQuery.Year > 2000)
   loConfig.ActiveColumnAttributeString = [ style="background: green; color: white" ]
ELSE
   loConfig.ActiveColumnAttributeString = [  ]
ENDIF
RETURN TRANSFORM(TQuery.Year)
ENDFUNC

The ActiveColumnAttributeString allows you to customize the <td> element with custom attributes which gives you full control over rendering.

Here's what the green boxed cell looks like:

Customizing Row Rendering

Finally it's also possible to affect row rendering using the OnBeforeRowRender() and OnAfterRowRender() handlers. These handlers also take expressions that have to return a string. Using these functions it's possible to get access to the row header and the individual column headers.

This is similar to the column customization except you use the RowAttributeString to customize the row.

First hook up the OnBeforeRowRender handler with the function expression:

loConfig.OnBeforeRowRender = "Process.RenderRowHeader(loConfig)"

Then implement the method:

FUNCTION RenderRowHeader(loConfig)

IF (TQuery.Year > 2000 )
	loConfig.RowAttributeString = [ class="highlight" ]
ELSE
    loConfig.RowAttributeString = []
ENDIF
RETURN ""

In this example, rather than setting an explicit style I simply assign a custom CSS class defined in a style sheet:

.highlight {
    background: #c6f1c6 !important;
}

which applies a light green background to the entire row. The !important forces the background to override other styles.

When you now render this grid you get:

Note that you have to always set the RowAttributeString to a value including the empty value, because when you set it that value stays for all subsequent requests. So effectively you have to reset it for each row.

Summary

As you can see you have a lot of control when rendering HtmlDataGrids with columns and values, even if the mechanism by which this works is not very obvious. But with a proper reference like this blog post it's easy to pick the right choice to customize your column or row render to match your needs exactly with very little code effort.

Visual Studio Gets Support for FoxPro Files

$
0
0

Visual Studio 2015 now has support for FoxPro files by way of a very cool add-in from Mads Kristensen. Mads is a a Program Manager on the Visual Studio Tools team and the prime driver behind extensions for ASP.NET tooling and he has created a cool extension that can take existing Textmate style syntax files and render them as syntax highlighted documents. Thanks to Matt Slay who a while back created a Sublime Text FoxPro language extension, Mads was able to add FoxPro as a language to the extension language pack.

End result: You can now view and edit FoxPro files with syntax coloring in Visual Studio natively.

Here's what this looks like:

You can find out more and install the extension from here:

or use the Visual Studio Extension Manager to add it directly from within Visual Studio.

You'll also want to install the File Icons extension to show appropriate icons for your FoxPro files:

Cool!

It's nice to have native support for FoxPro right in Visual Studio, so you can open and edit FoxPro files right from the Visual Studio project.

This works great when working with Web Connection, so that you can quickly open PRG files and edit them in-place. If you're Web Control Pages and you keep your PRG files with the script page file, the two files live side by side and you can edit them.

It's also useful for checking out generated script template PRG files while debugging code and you can also open Process class files (manually) in the editor and see your process class code side by side with a template.

Keep in mind the features are limited to syntax coloring. There's no auto-complete support, so you may still want to use the Web Connection add-in to explicitly open FoxPro files in the FoxPro editor.

Other Editors with Web Connection?

FWIW, you don't have to use Visual Studio or FoxPro either. If you want a different editor for your PRG files - like Sublime text as I've done for years - you can use the Open With... option to specify a default editor to open files with. You can map PRG files there to whatever editor you like including the VFP IDE.

Once done double clicking opens the file in the specified editor. I've been using Sublime for years because it fires up quickly, but now I may stick with the built in editor simply for the fact that everything is one place.

Web Connection and Editing FoxPro Files

Note Web Connection also supports opening Code behind files using the Web Connection Visual Studio Addin:

Web Control Pages automatically open the code behind file. For script and template pages a special page directive allows you to specify what file should be opened - notice the highlight in the code file above:

<% * SourceFile="~/../../fox/samples/wwdemo/wwdemo.prg" %>

which lets you specify what file is opened. Here it points at the Web Connection wwProcess class handler file as a relative path to the current document.

The editor that's used can be configured in web.config using the following settings:

<configuration><webConnectionVisualStudio><add key="FoxProEditor" value="" /><add key="FoxProEditorAlternate" value="C:\Program Files\Sublime Text 3\sublime_text.exe" /></webConnectionVisualStudio></configuration>  

An empty string value means that the VFP IDE is used, otherwise the file specified by the path is used with the filename passed as parameter.

Any way you slice it - there are now quite a few options for opening FoxPro code in a decent editor - you get to choose what works best for you.

Route Web Connection Scripts, Templates and Pages to a single Process Class

$
0
0

West Wind Web Connection supports a number of different 'frameworks' for generating HTML. There are two styles of MVC (Model View Controller) renderers and an ASP.NET like Forms based interface for creating rich FoxPro code based HTML pages.

These engines are available:

  • Web Connection Scripts (wcs by default)
    HTML templates that compile into FoxPro PRG files and are executed as code

  • Templates
    Simple templates that work well with embedded expressions and self contained code blocks that are evaluated on the fly (ie. no compilation).

  • Web Control Framework Pages
    These are ASP.NET style pages that use an object based approach to describing controls on a page.

Both Scripts and Templates work for MVC style applications where you have controller code in a class method, and the template/script is the view that displays the model data you accumulated in the controller code to display in the script or template.

Web Control Framework pages are more complex, compiling HTML controls into component classes that are coordinated and rendered by the page framework.

Only one Default nPageScriptMode

When you set up a new Web Connection process class that process class can associate with a default nPageScriptMode:

  • 1 - Template
  • 2 - Web Control Framework
  • 3 - Script

The default is 3 - Script.

The default determines what happens when you access a page like NonMethodPage.wwd for example, where there is no matching method in the Process class. If there is no NonMethodPage method in the class, Web Connection falls back to the default nPageScriptMode to decide what to do with the script. In this case, wwd will be passed to the default nPageScriptMode which is 3 - Script which compiles the script into a small PRG/FXP and it runs.

Handling more than one nPageScriptMode

So I just said that there's only one default, right? And that is so, but... you can actually tweak the behavior by explicitly setting the nPageScriptMode based on parsing rules in your code.

If I wanted to have multiple script maps for a single process method I might set up wwd, wwds, wwdx extensions for templates, scripts and pages respectively.

I then have to make sure I route all of these extensions in my MyServer::Process():

CASE lcExtension == "WWD" OR lcExtension == "WWDS" OR lcExtension == "WWDX"
    DO wwDemo with THIS

actually this is enough if SET EXACT OFF as it is by default:

CASE lcExtension = "WWD"
    DO wwDemo with THIS

this makes sure all requests with these extensions are routed to my process class.

In the process class I can then handle the extension routing in the OnProcessInit():

FUNCTION OnProcessInit()

* ... other init code

lcExt = UPPER(JUSTEXT(this.oRequest.GetPhysicalPath()))
THIS.nPageScriptMode = 3
DO CASE 
   CASE lcExt == "WWD"
      this.nPageScriptMode = 1
   CASE lcExt == "WWDS"
      this.nPageScriptMode = 3
   CASE lcExt == "WWDX"
      this.nPageScriptMode = 2
ENDCASE

Because OnProcessInit() fires early in the process pipeline you can change the page scriptmode which is used in wwProcess::RouteRequest() to find the right handler. Checked this out and it works great using a single process class to route requests for each extension to the appropriate handler.

And voila - you can now handle wwd pages as templates, wwds pages as scripts and wwdx pages as Web Control Framework pages.

You can make the logic more complex as well and look at other parts of the request. Perhaps extensionless URLs or query strings etc. - you have full access to the Request object to do as you please to figure out what gets routed where.

It's a cool little trick for your Web Connection applications.

this post created with Markdown Monster
Viewing all 133 articles
Browse latest View live