Quantcast
Channel: Rick Strahl's FoxPro and Web Connection Weblog
Viewing all 133 articles
Browse latest View live

Web Connection 7.02 has been released

$
0
0

I'm happy to announce that I've released v7.02 of West Wind Web Connection today. This is primarily a maintenance release that fixes a few small issues that have cropped since the initial 7.0 release, but there are also quite a few new enhancements and small new features.

You can find Shareware version of Web Connection here:

If you are a registered user, you should have gotten an email late last week with a download link. I've made a few more small fixes to the release since then, so if you downloaded last week or over the weekend you might want to re-download the latest bits using the same info from the update email.

Updating to Version 7.02

This release is not a major update and there is only one small breaking change due to a file consolidation. This is first and foremost a maintenance update for the huge 7.0 release, but if you're running 7.0 you should definitely update for the bug fixes.

Updates are easy and can simply install on top of an existing version, or you can install multiple versions side by side and simply adjust your specific project's path to the appropriate version folders.

Bug Fixes

First and foremost this release is a maintenance release that fixes a few small but annoying bugs in a number of different aspects of Web Connection. Version 7.0 was a huge drop of new functionality and processes in Web Connection and there were a few small issues that needed fixing as is usually the case when there is a major release.

A huge shoutout to Mike McDonald who found and reported quite a few small bugs and posted them on the message board. Mike went above and beyond apparently poking around the Web Connection code base to dig up a few obscure (and a few more serious ones) which have now been fixed. Thanks Mike!

Setup Improvements

The primary focus of Version 7.x has been to make the development and deployment process of Web Connection easier and the 7.02 continues this focus with a number of Setup and Getting Started related enhancements.

Web Connection now generates a launch.prg file for new projects and ships with a launch.prg for the sample project. This file is a one stop start mechanism for your application, launching both the Web Connection server during development and the Web Browser. This PRG file also contains the default environment setup (Paths back to the Web Connection installation basically) to make it drop dead easy to run your applications. The file can start either a full local IIS Web Server or launch IIS Express.

To launch with IIS or Apache:

do launch

to launch IIS Express:

do launch with .t.

The main reason for this file is to make it easier for first time users to make it easier to check out their application. It's also a great way to start your application for the first time after a cold FoxPro start and to ensure that the FoxPro environment is set up properly. The file can be customized too - for example you can add additional path and environment settings that you need for your setup, and you can change the startup path to a page that you are actively developing for quickly jumping into areas you are working on.

There are also improvements in the BrowserSync functionality to automatically refresh Web pages when you make changes to the Web content files. This was introduced in v7.0 and the default template has been improved for more reliable operation.

The Setup now also explicitly prompts for IIS or IIS Express setup when installing to remind people explicitly that a Web Server has to be installed before Web Connection is installed.

I've also spent quite a bit of time updating the Getting Started documentation to reflect some of these changes so the Setup docs, and the Getting Started tutorial all are updated for easier usage.

Updated Sample Applications

The West Wind Message Board and WebLog applications are fully functional sample applications that are in use on the West Wind site. Both have been updated to MVC Style scripting application from their original WebControl bases. The Message Board was updated for v7.0 and there have been a number of additional enhancements including a few nice editor updates, much better image compression on uploaded images and search enhancements. The WebLog has been completely reworked and simplified to MVC style scripts for the application.

The Message Board is available as an installable sample application on Github while the WebLog sample ships in the box with Web Connection as before.

New wwDynamic Class

There's also new useful feature in the form of a wwDynamic Class which lets you dynamically create a FoxPro class, simply by adding properties to it. This is similiar to using the FoxPro EMPTY class with ADDPROPERTY(), except you don't actually have to use that cumbersome syntax. The class also supports an AddProperty() method that can automatically set up the special character casing required for JSON Serialization. The .AddProperty() of the class automatically creates a _PropertyOverrides property that is utilized during JSON serialization to handle proper casing instead of the lower case default used otherwise.

Here's an example of using the wwDynamic class to create a type 'on the fly':

*** Extend an existing object
loCust = CREATEOBJECT("cCustomer")
loItem = CREATEOBJECT("wwDynamic",loCust)

*** Alternately you create a new object (EMPTY class) 
* loItem = CREATEOBJECT("wwDynamic")

loItem.Bogus = "This is bogus"
loItem.Entered = DATETIME()

? loItem.Bogus
? loItem.Entered

loItem.oChild.Bogus = "Child Bogus"
loItem.oChild.Entered = DATETIME()

? loItem.oChild.Bogus
? loItem.oChild.Entered

*** Access original cCustomer props
? loItem.cFirstName
? loItem.cLastName
? loItem.GetFullName()

For properly typed names with casing left intact for JSON Serialization .AddProperty() can be used:

loMessage = CREATEOBJECT("wwDynamic")
loMessage.AddProp("Sid", "")
loMessage.AddProp("DateCreated", DATETIME())
loMessage.AddProp("DateUpdated", DATETIME())
loMessage.AddProp("DateSent",DATETIME())
loMessage.AddProp("AccountSid","")
loMessage.AddProp("ApiVersion","")

* "Sid,DateCreated,DateUpdated,DateSent,AccountSid,ApiVersion"
? loMessage.__PropertyNameOverrides 

? loMessage.DateCreated
? loMessage.DateUpdated

loSer = CREATEOBJECT("wwJsonSerializer")
loSer.
loSer.Serialize(loMessage) && produces properly cased property names

Note I got the idea of this from Marco Plaza on the Universal Thread who came up with this idea and provides a library with a slightly different implementation that is a little more verbose, but provides a more pure data implementation. wwDynamic takes a more pragmatic approach that focuses on the ease of use in code, but there are a couple of edge cases due to FoxPro's weird handling of a few reserved property names.

A few wwHttp Enhancements

There are also a couple of enhancements in wwHttp. The first is some additional control over file uploads by adding some additional parameters to .AddPostKey() when posting multi-part form variables and specifically files.

.AddPostKey() now supports additional tcContentType and tcExtraHeaders parameters that allow you to specify a content type and additional Mime headers to the content. Extra headers are added as self-contained lines. Files now also add a content-length header to the attached file.

loHttp = CREATEOBJECT("wwHttp")
loHttp.nHttpPostMode = 2  && multi-part
loHttp.AddPostKey("txtNotes","Image of a wave")

*** Add content type and 
loHttp.AddPostKey("File",".\wave.jpg",.T.,"image/jpeg","x-file-id: 451a423df")

lcResult = loHttp.Post(lcUrl)

The wwHttp class now also adds new explicit methods for .Get(), .Post(),.Put() and .Delete(). These are simply wrappers around the existing .HttpGet() that set the `cHttpVerb

New wwUtils Path Functions that support Proper Case Paths

Added several new methods the wwUtils library that deal with returning filenames with proper paths. FoxPro's native path functions have the nasty habit of mangling paths to upper case, and in several applications this has caused me a number of issues with paths getting embedded with non-matching case. This can be problematic for Web Content that might end up on a case sensitive Linux server.

There's are now GetFullPath(), GetRelativePath(), OpenFileDialog() and SaveFileDialog() functions that all return paths in the proper case from files located or created on disk.

The OpenFileDialog() and SaveFileDialog() functions provide Windows File Open and File Save dialogs using the .NET file dialogs. All of the new methods use .NET code to provide the properly cased paths.

Interesting that it is so hard to translate paths into properly cased paths in Windows. I noodled around with various Windows API calls but it turns out they all have a few odd quirks that make them not work reliably especially for figuring out a relative path.

In the end the easiest solution was to call into .NET and rely on a combination of Path and URL helper system calls to provide the functionality here. Even the .NET code is not as straight forward as it could be. For me this was a requirement for a documentation application I've been working on for a customer where generated HTML output image links had to exactly match the and pathnames on disk. This also fixes a similar issue for me in Html Help Builder where traditionally paths were embedded as all lower case.

All Web Connection Binaries are now Signed

All Web Connection Binaries that are shipped - the setup and console exes, all dlls and the setup self-extracting package - are now properly signed with a digital certificate to verify the authenticity of the binaries as coming from West Wind Technologies. The signed exes should help with reducing nasty warning messages from Windows and SmartScreen and provide a nicer, less scary elevation prompt that also displays the West Wind source of the code instead of an anonymous binary name.

Summary

As you can see there's quite a bit of new stuff in this small point release. Behind the scenes Web Connection now also has a more reliable build process to compile each release, which has traditionally been very time consuming to me because of all the varied pieces pulled in. This release is the first that uses a fully automated end to end build process that completes in about 20 seconds. It won't make it quicker to fix errors and add new features, but it will make it much easier to release updates if we should find a breaking issue. Plan on seeing more frequent releases with smaller amount of changes in the future.

Check it out and as always please post any issues that you might run into on the Message Board.

See you there...

this post created and published with Markdown Monster

API Declarations in Performance Sensitive FoxPro Code

$
0
0

Visual FoxPro has good support for interfacing with API interfaces by using the DECLARE API keyword that lets you essentially map a function in Win32 DLL and map it a FoxPro callable function.

The good news is that you can a) do this and b) that it's very efficient. FoxPro's interface mechanism to the DLL call once it's registered is very quick.

Call your DLLs right

When you make API calls in FoxPro it's basically a two step process:

  • Declare your API and map it to a FoxPro function
  • Call the mapped function

Personally I tend to almost always abstract API calls into separate FoxPro functions that abstract away the API-ness of the function:

FUNCTION WinApi_SendMessage(lnHwnd,lnMsg,lnWParam,lnLParam)

DECLARE integer SendMessage IN WIN32API ;
        integer hWnd,integer Msg,;
        integer wParam,;
        Integer lParam

RETURN SendMessage(lnHwnd,lnMsg,lnWParam,lnLParam)
ENDFUNC 

to make it easier to call this code from FoxPro directly. It works fine this way but if you are calling APIs that are frequently called in quick succession you may find that performance is not all that great.

A Real World Example

Recently Christof Wollenhaupt posted a Windows API based implementation of various Hash encryption routines called FoxCryptoNg that don't require any external libraries using all native Windows APIs. You can check out the code here.

If you look at the code you see there's a DeclareApiFunction section that declares a number of APIs and originally his code would call the DeclareApiFunctions() method for each hash operation.

I checked out the code and ran some tests for performance (not really sure why) comparing it with the routines that I use in the wwEncryption class in the West Wind Client Tools and Web Connection.

When running the tests initially - when the declare APIs were called for each method call - the performance was abysmal. So much so that I filed an issue on Github.

The issue basically compares the function vs. the wwEncryption class. Running a test of a 1000 SHA56 hash encodings was taking over 15 seconds with foxCryptong class vs. under a second with the .NET based routines in wwEncryption.

Christof eventually responded and tracked down the performance to the API declarations. By changing is code to declare the declaration in the Init() instead of in each method performance ended up then being actually a little faster than the .NET based approach.

Watch your Declarations

So the code to get a went from:

Procedure Hash_SHA256 (tcData)
	Local lcHash
	DeclareApiFunctions()
	lcHash = This.HashData ("SHA256", m.tcData)
Return m.lcHash

taking over 15 seconds for 1000 hashes

to:

Procedure Init()
	DeclareApiFunctions()
EndProc

Procedure Hash_SHA256 (tcData)
	Local lcHash
	lcHash = This.HashData ("SHA256", m.tcData)
Return m.lcHash

to 0.7 seconds.

Whoa hold on there hoss - that's more than 20 times faster!!!

The moral of the story is that API calls are fast, but declarations are not!

The reason for this is that FoxPro's API functionality has to look up these API functions in the Windows libraries. It has to look up the function in these rather large libraries, verify the function signature and then provide a mapping to the FoxPro function that can be called from FoxPro code. That setup takes time and that's exactly what we're seeing here in terms of performance.

Bottom Line: For high traffic API calls - separate your API declaration from your API call!

Christof's solution was to simply move the declaration to the Init() which is fair. But as he points out in his response there's the possibility that somebody calls CLEAR DLLS at some point which would lose the declarations and the API calls would then fail. I actually find that quite unlikely but hey - anything is possible. If you can fuck it up, somebody probably will. ??

Isolating API Call From Declaration

I had never really given this a lot of thought to performance of API calls, although implicitly I've always felt like API calls didn't run particularly fast. I never really tested but now I think that the perceived slowness may have simply been the declaration overhead. For most of my applications I use API declarations go with the call so I'm as culpable as Christof's code to performance issues.

For example here's one that actually gets called quite frequently in my code - calling one of my own DLLs - and probably could use DECLARE optimization.

************************************************************************
*  JsonString
****************************************
FUNCTION JsonString(lcValue)
DECLARE INTEGER JsonEncodeString IN wwipstuff.dll string  json,string@  output
LOCAL lcOutput 
lcOutput = REPLICATE(CHR(0),LEN(lcValue) * 6 + 3)
lnPointer = JsonEncodeString(lcValue,@lcOutput)
RETURN WinApi_NullString(@lcOutput)
ENDFUNC
*   JsonString

Find High Traffic Methods and Separate

So there are a number of ways you can address the separation to cause declarations to be called just once.

Use a Class and DeclareApis style Initialization

Christof's solution of using a DeclareApis() function where you have all your declares in one place up front is a great solution if you are using a class. Why a class? Because it has a clear entry point that you can isolate and call with. A class is also a reference that you can easily hold onto after an individual call, and then reuse that class later to make additional calls.

Just to re-iterate to do this you'd create:

DEFINE Class ApiCaller as Custom

Procedure Init()
	DeclareApiFunctions()
EndProc

Procedure DoSomething(tcData)
	return ApiMethod(tcData)
EndProc

Procedure DeclareApiFunctions()
    DECLARE Integer ApiMethod In mydll.dll string
    DECLARE ...
EndProc

Static Declarations

The above approach works reasonably well but it may still end up calling the declarations many times because you may be instantiating the class multiple times.

Another approach I've found useful on high traffic APIs is to wrap them around a PUBLIC gate variable that checks if the API was previously declared.

So imagine I have this function (as I do in wwUtils.prg in various West Wind Tools):

FUNCTION JsonString(lcValue)

DECLARE INTEGER JsonEncodeString IN wwipstuff.dll string  json,string@  output
	__JsonEncodeStringAPI = .T.

LOCAL lcOutput 
lcOutput = REPLICATE(CHR(0),LEN(lcValue) * 6 + 3)
lnPointer = JsonEncodeString(lcValue,@lcOutput)
RETURN WinApi_NullString(@lcOutput)
ENDFUNC

Running the following test code:

DO wwutils
lnSeconds = SECONDS()
FOR lnX = 1 TO 100000
	lcJson = JsonString("Hello World")
	lcJson = JsonString("Goodbye World")
ENDFOR

lnSecs = SECONDS() - lnSeconds
? lnSecs

takes 15.2 seconds to run.

Now let's change this code with a Public gate variable definition that only declares it once:

FUNCTION JsonString(lcValue)

PUBLIC __JsonEncodeStringAPI
IF !__JsonEncodeStringAPI
	DECLARE INTEGER JsonEncodeString IN wwipstuff.dll string  json,string@  output
	__JsonEncodeStringAPI = .T.
ENDIF	

LOCAL lcOutput 
lcOutput = REPLICATE(CHR(0),LEN(lcValue) * 6 + 3)
lnPointer = JsonEncodeString(lcValue,@lcOutput)
RETURN WinApi_NullString(@lcOutput)
ENDFUNC

This now takes 0.72 seconds to run. That's more than 20x the performance!

This code is not pretty and it relies on a public variable, but it's undeniably efficient.

The way this works is that a public boolean variable is created. Initially this value is .F. because FoxPro variables declared or otherwise by default are always .F. when undefined. So the code checks for that and if .F. declares the API and also sets the PUBLIC variable to .T.. Next time through now the value of the public var is .T. and so the declare doesn't fire again. It's a little trick to have a 'singleton' code path at the expense of an extra PUBLIC variable.

Apply to Blocks of Declarations

You can apply the same technique to a larger set of API declarations that you might make in Init() or DeclareApis() type call. For example in wwAPI's init method I do the following now:

PUBLIC __wwApiDeclatationsAPI
IF !__wwApiDeclatationsAPI
	DECLARE INTEGER GetPrivateProfileString ;
	   IN WIN32API ;
	   STRING cSection,;
	   STRING cEntry,;
	   STRING cDefault,;
	   STRING @cRetVal,;
	   INTEGER nSize,;
	   STRING cFileName
	DECLARE INTEGER GetPrivateProfileSectionNames ;
	   IN WIN32API ;
	   STRING @lpzReturnBuffer,;
	   INTEGER nSize,;
	   STRING lpFileName 

	DECLARE INTEGER WritePrivateProfileString ;
	      IN WIN32API ;
	      STRING cSection,STRING cEntry,STRING cValue,;
	      STRING cFileName     

	DECLARE INTEGER GetCurrentThread ;
	   IN WIN32API 
	   
	DECLARE INTEGER GetThreadPriority ;
	   IN WIN32API ;
	   INTEGER tnThreadHandle

	DECLARE INTEGER SetThreadPriority ;
	   IN WIN32API ;
	   INTEGER tnThreadHandle,;
	   INTEGER tnPriority

	*** Open Registry Key
	DECLARE INTEGER RegOpenKey ;
	        IN Win32API ;
	        INTEGER nHKey,;
	        STRING cSubKey,;
	        INTEGER @nHandle

	*** Create a new Key
	DECLARE Integer RegCreateKey ;
	        IN Win32API ;
	        INTEGER nHKey,;
	        STRING cSubKey,;
	        INTEGER @nHandle

	*** Close an open Key
	DECLARE Integer RegCloseKey ;
	        IN Win32API ;
	        INTEGER nHKey
	  
	DECLARE INTEGER CoCreateGuid ;
	  IN Ole32.dll ;
	  STRING @lcGUIDStruc
	  
	DECLARE INTEGER StringFromGUID2 ;
	  IN Ole32.dll ;
	  STRING cGUIDStruc, ;
	  STRING @cGUID, ;
	  LONG nSize
	__wwApiDeclatationsAPI  = .T.
ENDIF
    
ENDFUNC
* Init

which loads all those API declarations only once.

This is a neat trick that I've applied to a few key APIs that are in heavy use in Web Connection recently to see a nice speed bump for a few common operations for the trade off of a few extra PUBLIC boolean variables bumping around in memory which is a small price to pay for the slight performance gain.

Caveat: CLEAR DLLS can break this!

Both of these approaches - per declaration or per block - do come with a Caveat: It is possible for some other code to do CLEAR DLLS and that will break subsequent API calls because the DLLS unload but the variable stays set.

Not for Every API Call

To be clear you don't need to do this for every API call. There's no need to do this say for this API call:

FUNCTION WinApi_Sleep(lnMilliSecs, llWithDoEvents)
LOCAL lnX, lnBlocks

lnMillisecs=IIF(type("lnMillisecs")="N",lnMillisecs,0)

DECLARE Sleep ;
  IN WIN32API ;
  INTEGER nMillisecs

IF !llWithDoEvents OR lnMillisecs < 200   
   Sleep(lnMilliSecs)    
   RETURN
ENDIF

*** Create 100ms DOEVENTS loop to keep UI active
lnBlocks = lnMilliSecs / 100
FOR lnX = 1 TO lnBlocks - 1 
   Sleep(100)
   DOEVENTS
ENDFOR

ENDFUNC

Watch for pre-mature Optimization

This is obviously an operation that's meant to be slow so need to speed it up. It also isn't necessary for UI related tasks, or basically anything that needs to be called only occasionally. It's only for things that are used on the critical path and especially operations that might occur in a tight loop or many times.

The previous examples of JsonString is a good example - that method is called quite frequently when serializing objects. An array or collection may have hundreds of objects when many string properties for example and there it makes a big difference.

Likewise in Web Connection there's a UrlDecode() function that calls into wwIPStuff.dll to decode larger strings. For large input forms in a Web application that method may be called 100 times successively and again that does end up making a difference.

So choose wisely.

Summary

API calls are one of the earliest Interop features in the FoxPro language and they provide a powerful and potentially fast interface to external functionality in Win32 DLL code.

Just remember that Declaring your API may have significantly more overhead than actually calling it so for critical path operations either declare the API up front or use the gate-keeper trick I showed above to bracket the code and load the declarations only once for the lifetime of the application.

Deploying and Configuring West Wind Web Connection Applications

$
0
0

So, you've built your shiny new Web Connection Application on your local machine for development and you're proud of what you've accomplished. Now it's time to take that local masterpiece and get it online: Ship it!

How do you do this?

In this long article I'll take you to the process of creating a small placeholder application and deploy it to a live server on a hosted service called Vultr which provides low cost, and high performance virtual machine services that are ideal of hosting a Web Connection site.

I'll use a brand new, virgin Virtual Machine of Windows Server 2016 and configure it from scratch by installing base applications on the server, configuring IIS, and uploading and installing a new Web Connection application.

Here's what we'll cover:

  • Creating a new Web Connection project
  • Customizing the project slightly for a custom ‘application’
  • Setting up a Vultr Virtual Machine Windows Server
  • Configure the Windows Server
    • Install Server Base Applications (editor, browser, tools)
    • Install IIS
    • Install FoxPro
  • Package the Web Connection Project
  • Upload the project
  • Set up the project on the server
  • Test the application
  • Install a free TLS Certificate for HTTPS
  • Make code changes and update the server

Creating new Applications - Projects Organize your Application

Starting with Web Connection 6.0 the process of creating a new application has been made much more consistent through a way of organizing a project into a well-known folder structure. The idea is to recognize what most projects are made up of:

  • Code and/or Binary files
  • Web content
  • Data

The Web Connection new project structure creates a single top level folder, with subfolders for Deploy (code and binaries), Web and Data. The Deploy folder then also contains the Temp folder where message files and logs are stored. All of this boils down to a known and repeatable set of locations so that a generic installer can properly configure a Web application more easily.

To demonstrate lets create a brand new Web Connection application called ‘Publishing’. I won't put any logic into this project other than making a few text and text based code changes - it'll be a stock Web Connection project - that's all we need and it'll make for a small project to distribute to boot.

Creating a new Web Connection Project

Create the new project by typing DO Console in FoxPro as an Administrator.

I chose the name for the project and the Process class as Publishing and PublishingProcess respectively. Note I use IIS Express here locally so I don't have to install anything.

I use the default to create the project in the WebConnectionProjects folder, but you can really put this project anywhere. I also set up a script map for the .pb extensions so I can access requests with .pb and map them to Web Connection handlers.

Finally I publish the project as a Web project and let 'er rip. If all is working you should now have a running Web Connection Server and loading the placeholder home page:

Notice that Web Connection 7.0 and later now has a simple startup process launcher that automatically starts the application with DO Launch or Launch(). The installer runs this automatically, but when you restart the application you'll have to run Launch() or Launch("IISExpress") from the command window.

This does the following:

  • Launches the Web Server if required (IIS Express in this case)
  • Launches the Web Connection Server
  • Opens a Web Browser on the default URL (http://localhost:7000 for IIS Express)

You should be able to click around the Web page to access the sample links at this point.

We have a running application. Yay!

Making a couple of small Changes

Just so we can see something a little custom, lets change the two sample links. To show off some of the new features in Web Connection 7.0 lets highlight site editing and Live Reload functionality.

If you have Visual Studio Code installed you can click on the Edit button and open your new site in VS Code. Code is a great light weight cross platform text editor with support for tons of languages including FoxPro. The editor command is configurable in Publishing.ini and it defaults to open VS Code in the project root, which gives access to both the Deploy and Web folders

  • Deploy
    Holds all your FoxPro Source code and ‘server’ resources and your project's configuration file (ie. YourProject.ini).

  • Web
    Holds all your Web files (templates, html, css, js etc.) as well as web.config which configures the Web Connection Web settings for IIS and Web Connection

Enabling Live Reload

A new feature in Web Conection 7.0 is live reload which lets open your Web page, and when you make a change to any Web files, or source code (outside of FoxPro's editor say from VS Code), the code is updated and the browser auto-refreshes. So, when you make a change you see that change immediately reflected in the browser.

Ch…, Ch…, Changes

Let's make some changes. Let's open the web/default.htm page and change the headline. Position the Web Browser and Editor so you can see both. Then go in the editor and change the Feature Samples header text to Web Connection Deployment Demo. If you pay attention you'll see that as soon as you save the change to disk, the Web Page shows the new header! The same works if you make changes to a CSS or JS file.

We can also make changes to Web Connection templates. Open web/HelloScript.pb page which is the second test link. You probably want to add the syntax in VS Code, by clicking on the language drop down in the lower right of VS Code's status bar and choose HTML. Again make a change to the header and chage it from the Hello World text to Ready to Deploy Application.

Finally we can even make code changes and see those reflected. Open deploy/publishingProcess.prg and change the StandardPage() header in the TestPage() method to read Hello from FoxPro Publish Project. Save and notice that the FoxPro server shuts down and restarts itself, and then refreshes the Web page to show the new text.

This is a new feature that is very productive.

Important

Make sure you turn Live Reload off for production applications as this feature has some overhead. This feature requires IIS 10 or later (Server 2012 R2 /Windows 10 or later or IIS Express 10).

So now we have an updated ‘application’ that has a few customization. Although this obviously an extremely simple application, it serves nicely to demonstrate the deployment process as it's small and quick to send up to the server as we'll do several times for this demonstration.

Ready to Publish

Ok - so we've made some changes to our project to have a highly, highly customized Web Server we can publish to a brand new Web Server machine. ??

Build an EXE

Generally I like to run my application during development using just the PRG Files. I launch with DO PublishingMain.prg (or have it launch through the new launch.prg). Once I'm ready to deploy however, I have to compile the project into an EXE that can be deployed to the server.

Admin Rights Required for Compilation

Note you need to be an Administrator to compile the project as the project contains a COM component which has to be registered. COM objects require Admin rights for registration.

Test your Server in File and COM Modes

Beyond that you should test your server as it would be run on the server:

  • Turn off Debug Mode
  • Run the EXE from Explorer
  • Or: Invoke the COM Object

If you're running as a COM object, before anything test by instantiating the COM server like this in VFP:

o = CREATEOBJECT("Publishing.PublishingServer")
? o.ProcessHit("query_string=wwMaint~FastHit"))

This fires a test request against the server. You can also access a specific page as a GET request with:

? o.ProcessHit("physical_path=Testpage.pb")

You can use ShowText() or ShowHtml() in wwUtils.prg to display the content if it's long.

Run the Application as an EXE or COM Object Locally

Once that works next run your application using the EXE or the COM object. In theory this should just work because you're running the same application in exactly the same environment so other than the packaging an EXE is no different than running inside of the FoxPro IDE.

Switching to COM can be done on the Admin Page.

On this page you can toggle Web Connection between File and COM Mode. Here I've switched into COM mode:

When Web Connection compiles it locally registers the server for the INTERACTIVE user so servers can show on the desktop. Note that standard COM registration will not do this and simply inherit the IIS account that is running the Application Pool.

You'll want to test your application now running in COM mode as well as file mode as an EXE and ensure the app runs as you'd expect locally.

If the app doesn't run locally, it sure won't run on the Web Server either, so make sure it all works before you send it up to the server.

Debugging is a lot easier locally than on a remote Web server!

Understanding the Project Layout

So at this point you should have a project that works and runs. The next step is to package up everything into something you can install on the new server.

Let's review a new project layout.

Root Folder

The root folder of the project contains administration files. IIS Installation, a build.bat you can use to package files and a link to locally start FoxPro in the deploy folder.

Deploy Folder: Source Files and Binaries

The deploy folder is your FoxPro folder - this is where you code goes as well as the compiled binary of your application (the EXE). The folder also holds Web Connection support DLLs that need to be deployed to the Web server.

When you deploy this folder only the binary files are picked up - source code files are ignored.

Web Folder: Web Resources

The Web Folder holds all your Web resources which are Web Connection Scripts and Templates, HTML, CSS and JavaScript files, images and anything else that your Web application needs to run.

Packaging up Everything: Build.bat

To help with getting everything ready for a first time deploy when you basically need to move everything to the Web server, Web Connection 6.5 and later provides a build.bat in the root folder which creates a ZIP file of all the files required to run your application.

You can run it by double clicking on the folder which produces a new Build directory which contains all the copied files and a zip file of everything.

You're now ready to take that publish file to your server.

But before we can do that we need to configure the server and get it ready for running as a Web Server.

Setting up a New Virtual Server

I'm going to use a brand new Virtual Server on Vultr which is the hosting company I use to host my own Web sites. Vultr is very reasonably priced (especially compared to Azure and AWS), and provides high performance hardware for the prices they charge. Vultr is a plain VPS provider meaning they provide virtual and physical servers, storage space but little else in the way of services. If you need support services, like extra storage, hosted SQL or NoSQL solutions, then you need to look into more complete services like Azure or AWS. But if all you want is to create a Virtual Server to host in the cloud, then you'll be hard pressed to beat the value that Vultr provides. I spent a lot of time looking around for a good Windows hosting service, and Vultr is what I ended up with.

I can spin up a new Vultr VPS server in about 10 minutes and I've done so for this demonstration.

This is what I think is the minimum hosting set up you should use for a Web Connection application which is:

  • 2 cores (never use a single core setup!)
  • 4gb of RAM
  • 80gb of Disk Space
  • Windows Server 2016

This setup costs $40/month and includes the Windows Server license. I use an older version of this package for hosting my Web Server and that site runs 20+ sites, SQL Server, MongoDb. This hardware goes a long way and it's very fast for all of my Web sites. The biggest limitation on this package is the disk space. 80gb is not a lot when you figture the Windows footprint (my old package is more expensive but includes more disk space). The next step up is $70 for 4 cores, 16gb RAM and 160gb of storage which is totally worth it if you need it.

Remember these specs are for VPS servers which doesn't reliably compare to ‘real’ processors, but I found that Vultr is much closer than Azure or Amazon in performance to what I would expect in a physical setup of these specs. And on either of those platforms you'd pay at least twice as much for lesser VPS hardware.

Remote Desktop for Server Setup

Vultr sets up a new virtual Server which is basically base Windows Server 2016 installation. The first thing we need to do is use Remote Desktop into the new server and start configuring it.

Create a new User

The first rule for a new server is: Don't use the Administrator account. Instead the first thing you should do is create a new user and add it to the Administrators group then log on and use only that account.

You can then disable the Administrator account. This reduces your attack surface machine as most attacks start with the Administrator account.

Install Required Software

Next up there are a number of bits of software that are needed. I highly recommend you use Chocolatey for this. Chocolatey is a package manager for Windows that allows you quickly install common tools and applications for Windows silently from the commandline. You install Chocolatey which is an application that sits in your global path and lets you execute chocolately commands.

To install Chocolatey you can run a single Powershell command:

Set-ExecutionPolicy Bypass -Scope Process -Force; iex ((New-Object System.Net.WebClient).DownloadString('https://chocolatey.org/install.ps1'))

Once it's installed you can install software from the command line - silently. For example:

choco install vscode
choco install GoogleChrome

So steps are:

  • Install Chocolatey
  • Run a Chocolatey script to install tools
    • VS Code Editor (or another editor of choice)
    • A decent Browser (Chrome or Firefox or Edgium)
    • 7zip
    • FileZilla FTP Client
    • FileZilla FTP Server (if you need to upload files)
  • Install IIS using script
  • Install Visual FoxPro Runtimes (or full IDE)
  • Install FoxPro SP2 (if installing IDE)

I've provided scripts for all these tasks in the Github Repository for this session with the exception of the FoxPro installation. I tend to store scripts like these in an \admin folder off the root of the server.

The IIS install Script ships with Web Connection. The others are custom scripts I use and am sharing here - make sure you check them before running to add or remove those that don't fit your environment. You can find more things to install on the Chocolatey site search.

Install Chocolatey

Once installed you should shut down Powershell and restart it. Once installed you can now easily install any of Chocolatey's packages. On the server there are a few things that I consider ABSOLUTELY necessary:

# Don't prompt for installations
choco feature enable -n allowGlobalConfirmation

# Remove the annoying UAC prompts on Server
choco install disableuac    

# Install essential Apps
choco install GoogleChrome
choco install vscode
choco install 7zip.install
choco install curl
choco install filezilla
choco install git
choco install tortoisegit
choco install xplorer2
choco install procexp

You can check Chocolatey for additional things you might need on the server - there are hundreds of tools and applications and even full software to install from there.

Install IIS

Next you need to install IIS on the server. Windows Server makes this a royal pain in the butt with it's user-hostile Roles and Features interface.

Luckily you can sidestep that mess, and use a Powershell script instead.

Web Connection ships with an Install-IIS-Features.ps1 script that installs all the required components needed to run a Web Connection application. You can go to your local machine and copy that script to the clipboard, then create a new Powershell file called Install-Iis-Features.ps1 and run it as an Administrator.

Keep an eye on the script execution and look for errors. This script takes a while to run (about 5 minutes or so on my new Virtual Machine server).

Install Web Deploy

Web Deploy is an IIS plug-in that allows you to deploy IIS from other machines using the MsDeploy tool. MSDeploy is integrated into Visual Studio and I'll use that to publish the site to IIS.

The IIS Script includes the Chocolatey code to also install WebDeploy as well as UrlRewrite which is another add-on module for IIS. The default script has these commented out because they use Chocolatey and so may fail if it's not installed. Un-comment them before running the script or if you forgot execute them one at a time after the IIS install is complete:

choco install WebDeploy
choso install UrlRewrite

Alternately install an FTP Server to push Files

If you don't want to use Visual Studio and Web Deploy, then you should probably install an FTP server. FileZilla Server works great and is easy to use. Whatever you do, don't use the IIS FTP server - it's terrible.

Once installed you can then use use an FTP client to copy files from your local machine to the Web server, but the process is more manual than with WebDeploy which does incremental updates.

Setting up your Web Connection Application

The server is now ready. Now we need two more steps before we can get the site to run:

  • Copy the packaged Build files to the server
  • Configure the Web Connection Web Site

Copying Files

Now that the server is configured and ready to go - all we need to do now is get our Web site over to it.

There are a few ways to do this:

  • Remote Desktop Drive Mapping to Local Drive
  • Visual Studio Publish
  • Using an FTP Server

The easiest here is the Remote Desktop File sharing and while that works it's infuriatingly slow, but it works and that's what I'll use here. I'll also show using Web Deploy and Visual Studio publishing later to update Web resources.

Now create a new folder structure into which to unpack the files. It can be anywhere - personally I like to use the same structure as I had on my client install so I'll put it in:

c:\webconnectionprojects\publishing

This should match the structure of your local files.

Create the IIS Web Site

This is the only manual configuration step - we need a Web site which can be configured for Web Connection.

So create a new Web Site. Open the IIS Manager:

Then create the Site by pointing it at the web folder of the Publishing project:

Note that I have to set a hostname for host header binding so that multiple sites can share port 80 on the server. I'm going to set up publishing.west-wind.com with my DNS provider at DnSimple, mapping the Vultr IP address to an A DNS record. This is necessary so the site can be accessed remotely on a shared port 80 with a custom domain name.

If you do this after initial creation you'll need to jump into the IIS Site's Bindings.

Application Pool Configuration

IIS Web sites run inside of an Application Pool and that application Pool needs to be configured. While Web Connection can create a new application pool for a new virtual, for root Web sites, the site has to be created first and an Application Pool has to be associated with it.

This means for a new Web site, we have to manually configure the Application Pool.The Application Pool is the IIS host process for the application and it determines the environment in which the Web Connection server runs.

The only setting that really needs to be set is the Identity - or the user account - that the Application Pool runs under. By default this will be set to ApplicationPool Identity and you definitely do not want to run with this account as it has no rights to access the file system or anything else on the machine. It's also difficult to set permissions on resources for this account because it doesn't show up on the permissions UI.

So to fix this, go to Application Pools and open the publishing.west-wind.com Pool:

Find Identity - by default this is set ApplicationPool Identity and change it to another account. LocalSystem, NetworkService, or a specific user account work here, but make sure that that account has sufficient rights in the folders.

I recommend starting with LocalSystem to start, as it has full permissions on the local machine. Make sure you get your app running first, and once it's up and running and working, you can dial back the security with a specific account that you give the exact rights required to run the application.

In addition, I also recommend setting the Enable 32-bit Applications, which runs your Application Pool in 32 bit mode. Although 64 bit will work running Web Connection in 64 bit mode has no benefits at all and requires extra overhead in the COM calls made when running in COM mode. Additionally, 32 bit generally has lower memory requirements.

Configuring the Web Connection Web Site

Now that the site is up and configured, we still need to configure Web Connection so it's connected to this new Web Site.

To do this we can use the Configuration Feature in Web Connection. When you create a Web Connection server it has a built in Configuration script that can self configure itself for IIS by running the application with a CONFIG parameter from the Command Prompt.

But before you do that we need to apply the Site ID from above to the configuration settings which are stored in the app ini file - in publishing.ini:

[ServerConfig]
Virtual=
ScriptMaps=wc,wcs,md,pb
IISPath=IIS://localhost/w3svc/2/root

Note that I applied the SiteId of 2 in the IISPath before the /root. This ID is important and you can get it from the IIS Site list:

The ID ensures that our configuration run configures the correct Web Site.

Note I'm going to create a new Web site with the app running at the root of the site, so the Virtual is empty, meaning the site root is configured. The ScriptMaps let you specify each of the script map extensions to create in IIS - each of those extensions are routed to your Web Connection server. This should have been set up in the project originally and you likely don't have to change it, but if you need to you can add additional extensions here.

With the configuration set we can now run the CONFIG command and hook up our Web Connection server settings to IIS.

.\Publishing.exe CONFIG

This should take 10-20 seconds or so to run as the configuration creates the virtual, configures the Application Pool, creates the scriptmaps and sets file permissions.

Once that's done you should now have a functioning Web Connection server and Web site.

You can Re-Run this Script

This configuration script can be run multiple times on a server - it won't hurt anything and will simply rewrite the settings each time it runs. It's great if you need to move an application to a new location. Simply move and re-run the CONFIG script and you're ready to go again.

Testing the Site

At this point your Application should be ready to rock n' roll!

I recommend you start in file mode, so perhaps double check your web\web.config file and make sure that:

<add key="MessagingMechanism" value="File" />

Then go to the deploy folder and launch your main EXE - Publishing.exe in this case. This starts the file based Web Server.

Now navigate to your DNS location on the local machine - or any browser:

http://publishing.west-wind.com

Assuming DNS has resolved you should be able to get to the Default page now. If this is setup for the Default Web Site and there's only one you can also use localhost or the machine's IP Address to navigate instead of the host name.

When the default page comes up, click on the two sample links and you should see our custom headers in the application.

Yay! Success.

Now, go to the Administration page at:

http://publishing.west-wind.com/admin/admin.aspx
* no you won't have access to mine at this address

Then to Web Connection Module Administration and File ? Switch to toggle into COM mode. Go back to the home page and hit those two links again and if all goes well the application should still work the same as in file mode.

Hoorah again!

Create a Free TLS Certificate with LetsEncrypt

You may notice in the picture above that Chrome is complaining that the site is Not secure. This is because the site is running without HTTPS - there's no Server Certificate installed. In order to make the link display less scary, you need to install a TLS certificate so the site can run over HTTPS.

A few years ago LetsEncrypt - an consortium of various Internet Service Providers - created a certificate authority not beholden to a commercial company with the goal to provide free SSL/TLS certificates. It was a huge success, and LetEncrypt is now serving billions of certificates. This organization which is supported solely through donations and sponsorships not only has made certificates free, but also provided the tools that make it possible to completely automate the process of installing and renewing certificates.

Using these tools it literally takes two minutes or less to create a certificate and install it in IIS including a setup that auto-renews the certificate when it expires in 90 days or so.

On Windows there's an easy to use tool called Win-Acme that makes this process trivially simple via a command line tool.

Download the tool and copy the files into a location of your choice. I use \utl\LetsEncrypt. Open a command window in that location and run .\wacs.exe to bring up the command line based interface.

It literally takes only a few prompts and you're ready to go with a new certificate.

Select:

  • New Certificate
  • Single Binding of an IIS Web Site
  • Pick your new Web Site
  • Agree to the terms

Let it 'er rip - and you're done! Yup that's it. Then navigate to your site via SSL.

https://publishing.west-wind.com

After you've installed a certificate we can now navigate to the site over https:// and get a less scary browser bar:

Certificates installed this way by default are automatically renewed after 90 days. Note that certificates are shorter lived, but with the auto-renewal is relatively painless to renew more often because it happens automatically.

Updating your Server and Maintenance

Once you've uploaded your site and got it all running, you're invariably going to want to change something about the site whether it's HTML content, or the actual compiled code.

Updating Web Content

There are a number of ways you can update content obviously.

  • Visual Studio Web Deploy for Site, or individual Files
  • Manual FTP of Files
  • RDP file copy (too slow to be used on a regular basis)

Visual Studio and Web Deploy

I like to use Visual Studio proper along with its Web Deploy features, because it's directly integrated into Visual Studio and super easy to push up either individual files or the entire site.

You can view Web Connection Web projects quite nicely in Visual Studio using the Web Site Projects. This is an old project type so it's a bit out of the way now.

Go to File ? Open ? Web Site which opens the site in Visual Studio. You can now edit files and make changes using Visual Studio.

When you're ready to publish or update files right click on the project node:

  • Select Publish Web Application
  • Publish to IIS
  • Fill in the info for the Dialog

Note that this requires WebDeploy which I installed as part of the IIS installation earlier. If WebDeploy is not installed on the server you're likely going to see long hangs and timeouts here.

Once set up you can now publish either the entire site, or individual files. Right click on the project to publish the full site, or right click on a file to publish just that file.

One really nice thing about this tool is that it is smart and compares what's on the server to what's on the client and only updates what's changed. Even if you publish the full site but only changed 1 or 2 files, only those files plus some meta data is sent to the server. This makes Web Publish very efficient and fast. I often publish individual files using the default hot key Alt-;-P which isn't very intuitive but because I use it so much I have muscle memory from it ??.

Using Web Deploy for Generic Files

You can also use WebDeploy to send up other files. For example, if it turns out you need new versions of the Web Connection support DLLs you can zip them up and upload them into the Web site temporarily. You can then RDP into the server pick up the zip file and swap ou the DLLs. The same works for any other resources files.

You can do pretty much the same thing if you have an FTP server installed and if you transfer lots of files to the server all the time a dedicated FTP server is more flexible than WebDeploy and it's close ties to Microsoft tools. FTP works with anything, but it's beyond the scope of this session to talk about setting up an FTP server.

Update your Server

Web Connection includes some tools that can let you automatically publish your updated EXE FoxPro Server by uploading it and efficiently hot-swapping it. You can do this without shutting down the Web Server.

The process is:

  • Update your EXE
  • Navigate to the Server Module Administration Page
  • Use Upload Server Exe to upload the EXE
  • Use Update Server Exe to hotswap the uploaded EXE

Here are the links on the Module Administration page for uploading and updating:

The process works by uploading a new server executable which is named on the server as YourExe_Update.exe extension and once uploaded then hotswapping

Click on Upload Server Exe to upload your new compiled EXE server to the server.

Once uploaded, click the Update Server Exe button to then hot-swap the server. This link will shut down all running server instances, put the server on hold so new requests start reloading the Web Connection server instances, and then copies the _Update.exe to actual server EXE. This routine also re-registers the COM object so if there are changes in the COM interface they are reflected in this update. All the servers are then restarted.

This process typically takes a couple of seconds, depending on how many server instances you have running and how fast they are to start up.

Automatic Updating via bld_yourProject

This manual process can also be automated directly from your FoxPro Web Connection project. When a new project is created Web Connection creates a custom PRG file that builds the Web Connection application into an EXE. Optionally you can pass a parameter of .t. to this function which causes it to build and then publish to the server.

Before you can do this you need to edit the generated bld_publishing.prg file and change the URLs for the online project. By default the URL points to localhost and you need to change this to point at the actual live, deployed site instead:

*** Server Update Urls - fix these to point at your production Server/Virtual
HTTP_UPLOADURL    =         "http://publishing.west-wind.com/UploadExe.wc"
HTTP_UPDATEURL 	  =         "http://publishing.west-wind.com/UpdateExe.wc"

Then you can now simple run:

DO bld_Publishing with .T.

You'll get prompted for username and password, and if a valid pair is entered your EXE file is uploaded and hotswapped on the server.

Summary

Alright - there you have it. We've gone from creating a new application, creating a brand new Vultr Virutal Machine, configuring it, setting up IIS and a new Web Site, doing a first time publish, configuration of the Web server, then installing the application and running the application. Finally we updated the application with a new version.

You've seen:

  • Setting up a Server 2012
  • Installing System Applications
  • Setting up IIS
  • Setting up a Web Site and Application Pool
  • Packaging your Application
  • Publishing your Application
  • Configuring your Application on the Server
  • Testing your Application
  • Running the application
  • Installing an SSL Certificate
  • Updating your Application Web files
  • Updating your Application Executable

Full circle. ?

You now have all you need to know to publish your Web Connection applications successfully.

Resources

Enhancing Web Applications with VueJs

$
0
0

prepared for:Southwest Fox 2019

Session Materials on GitHub

Web Frameworks come and go - frequently. VueJs is yet another Web Framework (YAWF), but I think you'll find that VueJs is a bit different than most other frameworks. Unlike most of its peers VueJs is not specific to building full featured client side SPA (Single Page Applications) which it supports, but it also addresses much simpler scenarios of enhancing existing simple HTML pages.

The focus of this article is on VueJs as a drop in JavaScript Framework that you can use in simple function HTML pages (rather than full featured SPAs) or in server generated HTML pages. Specifically I'll use West Wind Web Connection for my server side examples since it fits the FoxPro target audience of this paper, but the concepts really can be used with any kind of server framework - I use these concepts frequently with ASP.NET Core for example.

Framework Overload

So why use Vue? It is after all another framework and there are already tons of other frameworks out there.

I've used a number of JavaScript frameworks, and even though I have become a big fan VueJs, I tend to still use Angular as my primary framework to build full blown SPA applications. Vue also supports full blown SPA development with a full service Command Line Interface (CLI) and WebPack based build system for bundling, packaging and support tooling. A framework like Angular or Vue with the full build process in place, works well for complex SPA applications.

But you see, most of the big Web Frameworks are just that: Big and bulky. They require a large amount of bootstrap code just to load even a hello world application. More so, most require a complex build process that pulls in 100's of megabytes of dependencies, just to produce the final HTML output which often is also quite large (in the 100's of Kilobytes) especially for simple things.

If you're building a full featured, large Single Page Application front end for a complex enterprise application, that's perfectly fine. These build processes provide a number of other benefits such as automatically bundling and packing of resources, translating CSS from SCSS, LESS, provide tooling for testing and much more.

But it's overkill when you just want to drop a partial component into an existing page or add a small list of items into an existing static or server rendered HTML page. In fact, using a full SPA framework that's next to impossible to do effectively today (although Web Component proposals for many frameworks are aiming to change that some).

More Options with Vue

Where Vue really differentiates itself from other frameworks is that it can also easily be dropped into existing HTML pages using a single script reference, which allows Vue to be used more along the lines of how jQuery used to be dropped in to provide incremental enhancement to HTML pages.

Vue provides most of the functionality of other big frameworks that require full build processes, but with just a single, small (38kb compressed)script file library. It's actually slightly smaller than even jQuery. This means that with VueJs it's very easy to enhance existing static or server rendered HTML pages with easy JavaScript in much the same way that jQuery could be used in the past as a simple drop-in to any page. In fact, VueJs can take over many if not most of the features that jQuery used to provide using declarative programming and model design.

jQuery's Fall From Grace

Even though jQuery has fallen out of favor over the years in favor of bigger frameworks, it is still very useful especially for simple page processing. Many of jQuery's features have been co-opted directly by the HTML DOM, but there are still many, many useful helpers that come in handy as well as built-in AJAX callback functionality that's easy to use. Although there's much less need for jQuery in applications that use modern data binding, almost every application I built with client side code still benefits from jQuery. Out of favor? Maybe. But not down for the count? Not just yet!

Why use a a JavaScript Framework?

VueJs - like many of the other frameworks like Angular, React, Ember, Aurelia etc. - is a Model binding framework, that at it's heart provides an MVC/MVVM (Model View Controller, Model View ViewModel) data binding framework.

At the highest level all frameworks are based on a simple concept:

  • A JavaScript data model that describes the data to be bound
  • A template inside of HTML that describes how to render the data
  • Some bootstrapping code that binds the model to a template
  • Code that reacts to events and fires your JavaScript code

Implicit vs. Explicit

A framework like jQuery requires you to explicitly point at an element and read or write a value. A framework like VueJs instead implicitly updates your view when the model changes. So rather than assigning a value to a DOM object, you are updating a simple value in the model which then automatically updates the DOM based on the new value assigned to the model property. It's much simpler conceptually to update a simple value in code, than having to find and reference a DOM element for each update.

The end result of this implicit binding approach is that your code never (or very rarely) needs to directly talk to a DOM element. Instead it can just talk to the model, to affect changes on the DOM through the framework which handles the syncing of model to DOM.

Data Binding is the Key!

The key feature of VueJs and other frameworks is data binding, which actually can affect more than what you traditionally think of as data, such as display attributes and UI state. While you will always want to bind actual data values like a name, date or description, you may also want to bind state data such as whether an item is enabled or disabled, whether it's visible or whether it has a specific CSS class or style associated with it. All of this can be handled through the declarative HTML syntax inside of a VueJs HTML template.

Just like you can easily bind data to a ControlSource in FoxPro, VueJs allows you to bind data to an HTML element or its attributes. Unlike FoxPro though, the data binding in Vue is much more flexible as it allows you to bind to any property of each element. You can bind to the most common innerText, innerHTML and value elements of course, but you can also easily bind a title, class, style or disabled attribute. Essentially you can bind to any attribute that an element supports and bind to any event including custom user generated DOM events.

This is very powerful as it allows the framework to abstract the DOM away almost entirely. Rather than pushing data items individually into the DOM every time a value changes, you can simply set a property value on the model, and the framework takes care of updating the HTML DOM based on the template bindings on the page.

Event Binding

The other key feature is event binding. You can create methods on your model that you bind to the Dom and those methods can be triggered by events that the DOM fires. You can bind events like click, blur, change etc as well as any custom events you create on the DOM directly to methods on your model. Unlike classic event handlers these bindings are associated with your model and so make it easier to keep your code organized rather than creating random functions in your code.

Of course you can also call these methods on your model yourself directly. This means your model can describe your interaction and page logic both for internal (ie. you call your own methods as helpers) and event operation.

Additionally, methods in your model can also be used as binding expressions meaning you can use complex logic to easily to bind calculated or conditional values more easily using code. When bindings refresh these computed method bindings are refreshed also.

First look at Vue Syntax

To give you an idea what a Vue 'HTML template' along with the model binding code looks like here's a simple example of a list of items displayed with display and editable fields:

<!-- Template/View --><div id="todoApp"><h1>{{appName}}</h1><div class="todo-item"
     v-bind:class="{completed: todo.completed}"
     v-for="todo in todos" ><div class="todo-content" 
         v-on:click="toggleCompleted(todo)"><div class="todo-header"><div v-if="!todo.isEditing" >
                {{todo.title}}</div><div v-else><input type="text"  ref="todoTitle" 
                        v-model="todo.title"
                        class="todo-header inline-editor" /></div></div>                            <div v-if="!todo.isEditing" style="min-height: 25px;" >
            {{todo.description}}</div><div v-else><textarea v-model="todo.description"
                      class="inline-editor"></textarea></div></div></div></div><script>
// Model

// create the view model separately - more options this way
var vm = {
    appName: "Vue Todo List",
    todos: [ 
        { 
          title: "todo 1",
          description: "description",
          completed: false,
          isEditing: false
        },
        { ... },
        { ... }
    ],
    toggleEditMode: function(todo) { todo.isEditing = !todo.isEditing },  // ES5 syntax
    toggleCompleted: (todo)=> todo.completed = !todo.completed   // ES2016+ syntax (arrow function)
 }
// Initialization Code - bind the model to the template
var app = new Vue({
    el: '#todoApp',
    data: function() {
       return vm;  // bind the model to the view
    }
});<script>

Looking at the HTML and the Vue template syntax it should be pretty easy to discern what this page does, and that's part of the appeal of using a data binding framework. The templates look pretty much like normal HTML with some additional attributes and some {{expression}} binding expressions.

If you run this page here's what it looks like (with some added edit and remove buttons that I get to later):

It's a pretty simple page, yet there's a lot going on in this example actually. There's literally no code to update the DOM as all the rendering is taken care of by rendering data from the model (the vm instance). Even operations like changing the edit state of an item and displaying a completely separate view, or toggling the completed state are simply updating a model value (todo.completed = !todo.completed for example) that is then immediately reflected in the UI.

The Vue specific tags are those that start with v- like v-bind, v-model, v-if, v-else and so on. There are also special directives like the binding a v-bind:class or v-bind:style, where you can provide a class value to describe behavior like class names or styles.

The code to hook this up is also very simple - you create a model of data which typically is an object with properties and potentially nested properties/arrays that contains the data that is to be rendered into the View. Each simple value can be bound to v-text or via {{ property }} or - for nested objects - {{ property.childproperty }} bindings.

Because data binding in VueJs is reactive, any change you make to the model is immediately reflected in the HTML view, so when you change the vm.todos array or any of the Todo items inside of it, the template is immediately refreshed and the data updated.

The important point is this:

VueJs, not your own JavaScript code is responsible for updating the HTML DOM. Your code can just update the model data to update the HTML displayed on the screen. Note that you still can update HTML via the DOM, but generally your aim is to let the model do the work whenever possible.

All the tedious DOM update logic of poking values into the UI via code (ie. $("#appname").text(vm.appname)) and more importantly the more complex scenario of updating a list of data via code, is not necessary . Instead you simply assign a value to a model (vm.todos[0].title = "Updated Todo Item") and that value immediately displays.

Imperative vs. Declarative

If you come from classic style of JavaScript programming using raw JavaScript or jQuery, you likely have used manual updates via code, where you imperatively write each change into the HTML document.

With VueJs on the other hand, you only declaratively make changes to the model data, which in turn triggers VueJs to update the HTML template with the newly updated model data. The framework is smart enough to detect which specific properties have changed and updates only those HTML elements that effectively have changes.

To demonstrate here are a couple of examples:

Using an imperative approach with jQuery:

// using jQuery
var total = 200;
var subtotal = 180;

// throughout the page life cycle
$("#invoiceSubTotal",subtotal);
$("#invoiceTotal",total);

Using a Declarative approach with VueJs:

// create the data model (vm = View Model by convention)
var vm = {
    total: 200,
    subtotal: 180
};

// bind the model to the view
var app = new Vue({
    el: '#myApp',  // element to bind to
    data: function() {
       return vm;  // return the model here
    }
});

...

// throughout the page life cycle

// you only update the model
vm.total = 200;
vm.subtotal = 180;
// which transparently updates the DOM

Altough this is actually more code for this simple case, once you add more data to your model (or multiple models and multiple bindings), you only need to add properties to update. You don't need to know anything about what name an element on the page has to update it. It just happens when the model changes.

In theory a VueJs (or any other framework) page/application should never (or at least very rarely) access the HTML DOM directly and instead update the model that drives the HTML display. Using the model to update is preferred because:

  • It's much easier to write that code
  • It's independent of HTML or DOM
  • Potentially could work with other 'renderers' like native mobile
  • Bulk DOM updates are faster than individual updates
  • Less error prone (ie. if you rename an HTML element code still works)
  • No dependencies on specific DOM features (or even browser/mobile features)

Vue Basics

At a high level Vue is not very different from other frameworks. There are a handful of key features that Vue provides:

  • Inline HTML Templates
  • Declarative directives (v-for, v-if, v-show etc.)
  • Model ? Template Binding (v-text, v-html, {{ }}, v-bind:attr)
  • Two-way Model Binding (v-model)
  • Event Binding (v-on:event)

The idea is pretty simple. During the page's startup you do the following:

  • You create a data model
  • You add properties to your model for data
  • You can nest objects or use arrays
  • You add method for event handlers
  • You create a Vue instance
  • You attach the Vue instance to a DOM element
  • You attach your model to the Vue instance

Let's break all that down step by step.

Before I dive in let's create a simple HTML page first that'll hold the example. I'm using the sample folder here and am pulling in the Bootstrap CSS library, FontAwesome and VueJs from a local store. They just make things look nicer, but don't affect any of the operations here.

<!DOCTYPE html><html xmlns="http://www.w3.org/1999/xhtml"><head><title>Vue 100</title><meta charset="utf-8" /><meta http-equiv="X-UA-Compatible" content="IE=edge" /><meta name="viewport" content="width=device-width, initial-scale=1, maximum-scale=1" /><meta name="description" content="" /><link rel="shortcut icon" href="./favicon.ico" type="image/x-icon" /><meta name="apple-mobile-web-app-capable" content="yes" /><meta name="apple-mobile-web-app-status-bar-style" content="black" /><link rel="apple-touch-icon" href="./touch-icon.png" /><link rel="icon" href="./touch-icon.png" /><meta name="msapplication-TileImage" content="./touch-icon.png" /><link href="./lib/bootstrap/dist/css/bootstrap.min.css" rel="stylesheet" /><link href="./lib/fontawesome/css/all.min.css" rel="stylesheet" /><link href="todo.css" rel="stylesheet" /><!-- <script src="https://cdn.jsdelivr.net/npm/vue/dist/vue.js"></script> --><script src="./lib/vue/dist/vue.js"></script></head><body><div id="todoApp"><!-- page content here -->        </div></body></html>

The key item specifically relevant here is the inclusion of VueJs:

<!-- <script src="https://cdn.jsdelivr.net/npm/vue/dist/vue.js"></script> --><script src="./lib/vue/dist/vue.js"></script>

Start with a Model

Generally it's best to start with a model of data that you want to bind. It's not required of course, but I find it helps to think about the data you are going to render first. Let's start with the simplest thing possible.

Personally I like to create my model separately from the View object and then pass that to Vue rather than defining the model directly on the Vue object as the documention shows. The reason for this is that I like to create a locally scoped variable that I can access for my model so that I can always reference the model and not have to rely on the sometimes unpredictable nature of the this reference in JavaScript.

So I start with a model, which is just a JavaScript object map. You can create a class or function closure which in JavaScript also behavior like objects. for the following I use a Object Map.

Ideally you'll want to put script code into a separate JavaScript file, but for this first example I'll use a <script> tag in the HTML page.

At the bottom of the HTML page before the </body> tag add the following:

<script>
// create this first for a script wide reference
var vm = {
    appName: "Todo Application"
}

// bind the model to the todoApp Id/Element in the HTML
var app = new Vue({
    el: '#todoApp',
    data: function() {
       return vm;  // bind the model to the view
    }
});

I create the model first, followed by creating an instance of the Vue object.

The Vue instance is created and the two key items that are set on the passed in object map are:

  • el: The DOM Element to bind the model to using a CSS selector (#todoApp means Id of todoApp)
  • data: A JavaScript function that returns the model

The data object can either be an object instance or a function. The Vue docs recommend a function because it allows initialization code to be added just before the model is loaded which is after the DOM has loaded. In this method I simply return my Vue model as a static value but you can insert initialization code into that function like setting dynamic config value for example.

The object you pass can contain many other options, including a list of filters, locally used components, and much more. For now all we want is the model.

Add the HTML Template

The term HTML template may be confusing, because in reality you are not creating a separate 'template' but rather are writing the Vue template syntax directly into your existing HTML document. So in the area where above it says <!-- page content here --> you can now add the following:

<h1>{{ appName }}</h1>

If you open the HTML page in the browser now you should see the "Todo Application" displayed as a big header string. If you change your code and change appName to a different value you can see the value updated.

Dynamic Updates

The first binding works but it's not very dynamic. Let's do something slightly more interesting by adding a value that will dynamically change. Let's go back to the model and add a new property and an initialization function:

Let's add a couple a new property to the model and initialize the model. What I'll do is add a little time update mechanism that shows the current time updating every second by adding a time property and an initialize() function:

// create the view model separately - more options this way
var vm = {
    appName: "Vue Todo List",
    time: new Date(),
    initialize: function() {
        setInterval(function() { vm.time = new Date() },1000);            
    }        
 }
// initialize the model
var app = new Vue({
    el: '#todoApp',
    data: function() {
        vm.initialize();
        return vm;  // bind the model to the view
    }
});

time holds a JavaScript data, and when the model is initialized I explicitly create a timer (setInterval) that refreshes every second and creates a new date. IOW, every second the vm.time property is updated and should update the HTML with the new time.

To make this work we'll need to update the template:

<h1>{{ appName }}</h1><hr><p>Current time is: <b>{{time.toLocaleTimeString()}}</b></p>

When you run this now you'll see the time updating every second:

While maybe not impressive to look at, it's pretty powerful. It demonstrates neatly how you - or an automated operation in a timer here - can update just the model data. In this case vm.time is updated inside of the timer loop, and each time the timer ticks the model is updated. You can see that change reflected immediately in the HTML and so the time seems to be ticking up every second.

You don't write code to update the HTML DOM, you write code to simply change values on the model.

Vue checks the model for changes and when a change is detected fires a DOM update cycle that renders the affected parts of the template. Cool, right?

Static {{ }} Bindings

Note that you can bind data in a few different ways. The mustache syntax used above is very descriptive and it's a content binding that fills data into the document. It's statically expanded into the template. It's the most descriptive way to bind.

Content Binding on DOM Controls

Static bindings are very readable but they won't work for all controls because it requires a control that can take content and encode it at encoded/safe text.

You can also express those same bindings as a content-binding v-text or v-html tags to bind content instead:

<p>Current time is: <b v-text="time.toLocaleTimeString()"></b>

{{ }} bindings always bind HTML, safely encoded text. If you want to bind raw HTML you have to use the use v-html instead of v-text or {{ }} tags. The following renders an HTML string from Markdown text, which is a result that should not be encoded:

<div v-html="getRenderedMarkdown()"></div>

DataBinding in Vue

v-text and v-html binding are content bindings meaning they bind the content that are directly rendered into the HTML between the element brackets of these attributes.

But you can bind any attribute with Vue using the v-bind:attribute syntax. For example to bind the title attribute in the header you might use:

<h1 v-bind:title="appName + ' ' + time.toLocaleTimeString()">{{appName}}</h1>

An alternate slightly simpler syntax is using :attribute.The same title binding can be expressed like this:

<h1 :title="appName + ' ' + time.toLocaleTimeString()">{{appName}}</h1>

The : is a shortcut for vbind:. Although shorter I often find v-bind more descriptive and easier to read, but that's pure preference.

Now when you hover over the document title you should see the title in a tool tip and the tool tip text will change every second to reflect the time as well.

The expression above brings up an important point:

Vue 'expressions' are raw JavaScript and you can pretty much use any valid JavaScript expression inside of a v-bind directive or a {{ }} expression. Unlike other frameworks that use pseudo JavaScript that uses special parsing, in Vue you can simply use raw JavaScript for native functions or your own code as long as you can reference it through your model.

Editing Data

Displaying data is nice, but you also need to update data in your model from input created in the user interface. Vue supports two-way data binding via the v-model directive which allows you to bind a model value to a control in much the same way as v-bind does, but also supports binding back to the data source. You can use v-model with any of the HTML input elements.

Here's what this looks like:

<p><label for="">Update the App Name: </label><input type="text" 
            class="form-control"
            v-model="appName"
            /></p>

Notice the v-model="appName" attribute which binds the app name to the input box. When you now run this, you can type into the edit box and as you type you can immediately the title update:

What's nice about this is that you can update your model values and immediately see the changes reflected without any sort of update mechanism. If you update a value that triggers changes to another value (like say you add an order item and recalculate a total) those new values are immediately updated.

This functionality makes it very easy to create very interactive applications.

Event Handling

Data binding on its own is powerful but it's not all that useful if you can't fire off actions as well. To do this you can bind DOM events to functions in your model.

Let's add a button to the page that allows resetting the value of the appName to its default value after it's been changed, or to an updated value if it hasn't.

<button class="btn btn-primary mt-2" 
         v-on:click="resetAppName()"><i class="fas fa-recycle" style="color: lightgreen"></i> 
    Reset to Default                </button>

This hooks the click event of the button to an resetAppName function in the model:

resetAppName: function() { 
    if (vm.appName != defaultAppName)
        vm.appName = defaultAppName;
    else
        vm.appName = defaultAppName + " RESET";   
}

When you click the button the above code fires and you have access to the current model. You can also pass parameters to the function from script, including in scope variables, which is an important and powerful feature we'll look at when look at list binding.

Computed bindings

Vue is also smart enough to do what are basically computed bindings, if you bind to a method in your model:

var vm = {};
vm = {
  firstName: "Rick",
  lastName: "Strahl",
  fullName: ()=> vm.firstName + " " + vm.lastName
};

You can then embed can then print out the full name like this:

<div>{{ fullName() }</div>

What's nice is that because this is a model function that is bound into the HTML template, if you change firstName or lastName the name in the UI is still updated.

Conditional Binding

One important thing that UI needs to do is conditionally bind things based on a truthy state. Any value that has a value is truthy: a string that is not null, undefined or empty, a non-zero number, true, a non-null object are all truthy values. 0,false, null, undefined, an empty string all are non-truthy values.

For example, you might want to only and error message display if there's an error message to display.

To create a conditional binding you can use v-if="errorMessage" which doesn't render the element if the errorMessage is empty, null or undefined, or v-show/v-hide which make the element hidden but still in the document.

I'll use v-if here to create the error box:

<!-- only render this if there's an errorMessage to display --><div class="alert alert-warning" v-if="errorMessage"><i class="fas fa-exclamation-triangle" style="color: firebrick"></i>                
    {{errorMessage}}</div>
...<button class="btn btn-primary " v-on:click="setError()">
    Toggle Error</button>

The idea is if errorMessage is empty it doesn't display. When you click the button the error message is toggled, simulating an error that is displayed and cleared.

Then in the model we need an errorMessage property and a the setError() method that sets the error message whenever the button is clicked:

 errorMessage: "",
 setError: function() {
    if (!vm.errorMessage)
        vm.errorMessage = "An error occurred on " + new Date().toLocaleTimeString();
    else
        vm.errorMessage = "";
}    

If you run and click the button the error message is displayed and hidden after each click. Conditional binding is very useful for toggle states and allows you to easily create multiple states using separate html blocks for on and off states. For example, for a login button you might display a link to the login form when the user is not logged, but display the user name and a link that goes to the user's profile instead.

List Binding

So let's step up a little bit from the basic stuff to something a little more data driven by creating the typical ToDo list app.

To make this a little more interesting I'll use EcmaScript 2015 with native module loading. All ever green browsers - Chrome, Edge, FireFox, Opera - etc now support EcmaScript 2015 so you start taking advantage of these newer browser features without having to rely on complex build systems. The module system is one of the nicest features of EcmaScript 2015 because it lets each module determine what dependencies it has without having to load them all into a startup HTML page in the right order.

Anyway, this allows breaking up code easily into multiple source files and reference any dependencies.

  • TodoList-LocalData.html - base HTML page
  • todoApp.js - entry point JavaScript file, that holds the Vue model
  • todo.js - holds a todo item class

This is loaded into an HTML page like this:

<script src="./todoApp.js" type="module"></script>

Then todo.js contains the an individual Todo item class definition which is then loaded by todoApp.js - I'm separating this out into a separate file because we'll want to reuse that same class later in another sample page.

export class Todo {
    constructor(initial = {}) {
        this.id = null;
        this.title = "Todo";
        this.description = "";
        this.completed = false;
        this.entered = new Date();
        this.isEditing = false;
        if (initial)
             // this allows mapping an object passed for initial values
             Object.assign(this,initial);
    }


    static loadTodos(){
        var todos = [
            new Todo ({ 
                title: "Make SW Fox travel arrangements",
                description: "Compare fares and use travel site to book flights."
            }),
            new Todo( { 
                title: "Prepare for SW Fox",
                description: "Work on Vue Demo and get it done" 
            }),
            new Todo( {
                title:"Go windsurfing",
                description: "After work make time to go!"
            }),
            new Todo({
                title: "Drop Everything - It's Windy!", 
                description: "It's nuking, let's get in the car and go!"
            })
        ];

        return todos;
    }
}

This is modern JavaScript using classes so it looks a lot cleaner than classic JavaScript using only functions and protypes. This class defines a TodoItem class with properties for a title, description and completed status and a few others.

There's a static method call loadTodos() which creates some dummy data and returns an array of TodoItems.

Note the module syntax. In order to use a items from module you have to export them. Here I'm exporting the class. You can have multiple exports in a single file. For example, I can subclass Todo and export the subclass as well:

export class Todo2 extends Todo {
    constructor(){
        this.notes = "";
    } 
}

Next I create todo.js which imports the data

import { Todo } from "./todo.js";

which gives me access to the exported class by referencing it. Note that the export here is a class, but it can be any JavaScript expression, value or type. Whatever you export you can use as an import. Here todo can be used with new ToDo() to create a new todo item.

Here's the code to create an initial View Model, and assign it to Vue:

import { Todo } from "./todo.js";

const newTodoText = "*** New Todo";

// create the view model separately - more options this way
var vm = {
    appName: "Vue Todo List",
    todos: Todo.loadTodos(),  // [] array of todos    
};


// initialize the model
var app = new Vue({
    el: '#todoApp',
    data: function() {
       return vm;
    }
});

The TodosList-LocalData.html then has a root element in the page to which Vue is bound.

Here's a really simplified binding setup for this:

<div id="todoApp">
    ... header stuff<div class="page-header-text"><i class="fa fa-list-alt"></i> {{ appName }}</div>

    ... other layout

    <div><div class="todo-item"
            :class="{completed: todo.completed}"
            v-for="todo in todos" ><input type="checkbox"  
                    class="float-left mr-2" 
                    v-model="todo.completed"  /> 

            {{todo.description}}
        </div></div></div>    

This tiny bit of markup displays a checkbox to bind to each Todo's completed property and also the description. Here's what's pretty cool: Because completed is a checkbox and is bound using v-model (as we did earlier with the textbox), you can actually toggle the completed state on each todo item by clicking the checkbox!

By using a custom completed css style:

.completed {
    text-decoration: line-through;
    font-style: italic;
    opacity: 0.4;
}

toggling strikes out the todo item and makes it transparent which makes it look disabled:

Cool, right? Notice there's no code to manipulate the DOM, not even code to set the model, but instead toggling the checkbox, binds back to the model of an individual Todo item, which causes the state to change and the UI to re-render with the now updated styling.

Cool - let's make this look a little nicer. I'm going to add some CSS that makes the list look nicer and adds a few nice touches we'll use later:

.todo-item {
    padding: 8px;
    border-bottom: 1px solid #eee;
    transition: opacity 900ms ease-out;
}
.todo-header {
    font-weight: 600;
    font-size: 1.2em;
    color: #457196;
}
.todo-content {
    padding-left: 30px;
}
.todo-content .fa-check {
    color: green !important;
    font-weight: bold;
    font-size: 1.2em;
}
.completed {
    text-decoration: line-through;
    font-style: italic;
    opacity: 0.4;
}
.inline-editor {
    min-width: 200px;
    width: 50%;
    margin-bottom: 5px;
}

[v-cloak] { display: none; }

So let's put this to use and make the Todo items look nicer:

<div class="todo-item"
     :class="{completed: todo.completed}"
     v-for="todo in todos" ><i class="fa fa-fw float-left text-info" 
    style="margin: 10px 10px 20px; font-size: 1.7em"
    v-on:click="toggleCompleted(todo)"
    :class="{'fa-bookmark': !todo.completed,                      
             'fa-check': todo.completed,
             'text-successs': todo.completed 
            }"        ></i><!-- action icons --><div class="float-right"><i class="fa " :class="{
            'fa-edit': !todo.isEditing, 
            'fa-check': todo.isEditing, 
            'text-success': todo.isEditing 
        }"
        @click="toggleEditMode(todo)"
        style="color: goldenrod; cursor: pointer"
        title="Edit Todo Item"
        v-show="!todo.isEditing || todo.title"></i><i class="fa fa-times-circle"
        @click="removeTodo(todo)"
        style="color: firebrick; cursor: pointer"
        title="Remove Todo Item"></i>      <!-- content --><div class="todo-content"><div class="todo-header">
                {{todo.title}}</div>                            <div style="min-height: 25px;" >
            {{todo.description}}</div></div>        </div>

which looks like this:

Let's break it down. The Check Toggle is now on the bookmark or check icon on which you can click. So rather than a checkbox, I use an icon as a toggle. To do this a click handler is used:

<i class="fa fa-fw float-left text-info" 
     :click="toggleCompleted(todo)"
     :class="{'fa-bookmark': !todo.completed,                      
              'fa-check': todo.completed
            }"></i>

I'm using the special :class binding to specify styles to display based on a 'truthy' expression. If completed show the check mark - otherwise show the bookmark. This is a powerful feature that makes styling based on state very easy.

Since there's no more checkbox, we have to fire some code to toggle the state. I could do this right inline like this:

:click="toggleCompletd(todo)"

but generally a function is a better call as it's unlikely to be so simple. Inside of the vm I can now implement the method:

toggleCompleted: (todo)=> {
    todo.completed = !todo.completed;
},

Notice that the method expects a todo item as a parameter. Also note the click handler passes a todo item. Vue is smart enough to figure out which item of the array needs to be passed to the function that is called! This makes it very easy to figure out which item needs to be acted upon!

Next, let's implement the Remove button.

<i class="fa fa-times-circle"  v-on:click="removeTodo(todo)" />

Same idea - pass the todo to a function in the model:

removeTodo: (todo)=> {
    vm.todos = vm.todos.filter((td) => td != todo);        
},

This code uses the Array.filter() function to create a new array that filters out the existing item and assigns it the todo list.

When you now click on the remove button, the item disappears from the list.

Adding Inline Editing

So far, other than completing an item we haven't set up a way to edit the todo items. Let's hook up the edit button:

<i class="fa "  
   :class="{'fa-edit': !todo.isEditing, 
         'fa-check': todo.isEditing, 
         'text-success': todo.isEditing 
    }"
    @click="toggleEditMode(todo)"
    title="Edit Todo Item"
    v-show="!todo.isEditing || todo.title"></i> 

So what this attempts to do is toggle the edit mode on a todo item. The UI class has a todo.isEditing flag which is toggled by the function on the model:

toggleEditMode: (todo)=>{        
    todo.isEditing = !todo.isEditing;        
},

To add editing I'm changing the code a little like this:

<!-- content --><div class="todo-content"><div class="todo-header"><div v-if="!todo.isEditing" >
            {{todo.title}}</div><div v-else><input type="text"  ref="todoTitle" 
            v-model="todo.title"
            class="todo-header inline-editor" /></div></div>                            <div v-if="!todo.isEditing" style="min-height: 25px;" >
        {{todo.description}}</div><div v-else><textarea v-model="todo.description"
                class="inline-editor"></textarea></div></div>

Notice the v-if and v-else directives which conditionally display either the raw text, or an input field or textarea for editing the title and description.

Here's what editing an entry looks like:

When done I can click on the check button to essentially toggle the todo's isEditing=false state. When I do the view toggles back to display mode and then updated value display.

Pretty cool, right? Without writing any DOM manipulation code we've just made changes to two input fields and update the UI with the new values.

So that works, but now let's take a look and load data from a server and FoxPro running a Web Connection application.

Adding Server Data

So far we've updated local data which means every time the page reloads, the original data is restored as it's statically recreated. More realistically we'd want to load data from a server.

I'm going to use a Web Connection Web Server serving data using FoxPro.

The first step is to create a new project with Web Connection. I'm going to create:

  • Vue project program and VueProcess.prg Process Class

  • Set up Virtual called Vue and a scriptmap of .wcvue

  • Finally choose to create a REST Service

This will create a new Web Connection project that's ready to run. It'll open a command window in the project directory and you should be able to run:

launch()

to start the project and display a JSON status message.

Once that's working lets add some server side requests to serve todo items. Let's start with the list of todo items. Open vueprocess.prg and add:

FUNCTION ToDos()

IF !FILE(".\todos.dbf") 
   ReloadData()	
ENDIF

SELECT id, title, descript as Description, entered, completed, isEditing ;
     FROM TODOS ;
	 ORDER BY entered DESC ;
	 INTO CURSOR Tquery

Serializer.PropertyNameOverrides = "isEditing"

RETURN "cursor:TQuery"
ENDFUNC
*   Todos

FUNCTION ReloadData()

if (FILE("todos.dbf"))
   ERASE FILE Todos.dbf
endif  

CREATE TABLE TODOS (id v(20), title v(100), descript M, entered T,completed L, isEditing L)

INSERT INTO TODOS VALUES ("1","Load up sailing gear","Load up the car, stock up on food.",;
                        DATETIME(),.f.,.f.)
INSERT INTO TODOS VALUES ("2","Get on the road out East","Get in the car and drive until you find wind",;
                        DATETIME(),.f.,.f.)
INSERT INTO TODOS VALUES ("3","Wait for wind","Arrive on the scene only to find no wind",;
                        DATETIME(),.f.,.f.)
INSERT INTO TODOS VALUES ("4","Pray for wind","Still waiting!",;
                         DATETIME(),.F.,.F.)
INSERT INTO TODOS VALUES ("5","Sail!","Score by hitting surprise frontal band and hit it big!",  
                        DATETIME(),.F.,.f.)

RETURN .T.
ENDFUNC
* ReloadData

This code is simply created in a REST process class which turns each method into a REST endpoint. Any parameters passed are created from deserialized JSON, and you can also look at Request.QueryString() to retrieve query values from the URL.

The code then runs the logic to either create a new set of Todos, or returns an existing set. The set can be updated so it can be changed with the data from the client as we go through this demo.

To test this you can navigate to (assuming IIS Express here):

http://localhost:7000/Todos.wcvue

For IIS you can use:

http://localhost/vue/Todos.wcvue

which gets you:

By default FoxPro serializes data using lower case because FoxPro can't properly determine case for database data in free tables (always upper case returned). You can overide by specifying any property name explicit like this:

Serializer.PropertyNameOverrides = "isEditing"

Generally you'll want to do this for any multi-part field names like lastName, homePhone etc.

Cool - so this works. Let's add a few more functions to handle the same operations we handled on the client todo example. ToggleTodo() first:

FUNCTION toggleTodo(loTodo)
LOCAL lcID

IF ISNULLOREMPTY(loTodo)
   ERROR "No Todo item passed."
ENDIF

lcId = loTodo.Id

SELECT * FROM TODOS ;
       WHERE id = lcId ;
       INTO CURSOR TTodo
   IF _Tally = 0
  	   ERROR "Invalid Todo to update."
   ENDIF

UPDATE Todos SET completed= loTodo.completed WHERE id = lcId

RETURN .T.

This is a POST request where the client is meant to post a full Todo record which is serialized as JSON, then deserialized and passed as a parameter to this function. The code then sets the value (that was already toggled on the client) and updates the database if the record exists based on the id of the record. Simple.

The Todo() handler is a little more complex because it handles:

  • retrieving Todo item by id
  • updating a Todo item
  • adding a new Todo item

The single method basically looks at the HTTP Verb to determine which action to take.

FUNCTION ToDo(loToDo)

IF !USED("ToDos")
   USE ToDos IN 0
ENDIF
SELECT ToDos

lcVerb = Request.GetHttpverb()

IF lcVerb = "GET" 
   lcId = Request.Params("id")
   IF IsNullOrEmpty(lcId)
   	   ERROR "No Id provided to load a Todo item"
   ENDIF  
   SELECT * FROM TODOS ;
       WHERE id = lcId ;
       INTO CURSOR TTodo
   IF _Tally = 0
  	   ERROR "No Id provided to load a Todo item"
   ENDIF

   SCATTER NAME loTodo MEMO
   RETURN loTodo       
ENDIF

IF lcVerb = "PUT" OR lcVerb = "POST"
	IF VARTYPE(loTodo) # "O"
	   ERROR "Invalid operation: No To Do Item passed."
	ENDIF

   loTodo.IsEditing = .F.

	llNew = .F.
    LOCATE FOR id == loToDo.id
    IF !FOUND()
		APPEND BLANK
		loTodo.id = GetUniqueId(8)
      loTodo.entered = DATETIME()
		llNew = .T.
	ENDIF
	GATHER NAME loTodo MEMO
	
	*** Fix for differing field name
	REPLACE descript WITH loTodo.description
	SCATTER NAME loTodo Memo
ENDIF

IF lcVerb = "DELETE"
   lcid =  Request.QueryString("id")
   LOCATE FOR id == lcId 
   IF !FOUND() OR EMPTY(lcId)
      Response.Status = "404 Not found"
      ERROR "Invalid Todo - can't delete."      
   ENDIF
   DELETE FOR id == lcId
   RETURN .t.
ENDIF

RETURN loTodo

To test this you can't easily use a browser except for the GET operation because you actually need to post data to the server.

You can use a tool like PostMan or as I like to use my own product West Wind WebSurge which is a load testing tool that can also be used for testing individual URLs.

Using a tool like this makes it very easy to debug your server side code without having to run a client side application to hit the server first.

Ok we now have or server API - lets hook it up to the client.

Calling Server Side API Code from the JavaScript Client

The updated application will use the same styling and HTML template logic - all we're going to do is essentially change the View model to get data from the server.

Todo this I copied the original application and renamed the main HTML to TodoList-RemoveData.html and todoAppRemoteData.js.

Here's what the running application looks like:

The only things that change are the View Model code in todoRemote.js so lets jump there first.

ar vm = {
    appName: "Vue Todo List",
    todos: [],        
    errorMessage: "",

    loadTodos: ()=>{
        vm.errorMessage = null;
        vm.todos = null;
        return ajaxJson("todos.wcvue",null,
            (todos) => vm.todos = todos,
            (error)=> vm.setError(error));
    },
    ...
}    

So now we're retrieving data from the server and I'm using a Web Connection helper called ajaxJson() (in ww.jquery.js) here to make the call to the server. You can use $.ajax() or Axios or the native browser.

For a Web Connection app you can add ww.jquery.js to the page you can do:

<script src="lib/jquery/dist/jquery.min.js"></script><script src="scripts/ww.jquery.min.js"></script></body>

ajaxJson() is called with a Url, an optional value that is posted to the server, and a pair of functions with a success result that receives the deserialized result data, and an error handler that receives an error object with a .message property.

Errors display a message using the toastr library which provides pop up messages on the bottom of the screen.

setError: (error)=>{
    vm.errorMessage = error.message;
    toastr.error(error.message)
}

The ajaxJson() call is asynchronous, meaning it returns immediately, leaving the data blank initially. Once the data arrives from the FoxPro server, it is simply assigned to the vm.todos which populates the model.

Remember that Vue monitors properties for changes, and so initially it renders with no data and shows an empty list and then when the data arrives renders the list that was retrieved. On the local machine this happens so quick it might as well be instant. On a remote machine with a slow connection it might take a second or so.

Here's what toggling looks like:

toggleCompleted: (todo)=> {
    vm.errorMessage = null;
    var newStatus = !todo.completed;
    ajaxJson("toggleTodo.wcvue",
            { id: todo.id, completed: newStatus },
            (status)=> todo.completed = newStatus;
            (error)=>  { 
                todo.completed = !todo.completed;  // untoggle
                vm.setError(error); 
            } 
    );
},

The todo comes in and a new value is calculated. The todo status is not immediately changed however, because the call is asynchronous. So the ajax result call is what actually flips the completed value, so that the value is only updated if the call succeeds.

To remove a Todo works in a similar way:

removeTodo: (todo)=> {        
    ajaxJson("todo.wcvue?id=" + todo.id,null,
        ()=> {
            vm.todos = vm.todos.filter((td) => td != todo);    
            toastr.success("Todo removed.");
        },
        vm.setError,
        { method: "DELETE" });
},

The call requests to remove the todo with the given id. If the ID is found it's removed on the server and the server returns .t.. Only once the call returns do we then filter the data and remove the Todo that has been requested to be removed.

Finally let's look at the SaveTodo() function which saves an updated Todo.

saveTodo: (todo)=>{
    vm.errorMessage = null;
    ajaxJson("todo.wcvue",todo,
    (td) => {
        // update id from server
        todo.id = td.id;
        todo.completed = td.completed;
        todo.entered = td.entered;
        todo.isEditing = false;        

        toastr.success("Todo updated.");
    },
    vm.setError);
},

The code passes in a Todo which is sent to the server to be saved. When the result comes back from the server we updated the relevant fields such as an id (for new entries) the server update time, and we explicitly flip the editing flag to false.

There are a few more requests but the idea is pretty much the same. As you can see to switch from the memory based Todo list to the server based list required only a little reworking of existing requests and didn't require any changes to the HTML UI - the only changes made were in the View model that's updating data.

Hybrid Silo Application

So far I've shown what we could call a mini spa. A little self contained application which happened to run for the scope of the entire page. Vue supports adding components and components can be much smaller bits of code that can be combined to make up an application.

But you can also drop an interface like what I've shown here into a larger page as a 'sub-application'. So imagine you have a larger human resource application running and the todo app is a small sidebar that runs 'on the side' of the larger page.

Vue makes that entirely possible by allowing you to pick a DOM element and take over processing from that DOM element down.

Here's an example in a server rendered Time Trakker application. There's a project list that can be edited and new projects can be added interactively. This is perfect use case for Vue as you can provide interactive editing of content while the rest of the server rendered application continues to be server rendered and behave as you'd expect it. It's essentially an embedded mini-spa application inside of a server rendered page. This one happens to be very simple, but it's quite feasible the that you can have very complex interactions in the sub app.

Let's take a look by starting with the HTML. I've removed the edit code for the moment, so this list is now basically just displaying data that is retrieved separately from the server page after the top part has loaded. In this way the page can lazy load recent project list.

<div class="list" v-bind:class="{'hidden': !ready }"><div class="list-header"><button type="button" id="btnAdd"
                class="btn btn-success float-right" style="margin-top: -7px"
                v-on:click="addRowVisible = !addRowVisible"><i class="fa fa-plus-circle"></i>
            Add</button>
        Recent Projects</div><div v-for="project in projects"
         class="list-item"><a v-on:click="removeProject(project)"
           class="float-right btn"><i class="fas fa-times-circle text-danger"></i></a><div class="list-item-header "><i class="float-left fa-2x fa-fw far project-icon "
               v-bind:class="{
                'fa-clipboard-check': project.status == 1,'text-success': project.status == 1,
                'fa-arrow-alt-circle-down': project.status ==0, 'text-warning': project.status ==0   }"></i><a v-bind:href="'project.ttk?id=' + project.pk">{{project.projname}}</a></div><div class="small font-italic">
            {{project.entered}}</div></div></div>

This should all look pretty familiar by now. There are mustache bindings to the list fields and a bit of :class bindings to make sure the right icon is displayed. That bit is a little messy because it's inline but it's actually pretty straight forward.

The code to do this should also be familar:

vm = {
    baseUrl: "./",
    projects: [],
    entries: [],
    newProject: createProject(),
    ready: false,
    addRowVisible: false,

    initialize: function () {
        vm.loadProjects();
    },
    loadProjects: function () {
        ajaxJson(vm.baseUrl + "projects.ttr", null,
            function (projects) {
                vm.projects = projects;
                // don't show projects until loaded
                vm.ready = true;
            }, function (error) {
                console.log(error);
            });
    },
    ...
}    

var app = new Vue({
    el: "#CustomerPage",
    data: function () {
        return vm;
    }
});

The model has a projects property that is populated by an Ajax call. When the data arrives the table is made visible and the data shows.

The more interesting part here is adding and removing records. But again, the process is roughly the same as we saw with the todo list.

To add a new Project a single row is added to the list that provides the editing surface.

<div class="responsive-container"><input type="text" class="form-control" placeholder="New project name"
           v-model="newProject.projname"
           v-validate="'required|min:3'"
           name="ProjectName" id="ProjectName" /><div style="width: 250px;"><%= HtmlDateTextBox("StartDate","",[ placeholder="starts on" v-model="newProject.startdate"]) %></div><button type="button"
            class="btn btn-primary"
            @click="saveProject()"
            v-bind:disabled="errors.any() || !newProject.projname"><i class="fa fa-check"></i>
        Save</button></div><div class="text-danger" style="margin-top: 6px;" v-show="errors.any()">
    {{errors.first('ProjectName')}}
    {{errors.first('StartDate')}}</div>

A new record is shown for editing when you click the Save button it's sent off to the server.

saveProject: function () {

    ajaxJson(vm.baseUrl + "project.ttr", vm.newProject,
        function (project) {                    
            vm.projects.unshift(project);
            vm.newProject = createProject();
            vm.addRowVisible = false;

            toastr.success("New project added.");
        }, function (error) {
            toastr.error("Couldn't save project." + error.message)
        });
},

When the Ajax call returns the project from the server is added to the list of projects using unshift() which inserts an item at the beginning. Then there's some cleanup to remove the entered text and hide the add-row by way of an v-if flag.

This should give you an idea, what integration into another page looks like. The behavior inside of an existing page is not much different from the way we built the standalone Todo applet.

It's very common to have mini embedded sub-applets like this and Vue is well suited for this type of scenario because it can easily embed into a project.

Some Things to Watch out for

So I've been very positive about Vue and for good reason. It's easy to use, has many very throughtful features that save time, it's fast and lightweight and works with existing applications. Few tools can boast half the claims that Vue makes including many of the other big boy frameworks. Because it is easy to work with and flexible Vue has become very popular.

However there are also a few caveats that you have to watch out for. More and more Vue has been pushed into the realm of build processes, Web Pack and CLIs and while it works great there, that also has had an effect on the plain vanilla JavaScript hosting in that there is a lack of documentation for features using plain Javascript. Many examples assume you using the Vue CLI and a WebPack based module loading approach and transpilation plus .vue pages. While that's cool for full SPA applications it's overkill for the scenarios we've discussed here.

Another problem along the same lines is that many components are designed to be used with Vue pages. While supposedly most components should work just fine standalone and through CLI projects, I found many components next to impossible to use with plain ES2015+ JavaScript due to incompatible module loading. Essentially few components support ES2015+ module loading and expect WebPack to fix up all the JavaScript binding nonsense.

Using ES5 style global namespace loading via script is often the only way to get many components to work if at all if you're not using a full WebPack build.

In short, make sure you test any Vue components you might need before jumping in or making assumptions of what works.

Summary

Vue is no longer a new library, but it still has the feel of a breath of fresh air in the stodgy world of JavaScript frameworks that seem to pride themselves of making things ever more cryptic and complicated. Vue is wonderfully light weight and easy to integrate into existing applications.

It's an especially good fit for incrementally enhancing existing server side applications with JavaScript mini-spa or in page applets. I've been using this approach frequently in a number of applications with good results and i like the flexibility it affords by breaking up complex applications into smaller more manageable pages, rather than a massive SPA application.

Resources

this post created and published with the Markdown Monster Editor

Web Connection 7.10 is here

$
0
0

Web Connection 7.10 is out and this release brings a few significant enhancements. Here are some of the highlights I'll cover in this post:

A new self-contained Web Connection Web Server

The big news in this release is a new .NET Core based Web Server that has been added - for now as a working preview. The new Web Connection Web Server is a self-contained console application that can be used locally or hosted inside of IIS. To use it you point it at a --webroot folder and it will run a Web Connection application out of that folder. Or run it out of the current folder.

Once you've pointed at a Web folder, the site runs just like it would in IIS or IIS Express, but hosted by this Web server. The only thing that wil be slightly different is configuration and the Middleware Administration page.

This should look familiar - the page has most of the same content as the ASP.NET Module Administration page, but there are a few additional items on this one. Most importantly and key to making everything completely self-contained is that the you can specify the extensions for your FoxPro Web Connection Server to handle right via a simple setting.

Pros and Cons

Some of the advantages of this new server are:

  • Fully Self Contained (but requires .NET Core Runtime)
  • Pre-Configured for Web Connection
  • Just point at a folder with --webroot and go
  • Uses a single configuration file
  • Easy to configure
  • Web Connection specific configuration
  • Optimized operation for Web Connection Requests
  • Command Line EXE - can be fully automated
  • Built-in native Live Reload functionality
  • Can also run hosted inside of IIS for production
  • Can run on Linux in File Mode (Fox server still needs Windows)
  • 64 bit support
  • 99% compatible with existing Web Connection ASP.NET Module
  • Can be distributed with your application

Some considerations:

  • It does require a .NET Core installation (.NET Core SDK)
  • Requires a different but very small web.config for IIS Hosting

Although in theory you can use this Web Server as a production Web Server without a front end Web server like IIS, generally the accepted approach is to run a production application behind IIS to provide features, auto-restart, lifetime management of the server, SSL Certificates, Host Header support for multiple domains on a single IP Address, static content compression, static file caching etc. All these things can be handled by the Web Connection Server (courtesy of ASP.NET Core) but IIS is much better suited and vastly more efficient for these non-application Web Server tasks due to its tight Windows Kernel integration.

Easy Configuration

The most compelling reason for this new Web Server is that it's very easy to get started with. When you create a new project, the Web Connection Console now automatically creates a configuration file for both classic ASP.NET and the ASP.NET Core module.

For now the primary goal is to provide an easy server to get started with for development time. There's no configuration or installation of system components and the server can be auto-started as part of the new Launch("WEBCONNECTIONWEBSERVER") command that new projects provide. That command launches the Web Server, starts your Web Connection server, and automatically opens a browser window at the appropriate Web page.

Another important point: all configuration is in a single Web Connection specific XML configuration file that holds everything needed to serve static and Web Connection content. This includes scripts, default files, folder locations etc. It's basically the same stuff you've always configured in Web Connection.

The idea is when you get started with Web Connection you don't need to immediately start understanding all the details of how IIS works and how to configure that Web Server. You still need IIS for production, but for development none of that is necessary - unless you want to in which case you can still use IIS for development as well.

The Web Connection Web Server uses a separate, self-contained XML configuration file that holds all the settings related to the server. Here's what WebConnectionWebServerSettings.xml looks like:

<?xml version="1.0" encoding="utf-8"?><WebConnectionWebServerSettings xmlns:xsi="http://www.w3.org/2001/XMLSchema-instance" xmlns:xsd="http://www.w3.org/2001/XMLSchema"><HandledExtensions>.tp,.wc,.wcs,.wcsx</HandledExtensions><DefaultFiles>default.tp,Default.htm,index.html</DefaultFiles><VirtualDirectory>/</VirtualDirectory><MessagingMechanism>File</MessagingMechanism><ServerCount>2</ServerCount><AutoStartServers>false</AutoStartServers><ComServerProgId>Testproject7.Testproject7Server</ComServerProgId>    <ComServerLoadingMode>RoundRobin</ComServerLoadingMode><UseStaComServers>false</UseStaComServers><TempPath>..\deploy\temp\</TempPath><TempFilePrefix>WC_</TempFilePrefix><Timeout>90</Timeout><AdminAccount>ANY</AdminAccount><AdminPage>~/admin/admin.html</AdminPage><ExeFile>..\deploy\Testproject7.exe</ExeFile><UpdateFile>..\deploy\Testproject7_Update.exe</UpdateFile><UseLiveReload>true</UseLiveReload><LiveReloadExtensions>.tp,.wc,.wcs,.md,.html,.htm,.css,.js,.ts</LiveReloadExtensions><LogDetail>false</LogDetail><MessageDisplayFooter>Generated by Web Connection IIS .NET Connector Module</MessageDisplayFooter></WebConnectionWebServerSettings>

Again this should be familiar for those of you that are using Web Connection already - the settings are identical to the ASP.NET Module settings, with a couple of additional ones (at the top) that compensate for 'Web Server' configurations:

<HandledExtensions>.tp,.wc,.wcs,.wcsx</HandledExtensions><DefaultFiles>default.tp,Default.htm,index.html</DefaultFiles><VirtualDirectory>/</VirtualDirectory>

Handled extensions are all the extensions that are passed forward to the Web Connection server. This is the equivalent of script maps in IIS. The default pages are the default pages that are searched for when using extensionless URLs. Virtual Directory defines the application base path of the application which for the Web Server will almost always be /. If you're running an older application and you rely on a specific virtual path such as /wconnect/ it can be specified there to make sure the various admin pages in the server can find related resources properly.

Other than that - same as it ever was ??

Portable

Note that most of the settings are standard and the same for every project that uses the standard Web Connection project structure. The only thing that really changes are:

  • Extensions
  • Default Pages
  • Live Reload Extensions

everything else pretty much stays the same from project to project.

Oh and everything is portable - want to move the application to a new folder or run on a different machine? There's no additional config: Move your project to a new location and just start WebConnectionWebServer with a --webroot (or run the EXE from the folder) pointing at the new folder.

Command Line

There's also an install.ps1 script to make the server available in your PATH you so you can start it from anywhere. Preferrably you'd map this global version to the version in the Web Connection install folder. Once on the path you can do:

WebConnectionWebServer

in a Web root folder, or specify the folder from some other location:

WebConnectionWebServer --webroot "\WebConnectionProjects\TestProject7\Web"

When do run this it automatically opens the Web site in your default browser. By default Live Reload is also enabled so you're ready for productive work creating your application's content.

Each Project gets its own WebConnectionWebServer

Each project gets its own copy of Web Connection Web Server, so you can easily pin your application to a specific version of the server.

The reason for this is that if you decide to host your application using this new mechanism, the Web server interface is distributed with your application for easy configuration with IIS. Having the server in your project in a 'known location' also makes it easy for the tooling to automatically start the server via Launch().

The server code is small (about 500k) so it's not a burden to provide it for each project.

Running in Production

The main goal of this server is for use during development to provide an easy to get started environment. But you can also host the Web Connection Web Server in IIS using the ASP.NET .NET Core Module (ANCM) which hosts the application. This is similar to the way class ASP.NET is hosted in IIS, with tight integration directly into IIS for high performance operation.

This uses a much simpler hosting model in IIS that basically 'just runs' the .NET Core application. What this means is that a lot of the traditional IIS configuration that you had to do for ASP.NET falls away. In fact, IIS doesn't need to have a .NET Framework installation for this to work, although you do have to have the .NET Core Runtime installed on the machine.

Here's what the configuration for a Web Connection server application looks like in the \web folder of your project:

<?xml version="1.0" encoding="utf-8"?><configuration><configSections><section name="webConnectionVisualStudio" type="System.Configuration.NameValueSectionHandler,System,Version=1.0.3300.0, Culture=neutral, PublicKeyToken=b77a5c561934e089" /></configSections><webConnectionVisualStudio><!-- Configuration Settings for the Web Connection Visual Studio Add-in 
       Not used at runtime, only at the design time --><add key="FoxProjectBasePath" value="c:\WebConnectionProjects\MyProject\deploy\" /><add key="WebProjectBasePath" value="c:\WebConnectionProjects\MyProject\Web\" /><add key="WebProjectVirtual" value="http://localhost:5200" /><!-- Optional PRG launched when VFP IDE launches --><add key="IdeOnLoadPrg" value="" /><!-- The editor used to edit FoxPro code - blank means FoxPro Editor is used --><add key="FoxProEditorAlternate" value="%LocalAppData%\Programs\Microsoft VS Code\Code.exe" /></webConnectionVisualStudio><system.webServer><handlers><add name="StaticFileModuleHtml" path="*.htm*" verb="*" modules="StaticFileModule" resourceType="File" requireAccess="Read" /><add name="StaticFileModuleText" path="*.txt" verb="*" modules="StaticFileModule" resourceType="File" requireAccess="Read" /><add name="StaticFileModuleSvg" path="*.svg" verb="*" modules="StaticFileModule" resourceType="File" requireAccess="Read" /><add name="StaticFileModuleJs" path="*.js" verb="*" modules="StaticFileModule" resourceType="File" requireAccess="Read" /><add name="StaticFileModuleCss" path="*.css" verb="*" modules="StaticFileModule" resourceType="File" requireAccess="Read" /><add name="StaticFileModuleJpeg" path="*.jp*" verb="*" modules="StaticFileModule" resourceType="File" requireAccess="Read" /><add name="StaticFileModulePng" path="*.png" verb="*" modules="StaticFileModule" resourceType="File" requireAccess="Read" /><add name="StaticFileModuleGif" path="*.gif" verb="*" modules="StaticFileModule" resourceType="File" requireAccess="Read" /><add name="StaticFileModuleWoff" path="*.woff*" verb="*" modules="StaticFileModule" resourceType="File" requireAccess="Read" /><add name="StaticFileModuleZip" path="*.zip" verb="*" modules="StaticFileModule" resourceType="File" requireAccess="Read" /><add name="StaticFileModulePdf" path="*.pdf" verb="*" modules="StaticFileModule" resourceType="File" requireAccess="Read" /><!-- this is the only REQUIRED handler --><add name="aspNetCore" path="*" verb="*" modules="AspNetCoreModuleV2" resourceType="Unspecified" /></handlers><!-- check the path to the dll - in Project the below works   
         in a plain publish output use `.\WebConnectionWebServer.dll`  --><aspNetCore processPath="dotnet.exe" 
                arguments="..\WebConnectionWebServer\WebConnectionWebServer.dll"
                stdoutLogEnabled="false"
                stdoutLogFile=".\logs\stdout"
                hostingModel="inprocess"><environmentVariables><environmentVariable name="ASPNETCORE_ENVIRONMENT" value="Production" /><environmentVariable name="WEBCONNECTION_USELIVERELOAD" value="False" /><environmentVariable name="WEBCONNECTION_OPENBROWSER" value="False" /><environmentVariable name="WEBCONNECTION_SHOWURLS" value="False" /></environmentVariables></aspNetCore>               </system.webServer></configuration>

This config does two things:

  • Configures IIS to natively serve static files
  • Hooks up the .NET Core application via the ASP.NET Core Hosting Module (ACHM)

Additional IIS configuration settings can still be applied but by default those aren't necessary, so the above is a typical web.config which is completely boilerplate - nothing in here needs to change between projects.

Compatible with the existing ASP.NET Module

While the new server supports hosting under IIS, you can still use the existing battle tested ASP.NET based Web Connection Module. The new server and the old module are 99% compatible and can be used pretty much interchangeably. The module also saw a bunch of admin updates during these updates.

99%? There are a few obscure server variables that are IIS specific that are not available in the standalone server, but beyond that the code base for actual request processing is nearly identical to the old module.

Performance of the server is on par with the old module inside of IIS - in informal testing I don't see any significant performance gain or loss of using the .NET Core application inside of IIS.

Why this server?

As mentioned the main motivation for this server is the self-contained nature that makes it much easier to get started with Web Connection. You can simply install Web Connection - and make sure a .NET Core 3.x+ runtime is installed - and then run the WebConnectionWebServer locally. With integrated launch() behavior this can make getting started a no-configuration process.

The other reason is - progress. Microsoft has essentially discontinued .NET full Framework with all future improvements going into .NET Core. While there's not a huge difference in terms of how applications/servers are built, the way they are hosted is definitely different. This approach of using a runnable command line server, that can be automated easily is a good way to bring Web Connection in line with what is expected of other server solutions (like Node based apps for example).

So going forward this option (and it's only one option) provides some future proofing for Web Connection continuing to run on modern platforms - at least as long as FoxPro continues to run ??.

Updates to the Module and new Middleware Administration Pages

In concert with the new Web Server a bunch of work has been done to clean up the Module Administration interface. There are a number of enhancements here:

  • Clearer delineation between File Mode and COM Mode
  • Switching modes now shuts down servers both ways (didn't before)
  • Live Reload is now switchable on the Admin page
  • Additional editable fields in this view for quick updates

Both the Module and Middleware Admin pages have the same basic layout so for documentation purposes you'll see the same settings in both.

Console and Project Creation Improvements

The new Web Connection Web Server has been integrated into Setup and Project creation code:

so it works the same as other server types.

Launch.prg Improvements and Updating Launch.prg

The new Web Server has also been integrated into the Launch.prg so you can now do:

Launch("WEBCONNECTIONWEBSERVER")

*** or
DO .\Launch with "WEBCONNECTIONWEBSERVER"

There have been a ton of improvements in the new Launch() behavior to make it easy to switch between different server installations to start and run your Web applications.

Switching between modes is as easy as using a different Launch mode:

  • Launch("IIS")
  • Launch("IISEXPRESS")
  • Launch("WEBCONNECTIONWEBSERVER")

(assumes that the appropriate Web Server is installed and configured)

You can switch between modes as long as each mode has been configured. For now choosing Web Connection Web Server will also create a web.config that works with IIS Express even though the Web Connection Web Server doesn't use it when running local. This is so you can switch between modes. The new server only needs and uses web.config when hosted in IIS on a production server.

Because there are different modes, the Console writes separate config files:

  • web.AspNetHandler.config
  • web.DotNetCore.config

which are configured for the application and can be swapped into the live web.config. Typically you only use this for a production site swapping web.FotnetCore.config into the production web.config file for IIS hosting.

The Launch.prg file has been updated to make it easier to launch in different modes more easily. If you haven't used Launch.prg before, it provides application launching with a single command that:

  • Starts the Web Server (if required - for IIS Express/Web Connection Web Server)
  • Opens the Web site in your browser
  • Starts your FoxPro Web Connection server

all in a single command.

The Launch.prg files are generated for new projects, but the files are mostly generic with only a few generated values.

If you want to use an up to date Launch.prg for your project you can copy the template from \templates\Launch.prg and replace these <%= %> parameterized values defined near the top:

lcAppName = "MyApp"          && Project Name
lcVirtual = "MyApp"          && Project Name - used for IIS with Virtual folder
lcServerType = "IISEXPRESS"  && default server type when no parm is passed
lcWcPath = "c:\wconnect"       && or whereever Web Connection is installed

Once you've done this you now have an up to date Launch.prg file with all the latest and greatest settings.

Note that in recent versions this file has shuffled around a bit in how it works due to changes in project structure, the new Web Connection Web Server, Live Reload changes and a few other things. Going forward, this output should be more stable and not change between versions.

Non Admin Console Operation

The latest release of the WEb Connection Console is less strict about accessing various Console operation as Administrator. You might have run into this prompt:

Previously you couldn't continue, but now you can continue at your own risk ??.

You can now bypass Admin access if:

  • You're not installing for full IIS
  • You know that your account has permissions to write files in the targeted project folders

If you're not sure on the latter point - Windows can be a pain with where your local account can write to - it's still best to run as Admin.

What this means if you're creating new projects locally and you choose IIS Express or the new Web Connection Web Server it's possible to do those operations without Admin requirements.

Simplified Live Reload Configuration for ASP.NET Module

Previously the ASP.NET Module configuration for Live Reload required two steps:

  • Enabling the Live Reload Flag
  • Adding an additional handler for HTML/HTM files so Live Reload works for those

The reason for the latter was a pain point because you have to add it when you want live reload and remove it when you don't - it was easy to forget.

In this update Web Connection adds an internal Module that checks for HTML content and automatically injects the Live Reload scripts only if Live Reload is enabled.

So now, you only need to set the EnableLiveReload flag in one place both for the Web Connection Handler and Web Connection Web Server.

The Module/MiddleWare Admin page now also lets you toggle the state:

Toggling this switch now also automatically attempts to update the EnableLiveReload=On setting your MyApp.ini file. If there's only a single INI file in the \deploy folder the module now sets the value. You may have to restart the Web Connection FoxPro server to see the change however for server side code changes. Client side and Script code changes work immediately.

New wwCookie Class for Response.AddCookie()

The Web Security keeps getting more complex and managing cookies these days reflects that. There are tons of options you can set on a Cookie and the old behavior of the Response.AddCookie() method was quickly getting out of hand.

Instead of passing a ton of parameters, you can now pass a new wwCookie object that encapsulates all those settings more easily:

loCookie = CREATEOBJECT("wwCookie")

loCookie.CookieName = "testvalue"
loCookie.Value = "NewValue"
loCookie.Expires = DATE() + 10
loCookie.SameSite = "None"
loCookie.Secure = .T.
loCookie.HttpOnly = .T.

* ? loCookie.ToString()  && outputs the generated cookie string

*** Pass the cookie to set on the current request
Response.AddCookie(loCookie)

The cookie object has a number of new options that weren't available for the parameters only .AddCookie() method and this new object allows for adding additional features should they come along later.

Easy Async Method Invocation for wwDotnetBridge

wwDotnetBridge already includes an Async helper that allow you execute any method asynchronously on a new thread via .InvokeMethodAsync() method. The process works by calling a method with its normal parameters plus a callback object that is called when the operation is complete.

However, one issue that's getting more common is that .NET supports async/await which is an async pattern that the .NET Runtime uses to process Task based APIs. It's been possible to work with Task based APIs via wwDotnetBridge, but it wasn't a good approach as you had to capture the Task returned from .NET and eventually synchronously wait for it to complete.

The new InvokeTaskMethodAsync() provides a better way to do this using the same callback mechanism used for InvokeMethodAsync(): Passing an extra callback object to the method that can call you back when the result completes.

Here's an example of what you can do calling the Async .NET WebClient.DownloadStringTaskAsync(url) method:

do wwDotNetBridge
LOCAL loBridge as wwDotNetBridge
loBridge = CreateObject("wwDotNetBridge","V4")

loClient = loBridge.CreateInstance("System.Net.WebClient")

loCallback = CREATEOBJECT("HttpCallback")

*** execute and returns immediately
loTask = loBridge.InvokeTaskMethodAsync(loCallback, loClient,"DownloadStringTaskAsync","https://west-wind.com")
? loTask  && object

? "Done..."

RETURN


DEFINE CLASS HttpCallback as AsyncCallbackEvents

*** Returns the result of the method and the name of the method name
FUNCTION OnCompleted(lvResult,lcMethod)

? "File received. Size: " + TRANSFORM(LEN(lvResult))
? SUBSTR(lvResult,1,1500)

ENDFUNC


* Returns an error message, a .NET Exception and the method name
FUNCTION OnError(lcMessage,loException,lcMethod)
? "Error: " + lcMethod,lcMessage
ENDFUNC

ENDDEFINE

This code executes and doesn't stop when the method is invoked. Instead the HttpCallback.OnCompleted() handler is called back when the result has been downloaded.

This makes it a lot easier to consume async .NET APIs and still get the benefit of the Async functionality. Note that unlike InvokeMethodAsync() this method typically executes on already allocated threads from the .NET Thread pool so it's less resource intensive that InvokeMethodAsync() which uses threads.

Breaking Changes

There are a few small breaking changes in this release.

wwRequestLog Structure Changes

First you should delete your wwRequestLog.dbf file as the structure has changed. There's a new field that's been added for Account and the field widths have been tweaked.

Live Reload Configuration Changes

Live Reload Configuration has changed and is simpler now, but if you were using it previously you'll want to update your web.config file to reflect the simpler settings.

Remove old Handler (if you have it)

<handlers><add name=".LiveReload_StaticHtml_wconnect-module" path="*.htm*" verb="*" type="Westwind.WebConnection.WebConnectionHandler,WebConnectionModule" />
   ... leave additional handlers</handlers>

Add new Handler

<modules><add name="WebConnectionModule" type="Westwind.WebConnection.WebConnectionModule,WebConnectionModule"/></modules>

Summary

So these are the highlights of new and improved features - there are a handful more and you can look at the complete change log and the referring links in there.

Enjoy...

Web Connection 7.12 Release Notes

$
0
0

We've just released another update to Web Connection - Version 7.12 is a maintenance release that brings a handful of new features and fixes a few small issues.

This release continues on the current trajectory of improving installation, project management, debugging, executing, deploying and managing Web Connection applications more easily with focus on the project creation and Launch tooling, improved administration interfaces and improved deployment tools.

Let's look at a few of the highlights in this release.

Update Project Resources Helper Console Task

This release adds a new Console UpdateProjectResources operation that allows you to update an existing project's support resources to the latest files that an Web Connection update ships.

When you install a new version of Web Connection, there may be new versions of a number of files added to the distribution:

  • Updated Web Server Module DLLS (in templates\scripts)
  • Updated FoxPro support library DLLS (in deploy)
  • Updated Web Resources (in templates\ProjectTemplate\Web)

While there are not that many files, it's hard to keep track of which files have been updated and which have not.

The new feature is in the form of a CONSOLE command that you can issue from inside of FoxPro:

* Prompts for everything
do Console with "UPDATEPROJECTRESOURCES"

* Use command line parameters
do Console with "UPDATEPROJECTRESOURCES",  ;"c:\WebConnectionProjects\TestProject",;"modules,dlls,libs,scripts,css,views"

If you run without parameters you're prompted for the root folder of a Web Connection project (6.x+):

The expectation here is that it uses the standard Project structure with deploy and web folders and with the web folder having lib, scripts,css and views folders.

The second parameter prompts for the type of resources to update:

These are the 'items' to update:

  • modules
    The Web Connection Web Server dlls: webconnectionmodule.dll, wc.dll or the Web Connection Web Server folder.

  • dlls
    Updates the DLLs in the deploy folder. This is wwipstuff.dll, wwdotnetbridge.dll, and the various support dlls like newtonsoft.json.dll, markdig.dll and renci.ssh.dll. Note that in v7 projects install with private copies of these files so that when you deploy you have a self-contained install of files and during dev you run with the same DLLs you are likely to deploy.

  • libs
    Updates the standard JavaScript and CSS libraries used by the default Web Connection templates. This includes Bootstrap, FontAwesome, jquery and a few others.

  • scripts
    These are Web Connection specific scripts like ww.jquery.js, jquery.makeTableScrollable.js and some older Angular support libraries.

  • css
    Replaces the default CSS stylesheet application.css. The old one is backed up with a date name attached.

  • views
    Updates the web\Views folder which holds the default page template views that are used to render the stock UI used in the samples and for default layouts used in the Visual Studio and Visual Studio code templates.

Make sure you back these up before updating if you've made changes to them. I recommend creating a back up folder and then comparing with BeyondCompare or similar tool to see what's changed.

When you run this tool please make sure you carefully look at the options in the second dialog (or provide them directly on the command line) as these will overwrite existing files and if you've changed your templates/stock files this will blow away your changes. Make a backup first - always when running this command against a project.

We've had a feature like this before in Web Connection but it wasn't complete and kind of buried. In the next version I'll add this officially to the Console window with a dialog that will make this even more visible and perhaps a little easier to use yet but for now the command line version should be big step up to keep your projects up to date.

Updated and Consolidated Module/Middleware Administration Page

The Module Administration Page traditionally has held only the configuration information for the Web Connection ASP.NET Module or now also the ASP.NET Core Middleware for the Web Connection Web Server. The settings you could see and set there were only for the Web Server specific settings.

Consolidated Administration Page

In this latest update the relevant admin.aspx or admin.html page options, have been moved into the Module Administration Page.

The URL for the Module Administration page is:

  • /admin/Administration.wc
  • /admin/ModuleAdministration.wc

Actually you don't need the /admin path - it works from anywhere.

The new page looks like this:

This may look familiar, but there are a number of new items on this page.

  • Clearer COM/File Mode indicators
  • Summary of server settings at a glance (Web Server Section)
  • Logging Section that shows both Module logging and Fox Server Logging
  • Pack and Reindex Session and Request log is on this page now
  • Live Reload Settings including turning on and off

Note that the ASP.NET Core Middleware for the Web Connection Web Server has a slightly different but functionally equivalent admin page.

This is now the main Administration page that replaces the default admin.aspx.

The old admin.aspx pages had a number of options that were linking to operations that are now on this page and a few options that weren't really supported anymore. IOW, this page has everything that pertains to Administration now.

This means there's a single page to go to so you don't have to click through.

Admin Authentication Clarifications

With the single Administration.wc page, there's now also is only a single Authentication that occurs and we have a little more control over that process.

If Authentication fails on the local machine, there's now a detailed error page:

The text in yellow is only shown if accessing the page locally which hopefully will help troubleshoot any login issues.

.NET Core self contained Web Connection Web Server

Web Connection 7.10 introduced a new Web Server for Web Connection: The Web Connection Web Server which is based on .NET Core and provides a standalone, fully self contained, .NET Core based Web Server that you can run from the command line and that includes built-in Live Reload Features that can detect changes in HTML, CSS, Script pages as well as code changes and automatically refresh your browser on these changes.

The server requires that .NET Core 3.x is installed, but otherwise is fully self contained and can be run from the command line which means you can easily automate launching it. The server also is installed as part of every project so it's there for every project, meaning you can move this to a different machine, make sure .NET Core is installed, and then run the application out of a folder.

Self-Contained Local and Intranet Web Sites

A self-contained Web Server may not sound that impressive, but it is actually quite cool: You can easily deploy a local, fully self contained application that runs a Web Connection Web site. Since the Web Server is part of the project everything you need to run the site can be bundled into an XCOPY deployable folder.

To launch your site you can then simply do:

cd \WebConnectionProjects\TestProject\web
..\deploy\testproject.exe
..\WebConnectionWebServer\WebConnectionWebServer

You can run a site on a local machine either in a browser, or build a desktop application around it that accesses the site via a Web Browser control, or makes REST API calls into the Web Connection application.

You can read more about this new Web Server in the documentation, both on how to run it locally for development as well as in deployed applications:

IIS Integration for the .NET Core Middleware Added

The standalone server is great for local development because you can simply launch it as part of a startup program - like the provided launch() command that is created with new projects - and just be up and running. Other than the .NET Core 3.x requirement there's nothing else to install. It just works.

But you can also run the .NET Core Server inside of IIS using the ASP.NET Core Hosting Module that is part of IIS. This Microsoft provided module basically runs a .NET Core based server inside of IIS as an InProcess component in much the same way classic ASP.NET applications were run. You can now use this feature to host a site in IIS using .NET Core.

The West Wind Message Board has been running using the Web Connection Web Server middleware inside of IIS for nearly a month, and it's been working as well as the classic ASP.NET handler. There have been no issues or incompatibilities and performance is on par with the ASP.NET Module.

7.12 also eliminated a few of the outstanding differences between the ASP.NET Module and the ASP.NET Core Middleware which related to handling Windows authentication. Both Module and Middleware are now nearly 100% compatible. There are few differences in the server variables that are published since the middleware has to mimic the behavior of the ASP.NET variables published and some of those values are not published. However, differences here should be very rare unless you use some obscure IIS Server Variable.

Running on Linux? Yes you partially can now!

Yes, hell may be freezing over, but with the .NET Core middleware it's actually possible to run the Web server portion of Web Connection on a Linux server. The following is a screen shot of Web Connection running on my Ubuntu Linux machine:

As cool as that is, it's important to understand that you still need Windows in order to run the FoxPro server with your application code. But it is possible to run the Web Server either standalone as I'm doing in the example above, or hosted behind a Web Server front end like nginX or haProxy.

In order for this to work you have:

  • Web Connection Web Server ASP.NET Core server running on Linux
  • Optionally the server is launched behind nginX or haProxy, Apache etc.
  • Using File based messaging with Temp files going to a Shared location
  • The Web Connection FoxPro Server runs on Windows

The key here is that it requires:

  • Running in File based mode
  • Using a shared Temp file location for File based message files
  • Separating Web (on Linux) and Deploy Folders (on Windows)
  • Having the Windows Machine Access the Linux File System (via Samba)

Running some proof of concept tests of this setup allowed me to run the West Wind Message Board application in this mixed environment where the Linux provides the Web Server, and Windows provides the Application Server.

It works, but there are still a few issues to work out - namely Administration authentication which currently relies on built-in Windows Authentication that's not available on Linux. An alternate authentication mechanism may be required.

The other consideration is this: Since you still need a Windows box to run the FoxPro application, is this even of interest to anyone? Over the years I've heard requests for this feature on numerous occasions from developers at organizations that don't use any Windows Web servers and in these scenarios it may be possible to deploy this as a solution even though a Windows server (or desktop?) machine somewhere on the network may still be required.

The other downside here is that it has to run in file mode. OBviously COM doesn't work on Linux, so the only way to communicate between Windows and Linux then is file based mode. This in turn requires some logic to manage the FoxPro servers so that when servers die new ones can be started.

Interested to hear if there are people reading this and thinking that this might be an interesting to use, or whether this is all academic...

Binary Server Communication for COM

The last item here is an internals feature, but it actually it turns out that this has quite a positive impact on memory usage and performance both for the .NET Core and ASP.NET implementations.

Web Connection in the past has always send COM server messages for request data and response data via strings. FoxPro treats binary strings and binary data identically, and in the past COM also was able to pick up raw ASCII text data and deal with it as binary.

The wwServer::ProcessHit() method in the server takes a string input of the server's request buffer, and returns a string result of the Response output.

While building out the COM interface for the .NET Core Server I unfortunately found out that .NET Core apparently handles Unicode string conversions over COM slightly differently than classic .NET which resulted in binary or even extended ASCII data getting corrupted in some situations.

As a result I changed the entire data message pipeline for both the .NET Core Middleware and the ASP.NET Module to use binary data. The request data from .NET is now sent as raw binary data to FoxPro and FoxPro turns its final Response output into a binary stream that is sent back to .NET.

There's now a wwServer::ProcessHitBinary() method that receives a BLOB input of raw binary data from the COM object, and returns the final out as a BLOB back to the COM server.

The binary messages eliminate the COM Unicode string conversions which were quite expensive in terms of memory and also overhead on large request or response bodies. Unicode conversions required an extra string variable to hold the temporary data, and that is now eliminated. This removes the overhead of processing the string as well as the extra (double sized) memory used by the intermediate string. This change should help reduce memory overhead in the Web Server process for large request or response bodies as well as improve performance slightly as that memory conversion is performed. Now data is just raw binary that is converted directly in FoxPro as UTF-8 for inbound data, or as a raw binary array that is sent straight into the ASP.NET output pipeline without any conversions.

Template and Library Updates

The Web Connection default UI templates have seen some minor tweaks and adjustments and if you use the stock templates you might want to update to the latest versions. We've also updated Bootstrap and FontAwesome to the most recent versions and Bootstrap is now integrated with the bundled script library that doesn't load the support Popper.js support library anymore. That library has been removed (but will still be there if you upgrade).

All the Administration links in the default templates have been updated to point at admin/Administration.wc instead of admin/admin.aspx.

You can use the new DO CONSOLE "UPDATEPROJECTRESOURCES" command to update resources in your project(s) as described earlier in this post. Make sure you back up or commit changes to your project first before updating templates.

Note that template changes are always optional - if you're using existing templates you can just use the old ones, but from time to time it might be a good idea to compare (using BeyondCompare for example) to see what's changed over time and merge changes that you like into your templates if you don't want to do a wholesale change.

Summary

Functionally Web Connection 7.12 is a maintenance update and there are no breaking changes in this release other than you might want to optionally update your default templates in your projects.

The changes I've described here are all operational and they don't affect your application code - all these changes deal with administration and management of your projects and applications so updating in this release should be pretty smooth.

Enjoy.

Troubleshooting Asynchronous Callbacks into FoxPro Code

$
0
0

FoxPro is not known as a platform for multi-threading or for dealing with asynchronous code, so it comes as no surprise that when working with asynchronous code that calls back into FoxPro from other applications can be challenging for those of us still working with FoxPro.

Lately, I've been working with a lot of 'callback' code in FoxPro from a number of different scenarios:

  • wwDotnetBridge Async Calls
  • wwDotnetBridge Thread Operations
  • Callbacks from Remote services like SignalR
  • Callbacks from the WebBrowser Control and JavaScript

All of these scenarios have a common theme, namely that an external application is calling back into FoxPro code. The new async features in wwDotnetBridge in particular make it very easy to make external code execute asynchronously and have you get called back when the Async operation completes.

The following example calls any .NET method asynchronously and returns the result back to with a callback when it completes rather than having the FoxPro caller waiting for it:

loBridge = CreateObject("wwDotNetBridge","V4")

loTests = loBridge.CreateInstance("Westwind.WebConnection.TypePassingTests")

*** IMPORTANT: The callback object must remain in scope
***            Either use a public var, or attach to an object that
***            stays in scope for the duration of the callback
PUBLIC loCallback
loCallback = CREATEOBJECT("MyCallbacks")

*** This methods returns immediately - then fire events when done
loBridge.InvokeMethodAsync(loCallback,loTests,"HelloWorld","Rick")

RETURN

*** Handle result values in this object
*** The callback object is called back 
*** when the method completes or fails
DEFINE CLASS MyCallback as AsyncCallbackEvents

*** Returns the result of the method and the name of the method name
FUNCTION OnCompleted(lvResult,lcMethod)
DOEVENTS && recommended!
? "Success: " + lcMethod,lvResult
ENDFUNC


* Returns an error message, a .NET Exception and the method name
FUNCTION OnError(lcMessage,loException,lcMethod)
DOEVENTS && recommended to avoid re-entrancy issues
? "Error: " + lcMethod,lcMessage
ENDFUNC

ENDDEFINE

Likewise in one of my applications - HTML Help Builder - I do complex interop with a Web Browser control where JavaScript code running inside of the Browser document can call back into FoxPro code. For example, when the editor updates text after a short timeout it calls back into my FoxPro application and requests that the preview should be updated, or that the editor text should be saved to disk.

This all works surprisingly well.

Until it doesn't ??

Async Code is not like Regular Code

As mentioned at the start, FoxPro is not really a multi-threaded environment, so it has no notion of external code calling back into FoxPro. There are a few well known mechanisms that can handle async operations that are native to FoxPro:

  • FoxPro Events (like Click, Change, Timer etc.)
  • ActiveX Control Events

These high level events are designed into FoxPro and they understand some of FoxPro limitations so they tend to fire into your code in a controlled manner. For example a click event or timer event doesn't interrupt executing code in most cases.

The same is not true for 'manual' callback code. If you pass a random FoxPro object to a COM component and that COM component calls back from an Asynchronous operation or even from a completely non-UI thread, the callback will happen immediately and potentially interrupt currently executing code.

FoxPro internally manages to marshal the thread back to the UI thread, but the timing of it is not controlled - the code can fire at anytime and will interrupt any running code on the next line. The currently executing command or statement completes and then the interrupting code is fired.

FoxPro's execution scope is basically at the line level. Each line of code is guaranteed to complete before something else runs. But any code called externally while another function or code block is running can potentially be interrupted, mid-function. So if an external component happens to call back while executing a long running piece of code it's quite possible and even likely that the external will start executing its own code right in the middle of the previously running code.

If that sounds scary it should - because it's one of those things that'll work without problems 99% of the time, but bite you in unpredictable and random ways.

Async Defensive Programming

If you are dealing with async code in FoxPro the first thing you should always strive for in callback is to:

  • Minimize the amount of code you run
  • Try to avoid changing any non-local state

The idea is if your code interrupts some already running code, you don't want to change the execution state of the original code, so that it can complete processing without errors when control is returned to it.

For example, assume that you have some code that runs in a SCAN loop looping through rows of a table. Now an async call comes in from a COM object, and in that code you change the workarea or close the table that the SCAN loop is using. When the execution pointer returns to the originally running SCAN loop code, that code has no idea that the cursor was closed or the workarea has moved so the code will likely fail as it continues executing. This is an extremely hard to debug error because when you look at that code you probably think: "How could this possibly not work? I'm using a SCAN and I'm not changing workareas, so why is my cursor no longer selected?" Async code is sneaky that way.

By reducing the amount of state you change in async callbacks and resetting anything you touch that is non-local to its original state, you can minimize problems with interrupted code turning into corrupted code.

If you have to change state in callback code another good strategy is to store the relevant state somewhere - in a table, a global variable or a state store - and then access that data in a more controlled way. Perhaps if you know that your async call is likely to interrupt a loop of some sort, perhaps the loop can check for some state and then explicitly process the async data using the standard top-down FoxPro call stack which is more predictable in behavior.

Mitigating Async Callback Hell - DOEVENTS

It may not seem super obvious, but FoxPro has a command to let FoxPro catch up with existing non-idle processing and that command is DOEVENTS.

Here's what the FoxPro DOEVENTS documentation says:

FoxPro DOEVENTS Command

You can use DOEVENTS for simple tasks such as making it possible for the user to cancel a process after it starts, for example, searching for a file. Long-running processes that yield control of the processor are better performed using a Timer control or delegating the task to a COM Server executable (.exe). In this situation, the task can continue independently of your application, and the operating system takes care of multitasking and time allocation.

Any time you temporarily yield control of the processor in an event procedure, make sure the procedure is not run again from a different part of code before the first call ends. Doing so might cause unpredictable results. In addition, do not use DOEVENTS if other applications might interact with your procedure in unforeseen ways during the time you have yielded control of the processor.

These docs are sufficiently cryptic as they don't really address all that DOEVENTS does and somewhat misrepresents by referring only to Windows events (which also happen to apply to FoxPro events).

DOEVENTS's purpose is essentially to let other code in a different execution context run, before the code following DOEVENTS fires. This can be code on other threads (including FoxPro internal and Windows events), but it can also be FoxPro code like events fired from the UI or things like Timer events.

This isn't always as clean as it sounds because of the way FoxPro decides what makes up those execution context boundaries is pretty vague, but in most cases you can assume that FoxPro will process other code that is executing in the event queue. However, if you have very long running code, FoxPro may still butt into the middle of code so it's not 100%, but for most scenarios DOEVENTS does what you want for async code - it lets other events/code finish before executing your next line of code.

Therefore it's a good idea in any code that is called back asynchronously to start with a DOEVENTS command.

Here's an example:

*** Asynchronusly called back from WebBrowser control
FUNCTION PreviewMarkdown()

*** Minimize overlapping preview calls
DOEVENTS

*** Update TextBox and ControlSource
this.RefreshControlValue()

*** Preview the Markdown, this can take some time to process and 
THISFORM.Preview(1)

ENDFUNC

A real-world Example Failure

Let me put this into perspective with a real world example in Help Builder using the previous code snippet. For the longest time I've been having major issues with the editor with largish Markdown topics in the editor. Essentially the editor would start slowing down and at some point start generating corrupted Preview HTML.

In the code above the thisform.Preview(1) method call essentially creates a Markdown file on disk and then reads in the string and updates the content from the rendered output in browser by stuffing the content into an HTML DOM element. For the longest time I've been using this code I didn't have the DOEVENTS call in this method call.

The code still works just fine most of the time for most smaller or medium sized topics when the content generation is very fast. But as topics get larger the topic output creation on disk gets slower. I have one topic in the Web Connection documentation (the Change Log) that is a massive 2000+ line document that's nearly a 150k of text.

And guess what: Without the DOEVENTS call multiple PreviewMarkdown() calls can potentially start executing concurrently. The editor asks for a refresh and asynchronously hands off to FoxPro. I then keep typing and as I stop or click I might again trigger a PreviewMarkdown() call, but before the last one completed. Because JavaScript is asynchronous, this totally can happen.

Wanna take a guess what happens next?

The original call to PreviewMarkdown() is interrupted, and the new call starts executing, it runs for a bit, then the other one starts going again and so it goes back and forth.

In that scenario there is some accidental shared state: The HTML output file that is generated as part of Markdown generation.

It's nasty: The routines that write the output to disk are competing with each other essentially ending up with multiple file writers writing content concurrently to the same file. The file corrupts with invalid and duplicated HTML content, the update string ends up missing and the content rendered is completely borked, which to top it off happens to also screw up the Web Browser control rendering which is trying to make sense of the now 300k+ file of badly misformatted HTML. Boom!

It's ugly as heck. The end result is that browser is overwhelmed by the long misformatted document and because it takes so long to render it starts slowing down the UI thread. Meanwhile new requests for previews come in because of the timing and the entire application crawls to a near stop with characters painting to the screen.

It took me forever to figure out what was going on here because the right methods were being called and the input parameters always are correct. Finally, I broke down and used debug outs and log files to trace the output written actually captured, and the code always had the correct string output, but the on disk the final HTML file would often be corrupted. I tried a million things trying to avoid writing when another write was already in progress etc. That didn't help...

... until I realized that this was actually occurring because events were overlapping! Lightbulb meet keyboard: Adding DOEVENTS all but eliminated the problem even with my massive change log file. Not 100% - very, very large files can still be problematic as eventually DOEVENTS will return even if other code has not completed.

Throttling and preventing Nested or Stacked Callbacks

Another very important thing that I ended up implementing after this discovery was better support for throttling. My editor already debounces keyboard input by about a second of idle time - meaning the preview is only refreshed when you stop typing for at least a second.

However, adding some additional checks at the top line code that basically check if the rendering code is already executing and disallow access if it is was also important in making the problem go away. In async call accidentally dual executing code can be a real killer because it can cause odd failures as perhaps the same state (in my case the rendered preview file) is accessed, or simply because the the increased resource use causes a slowdown that often invites even async fox code executing.

Here's what this looks like in the actual implementation of the simpified PreviewMarkdown() I showed earlier:

LPARAMETERS lvParm1, lvParm2
LOCAL loBand, lcAnchor, lnEditorLine
PUBLIC __plPreviewRefreshing

DOEVENTS

this.RefreshControlValue()

IF !__plPreviewRefreshing AND VARTYPE(THISFORM.oIE) = "O"
  __plPreviewRefreshing = .T.
  * DebugOut("Previewing actual" + TRANSFORM(SECONDS()))
  lcAnchor = .f.  
  TRY
 	 lnEditorLine = this.texteditor.getlinenumber(.T.)
  	 lcAnchor = "pragma-line-" + TRANSFORM(lnEditorLine)
	 DOEVENTS  
	 * THISFORM.DoEditOperation("cmdSave",lcAnchor)
     THISFORM.Preview(1,lcAnchor,.T.) 
  CATCH
  FINALLY
     __plPreviewRefreshing = .F.
  ENDTRY

ENDIF

Notice the __plPreviewRefreshing public variable which is use to prevent re-entrancy. The code uses a TRY/FINALLY block to ensure that the variable is always reset to .F. even if for some reason the code fails.

Bottom line if you know you have async callback code think about and understand what happens when the same code executes simultaneously, and if it can't work that way, make sure that there are safeguards to prevent the same code from being executed if another 'callback' is already running it.

Summary

Between DOEVENTS and the re-entrancy check I was able to get the editor to work much more reliably even with fairly large documents. Due to FoxPro's relative slow ActiveX interface and UI thread marshaling the performance is still not anywhere near what I see with Markdown Monster in .NET, but the behavior is much closer now than previously.

I'm very happy for solving this long standing problem I've been battling for a few years in Help Builder. Needless to say I'm stoked this simple solution worked, although I sure as heck would have preferred to find it much sooner and before trying so many different things first (like creating a .NET based browser control and calling that from FoxPro on a completely separate thread which didn't help for the same reasons).

If you are using asynchronous callbacks in FoxPro from anything that is calling you back via COM or any other truly asynchronous interface, make sure that you use DOEVENTS to help mitigate re-entrancy problems and if you know the same bit of code may be called quickly in succession either make very, very sure that there's no shared state, or else block off access while one callback is already in progress.

Hope this helps some of you out.

this post created and published with the Markdown Monster Editor

FoxPro Date Rounding Errors in COM and .NET

$
0
0

Ran into a nasty problem with COM Interop in .NET recently based on a message on the West Wind Message board. Basically the initial message points out that dates were getting compromised in two way JSON conversions when using wwJsonSerializer.

.NET for Date Handling

Date handling in FoxPro is decidedly lacking because FoxPro dates have no concept of time zone association. FoxPro only supports 'local' dates meaning dates reflect current Windows timezone. For JSON serialization typically the date needs to be encoded either using a UTC date that adds or subtracts the timezone offset or by specifying the local date with a timezone offset.

There are ways to do this in FoxPro using the Windows Timezone APIs but it's pretty gnarly code that requires structures and several API calls which are generally fairly slow in FoxPro.

So wwJsonSerializer uses some .NET code to serialize dates properly and do both the UTC conversion and JSON encoding in .NET.

I then have a JSONDate() function that looks like this:

FUNCTION JsonDate(lvValue, llAssumeUtcDate)
LOCAL lcDate, loBridge

IF VARTYPE(lvValue) = "D"
	lvValue = DTOT(lvValue)
ENDIF	
IF EMPTY(lvValue)
	lvValue = {^1970-1-1 :}
ENDIF

*** Make sure wwDotnetBridge is loaded with DO wwDotnetBridge
loBridge = EVALUATE("GetwwDotnetBridge()")
RETURN loBridge.oDotnetBridge.ToJsonUtcDate(lvValue,llAssumeUtcDate)

There's similar code in wwJsonSerializer() that does the inline date serialization rather than calling this function and checking for the library for every date conversion.

The original .NET function was super simple:

public string ToJsonUtcDate(DateTime dt, bool isUtc)
{
    if (!isUtc)
        dt = dt.ToUniversalTime();
    return JsonConvert.SerializeObject(dt,wwJsonSerializer.jsonDateSettings);
}

So far so good. The code works. In fact if I do this:

? TRANSFORM(JsonDate(DATETIME()))
? TRANSFORM(JsonDate({^2020-06-03 19:00:00}))
? TRANSFORM(JsonDate({^2020-06-02 20:00:00}))
? TRANSFORM(JsonDate({^2020-06-02 20:01:19}))
? TRANSFORM(JsonDate({^2020-06-02 23:59:59}))
? TRANSFORM(JsonDate({^2020-06-02 00:00:00}))

Everything works just fine - the dates are created as you'd expect:

No problems. The dates are offset by the UTC conversion and the values are coming back correctly.

Dates out of a Database == Date Rounding Problems

However when using a cursor, some date values are getting slightly changed to what looks like a rounding error. Check it out:

That one date for some reason contains fractional millisecond value. As you can see in the Fox code all the dates are assigned the same way, but the second date always renders with the fractional millisecond value.

Weird!!!

When checking this code in .NET, I can see that the date value comes in invalid from the get-go, which means it's not .NET that's mucking up the value. The failure is somewhere in FoxPro's conversion of:

  • A DateTime value in the database
  • COM Call into .NET

The important and very weird thing here is that this only happens with cursor date values. It doesn't happen - even with the very same date value - when the date is directly passed to .NET. if you look at the sample code above you can see I'm passing the same exact date in the first block, and then again in the cursor sample. It works in the first block without the fractional value, and gets munged in the second.

Hack me up!

I went through a few iterations in trying to fix this, but in the end decided to create a very hacky fix in the .NET function to fix up the date.

The idea is to basically create a new date and check for the millisecond value and round that value up if it's over 500 milliseconds. For problem values the millisecond value always is 999, so it's easy to find when there is a problem. FoxPro dates only have second resolution that you can set so in theory there never should be a millisecond value.

With that here's the code that checks and recreates a new date if the millisecond is set:

public string ToJsonUtcDate(DateTime time, bool isUtc)
{
    // fix rounding errors
    int second = time.Second;
    int minute = time.Minute;
    int hour = time.Hour;
    int millisecond = 0;
    if (time.Millisecond > 500)
    {
        second = time.Second + 1;
        if (second > 59)
        {
            minute = minute + 1;
            second = 0;
        }
        if (minute > 59)
        {
            hour = hour + 1;
            minute = 0;
        }
        if (hour > 23)
        {
            hour = 23;
            minute = 59;
            second = 59;
            millisecond = 999; 
        }
    }

    // we need to fix the date because COM mucks up the milliseconds at times
    var dt = new DateTime(time.Year, time.Month, time.Day, hour, minute, second, millisecond );

    if (!isUtc)
        dt = dt.ToUniversalTime();
    var json = JsonConvert.SerializeObject(dt,wwJsonSerializer.jsonDateSettings);
    return json;
}

Yeah ugly as hell and it has one potential failure point in the 23:59 - 00:00 minute of the day. The code here opts to not roll over the date because adding a day gets way more complicated due to calendar issues. Luckily it looks like 23:59:59 and 00:00:00 are dates that work and don't have problems.

Other Ideas? Be very Careful!

As I mentioned I had a few other ideas. One was to figure out the dateTime offset once and then just use TTOC(ltDate,3) to convert into the ISO 8600 format.

Something along the lines of this:

IF THIS.nUtcTimeOffsetMinutes == -1
	IF ISNULL(this.oBridge)
		THIS.oBridge = GetwwDotnetBridge()
	ENDIF
	THIS.nUtcTimeOffsetMinutes = this.oBridge.oDotnetBridge.GetLocalDateTimeOffset()
	*this.nUtcTimeOffsetMinutes = THIS.oBridge.GetProperty(loNow,"Offset.TotalMinutes")	
ENDIF

IF (!this.AssumeUtcDates)
    *** Date is not UTC formatted so add UTC offset
	THIS.cOutput = this.cOutput + ["] + TTOC(lvValue + (-1 * this.nUtcTimeoffsetMinutes * 60),3) + [Z"]
ELSE
	THIS.cOutput = this.cOutput + ["] + TTOC(lvValue,3) + [Z"]
ENDIF

This seems to work fine, but it's not quite accurate. The reason is that UTC dates actually reflect the active Daylight savings status in the offset. So if you pick a date and time in January and one in June the time of otherwise identical time values are going to be different in UTC format. The code above does not take that into account and this will cause problems in de-serialization.

Therefore it's very important that the date conversion properly handles the UTC timezone conversion or writes out the proper timezone offset into the string. Both require the correct timezone for the specific date so this is critical. This is hard as heck to do with FoxPro code and even the Windows APIs, but trivial in .NET which automatically handles proper UTC processing of dates time values.

Summary

FoxPro's dates are simple, but when they travel over COM funny things can happen. And it looks like FoxPro dates that live in Cursors have some extra screwy characteristics that can cause problems with the seconds/milliseconds rounding down to fractional values that effectively corrupt dates for FoxPro's second resolution.

The workaround above I showed that explicitly recasts a date in .NET and checks for 'rounding' errors is nasty but it works and can be applied to any application that needs to accurately get FoxPro dates into .NET.


Workaround for horrendously slow SUBSTR Character Parsing in FoxPro

$
0
0

FoxPro string processing generally is reasonably fast. String processing has always been optimized with a number of optimizations that make FoxPro - despite its age - reasonably competitive when it comes to effective string processing.

But there's an Achilles heel in the string processing support: There's no decent high performance way to iterate a string character by character. If you are building system components like parsers that's a key feature and it's one that FoxPro - and there is no other way to say this - sucks at.

SUBSTR(): Slow as Heck

The FoxPro SUBSTR() function is the only native language function that you can use to iterate over string character by character:

FOR lnX = 1 to LEN(lcString)
   lcChar = SUBSTR(lcString,lnx, 1)
ENDFOR

At first glance this seems fine. If you work with small strings this is reasonably fast and there's no problem. But if the longer the string gets the slower this function becomes.

How slow? Very! Consider this 1mb string and parsing through it character by character:

*** Warning this code will lock FoxPro for a long time!
LOCAL lnX, lcString
lcString = REPLICATE("1234567890",1000000)

lnLength = LEN(lcString)
TRANSFORM(lnLength,"9,999,999")

IF .T.
lnSecs = SECONDS()

FOR lnX = 1 TO lnLength
   lcVal = SUBSTR(lcString,lnX,1)
ENDFOR

*** 35 seconds! Holy crap... 
? "SUBSTR: " +  TRANSFORM(SECONDS() - lnSecs )

ENDIF

Yikes! On my machine this takes an eternity of 35 seconds. Doubling the iterations makes this take nearly 3 minutes! In other words, the slowdown isn't linear - it gets much worse as the size increases.

Here's how this shakes out (on a reasonably fast, high end I7 Dell XPS laptop):

  • 1mb - 35 seconds
  • 2mb - 168 seconds
  • 3mb - 525 seconds

Yikes. I would argue even the 1mb use case is totally unusable let alone larger strings.

Bottom line:

SUBSTR() is slow as shit on large strings!

Does this matter?

For most types of applications it's rare that you need to iterate over a string 1 character at a time. But there are some applications where that's necessary especially if you're building system components like parsers - of which I've built a few over the years and every time I look into it I run into the SUBSTR() issue.

A few years back I built my first version of a JSON parser in FoxPro code. A text parser typically needs to read strings a character at a time to determine what to do with the next character, using a sort of state machine. I figured out right away that using SUBSTR() wasn't an option for this. It was horrendously slow once string sizes got even moderately large. I opted for some other approaches that would read to specific string bound using string extraction and while that actually provided decent performance it resulted in a number of artifacts and inconsistencies that required workarounds and ended up being a constant flow of incoming special case scenario bugs. Very unsatisfying.

The performance was so bad that I ended up throwing away the original parser and instead opted to use a .NET based parser (Newtonsoft.Json) and capturing the results as FoxPro objects. Even with all the COM interop involved this solution ran circles around the native implementation and as a side effect has been rock solid because the JSON parser is a hardened and dedicated component that is regular updated and patched.

Is there a WorkAround?

Natively FoxPro doesn't offer any good workarounds for the SUBSTR() quandry. However, if you really need this functionality there are a few ways you can get around it using creative alternatives.

Two that I found are:

  • Using wwDotnetBridge::ComArray on .ToCharArray()
  • Using a file and FREAD(lnHandle,1)

wwDotnetBridge and ToCharArray()

Since FoxPro natively doesn't have a solution, it's reasonable to hold the data in another environment and then retrieve the data. One option for this is to use .NET and wwDotnetBridge which provides for the ability to store a string in .NET and manipulate it without loading the string or a character array thereof into FoxPro.

Here's what you can do with wwDotnetBridge to parse a string character by character:

do wwDotNetBridge
loBridge = GetwwDotnetBridge()

lnSecs = SECONDS()

* Returns a COM Array object
loStringArray = loBridge.InvokeMethod(lcString,"ToCharArray")
lnLength = loStringArray.Count

FOR lnX = 0 TO lnLength -1
	lcVal = CHR(loStringArray.Item(lnX))
ENDFOR

* ~ 2.5 seconds (still not very quick really) - in .NET same iteration takes 0.03 seconds
? "wwDotnetBridge ToCharArray(): " + TRANSFORM( SECONDS() - lnSecs ) 

ENDIF

2.5 seconds - while still not blazing fast - is considerably better. Performance of this solution is also linear - doubling the string size roughly doubles the time it takes to process plus a little extra overhead, but overall, linear.

The way this works is that wwDotnetBridge.InvokeMethod() returns arrays as a ComArray structure where the actual array isn't passed to FoxPro but stays in a separately stored value in .NET. The .Item() method then retrieves an indexed value out of the array which is very fast in .NET.

While better than SUBSTR() for large strings, this approach is not as fast as it could be, because there's a lot of overhead in the COM Interop involved in retrieving the individual value from the array. Still the performance with this at least is predicatable and linear.

Using FREAD() to Iterate

Another creative solution that doesn't require an external component like wwDotnetBridge is to use low level file functions to:

  • Dump the string to a file
  • Open and read the file 1 byte at a time
  • Close the File
  • Delete the file

This seems very inefficient, but file operations on a local drive are actually blazingly fast. The actual file read operations are buffered so reading the bytes is fast. Most of the overhead of this solution is likely to come from dumping the file to disk and then deleting it when you're done with the string.

String Splitting

After I posted this article and replied to an original posting on the Universal Thread, Marco Plaza replied with another even better and more performant solution that involves breaking the large string up into small chunks and then running SUBSTR() against that.

I made a few tweaks to Marcos version by making the code more generic so it doesn't hardcode the sizes:

lnSecs = SECONDS()

lnCount = 0
lnBuffer = 3500
FOR lnX = 0 TO 9999999999
	lcSub = SUBSTR(m.lcString,(lnX*lnBuffer)+1,lnBuffer)
	lnLen = LEN(lcSub)
	IF (lnLen < 1)
	    EXIT
	ENDIF
	For lnY = 1 To lnLen
		lcVal = Substr(lcSub,lnY,1)
		* lnCount = lnCount + 1  && to make sure right iterations are used
	Endfor
ENDFOR

* 0.35 seconds 
? "String Splitting: " + TRANSFORM( SECONDS() - lnSecs )  + " " + TRANSFORM(lnCount)

A few Results to Compare

To test this out I set up a small example:

CLEAR

* 1mb string
LOCAL lnX, lcString
lcString = REPLICATE("1234567890",100000)

lnLength = LEN(lcString)
? "Iterations: " + TRANSFORM(lnLength,"9,999,999")

IF .T.
lnSecs = SECONDS()

FOR lnX = 1 TO lnLength
   lcVal = SUBSTR(lcString,lnX,1)
ENDFOR

*** 35 seconds
? "SUBSTR: " +  TRANSFORM(SECONDS() - lnSecs )

ENDIF

IF .T.
do wwDotNetBridge
LOCAL loBridge as wwDotNetBridge
loBridge = GetwwDotnetBridge()

lnSecs = SECONDS()

* Returns a COM Array object
loStringArray = loBridge.InvokeMethod(lcString,"ToCharArray")
lnLength = loStringArray.Count
FOR lnX = 0 TO lnLength -1
	lcVal = CHR(loStringArray.Item(lnX))
	*lcVal = loBridge.GetIndexedproperty(loStringArray.Instance,lnX)
ENDFOR

* ~ 2.5-2.9 seconds (still not very quick really) - in .NET same iteration takes 0.03 seconds
? "wwDotnetBridge ToCharArray(): " + TRANSFORM( SECONDS() - lnSecs ) 

ENDIF


IF .T.

lnSecs = SECONDS()

STRTOFILE(lcString,"c:\temp\test.txt")
lnHandle = FOPEN("c:\temp\test.txt",0)

DO WHILE !FEOF(lnHandle)
  lcVal = FREAD(lnHandle,1)
ENDDO
FCLOSE(lnHandle)
ERASE("c:\temp\test.txt")

* 3.6 seconds 
? "FREAD : " + TRANSFORM( SECONDS() - lnSecs ) 

ENDIF

Running this with:

1,000,000

The divergence here is so large that SUBSTR() is basically unusable at this size:

  • SUBSTR: 35s
  • ToCharArray: 2.6
  • FREAD: 3.7
  • Split: 0.319

500,000

Here SUBSTR() is borderline but already very slow to process the string.

  • SUBSTR: 8.62s
  • ToCharArray: 1.32
  • FREAD: 1.85
  • Split: 0.022

100,000

Here SUBSTR() is roughly on par with the .NET solution. This is roughly the tipping point where SUBSTR() becomes significantly less efficient for anything larger.

  • SUBSTR: 0.26
  • ToCharArray: 2.66
  • FREAD: 0.39
  • Split: 0.319

10,000

At smaller sizes SUBSTR() performs considerably better than the other solutions. here you can see that SUBSTR() is 10x faster than the other solutions.

  • SUBSTR: 0.003
  • ToCharArray: 0.025
  • FREAD: 0.041
  • Split: 0.002

Summary

From the results above it would appear that SUBSTR() is reasonably fast up to about 100kb string, but anything larger than that and its performance starts dropping of extremely quickly and if you need to parse character by character you really need to look at other approaches.

Once that happens you need to really look at one of the alternatives. Marco's string splitting approach is by far the fastest solution, but it'll require a bit of logic to make sure you're iterating the string correctly (inner and outer loops) - if you need to grab the individual character in several places and it's not easily isolated into a single location the double loop approach can be tricky to keep consistent. The wwDotnetBridge approach also works reasonably fast and other than the initial string load, retains basically the same behavior as `SUBSTR(). But then again - if you're running into perf issues because your strings are too big you'll probably want to go with the fastest possible solution which is the string splitting.

It's not too often that you'll need this sort of code, but it's good to know there are workarounds to make this work if necessary.

this post created and published with the Markdown Monster Editor

Web Connection 7.15 Release Notes

$
0
0

We've just released an update to Web Connection. Version 7.15 is a maintenance release that brings a handful of new features and fixes a few small issues. The changes in this release center around logging improvements with a new way to specify log formats and a new Request Viewer that makes it easier to examine requests while debugging applications.

Log Format Changes

Web Connection's logging infrastructure dates back to the very beginning of Web Connection 25 years ago. If logging is turned on Web Connection logs request into a log table that holds log information. In the past the information captured in the log table was pretty sparse, initially supporting only the request basics: The URL, IP Address, Referring URL etc. Back in the beginning no request data was captured. Sometime much later a second mode was added - via a compiler switch - that allowed for more extensive logging that would capture the entire request. Even then that log format did not capture the response.

In addition to logging Web Connection also has supported Save Request Files which captures the complete last request in a couple of text files. You could look at the last - and only the last request - by using the Display Request button on the status form.

With this release these two features now have merged into one. Specifically the two old settings, the WWC_EXTENDED_LOGGING_FORMAT compiler switch and the SaveRequestFiles configuration swich have now migrated to a single setting called LogFormat (in MyApp.ini) which can be accessed via Server.oConfig.nLogFormat.

LogFormat supports the following values now:

  • 0 - No Logging - No log data is generated except on errors
  • 1 - Minimal Request - Only the request URL is logged
  • 2 - Full Request - The URL and Server Variables and Form Data is logged
  • 3 - Request and Response - The Url, Server Variables and Form Data and the Response is logged

The setting can be set in MyApp.ini, in code or via the updated Server UI:

This means the setting can now be changed at runtime for a server instance or with a restart for all instances after saving in the MyApp.ini file. This is obviously a lot more flexible than the old compiler switch which at the time was implemented as an after thought and done that way to prevent any breaking changes. But it was obviously not very flexible as changing the limited log format.

The old Save Request Files checkbox and Display Request buttons have been ursurped by this new interface. You can now change the logging format to 3 - Request and Response and be able to capture all requests with this info and you can look at the last few requests when clicking on Display Requests.

Updated Request Viewer

When you click on Display Requests you get to the updated Request Viewer which lets you look at a specified number of the last requests. Unlike the old Display Request behavior you get a list of recent requests to choose from so you're not stuck with just the very last request.

There's a new Request Info page that shows some summary information about the active request. On errors the error information is also displayed.

The other three tabs look pretty much like they did before although there options to open the HTTP response and Formatted Request in external editors for easier reading (for me those open in VS Code which is the default editor for HTML and INI files).

Here's the Response page:

and the Formatted Request Page:

You can now navigate through the old requests. Error requests are flagged with a * at the end so you can easily see those with error information displayed on the Request Info tab.

These two changes - the new log format and the new Request viewer - greatly simplify on how you think about logs I hope with a single setting that needs to be updated.

Log Format Recommendations

Logging request and response data can take enormous amounts of space and very easily overrun FoxPro's file limits especially if you log both request and response. For this reason you need pay attention how much data is getting logged and keep an eye on the log file size. Make sure you either clear the log regularily or back it up if you need to keep log data in the longer term.

In production, it's recommended that you limit your logging to no logging or minimal logging unless you have a specific need to look closer at requests due to an application error or security issue that you need to track down. In other words, turn extended logging on when you need it, but don't use it on a regular basis.

For development on the other hand using full request and response logging is quite useful as it allows you to look at a history of requests easily while you're working on and debugging the application. Just make sure

Updated Status Form

While working on the logging improvements the Status form also got some updates. Since the Save Requests and Display Request buttons where removed the form is a lot simpler now. I've also removed the Clear Log functionality and the old log browser. These items are available via the Web interface and the old form with its ugly browse Window really wasn't very useful anyway as it didn't show all the request data. Some of that slack has been taken up by the Request viewer which provides much more useful request information, but doesn't even try to show the entire log - you pick your snapshot size of the last requests you want to see.

The new status form looks like this now:

The one new thing (besides the removed options) is the Live Reload Checkbox which now lets you visually toggle the server side live reload behavior that triggers Web Connection server restarts when server side source files like .prg, .vcx, .ini are changed. This setting is used in conjunction with the module level Live Reload Flag which can be set on the Module Admin Page.

Live Reload Documentation Updates

Speaking of Live Reload: Live Reload is a newish feature in Web Connection that lets you see markup and code changes updated in the browser as soon as you you make them without having to explicitly refresh pages in the browser. This is a relatively new feature in Web Connection (as of 7.10+) and it's something that I continue to highlight because it's been such a big productivity improvement for the work I do with Web Connection and think everybody should be taking advantage of it!

I've updated the Live Reload documentation (and here) in the Web Connection docs, and also created a short screen capture video that demonstrates what working with Live Reload looks like in an actual project (this message board in fact):

This walk through demonstrates:

  • Web Connection Script page changes (page just reloads)
  • CSS Changes (page just reloads)
  • FoxPro Server Code Change (server restarts, page reloads)
  • Fixing a FoxPro Code Error

Again - it's incredibly productive, so if you're on Web Connection 7.10 or later be sure to check out the live reload functionality.

The last release added a new wwCookie class that can be used to set more HTTP Cookie options that was previously possible. This release sets the SameSite=Strict policy by default on cookies that are created as that's becoming a requirement for browsers unless an explict server policy is set. SameSite forces cookies to be set for the local site only, so cookies can't be highjacked by iFrames or resource links like images. The browser provides the cookie only to the same site that created the cookie.

This should help with DevTools warnings which show a dire warning that cookies are not same site. In the future these errors will cause cookies to not be set, so this is a vital fix. It's still possible to explicitly specify a different cookie SameSite policy, but it has to be explicitly set.

This change affects both manual cookies you create as well as wwSession cookies.

Fixed: JSON Date Rounding Errors

This release also fixes a small but significant bug with JSON parsing that has been present in wwJsonSerializer since the very beginning. This subtle bug showed itself by serializing dates with slightly off values that would not come back the same in Round Trip serialization. It's a very subtle bug because most dates work fine, but some dates fail.

IOW, if you serialized some original date values to JSON then deserialized them back into a datetime value the time would be slightly off by one second due to a rounding error. It's an insidious bug that was fixed, and if you're interested in all the nitty gritty details, check out the blog post:

Change over to Build.ps1 from Build.bat for Project Packaging Script

This is a really small change: Updated the Web Connection packaging build script to use Powershell to create a more generic script that is more portable. The build script packages the EXE, INI, dependent DLLs, a cleaned up Web folder (minus compiled files) and the data folder to provide a single zip file. Requires a 7Zip installation.

Start-FoxPro-IDE-in-Project.ps1 Script

To make it easier to generically launch the Web Connection development environment for a project the new project now generates a Start-FoxPro-IDE-in-Project.ps1 Powershell script. This is in addition to the shortcut which also works in the project folder, but breaks if the project is moved. The Powershell script always works as it can use relative paths, rather than the required full paths in the Shortcut. You can just Run with Powershell to launch your project in the FoxPro IDE.

Here's what a new project's root folder looks like now:

Notice the build.ps1 and the Start-FoxPro-IDE-inProject.ps1 files as well as the shortcut. The short cut is easier as you can just double click it, but it's tied to the specific location where the project was created. If the project gets moved, the shortcut breaks, but the Powershell script still works.

I always recommend using these shortcuts to start as they ensure that the Foxpro paths are set up properly as they insure the config.fpw from the Deploy folder is used to set paths to the Web Connection libraries and whatever other paths you've set up.

Breaking Changes in 7.15

There are a couple of small breaking changes in 7.15. They're not really changes, but rather file updates that are required.

  • Must update wwDotnetBridge.dll
    wwDotnetBridge has some important fixes and a few additional helpers that are used by some of the libraries - specifically wwJsonSerializer which break when used with the older DLL.

  • wwRequestLog Structure Changes
    The wwRequestLog has a few changes in fields so if you're using FoxPro tables, delete the wwRequestLog table and let it recreate. For SQL Server remove the table and use the Console SQL Log Table creation Wizard to let it recreate or use the Westwind.sql template script on an existing database.

  • Recommended: Set the LogFormat
    As discussed above the new LogFormat property is used to control logging. The default format is 1 - Minimal Request which is fine. But for development it's often useful to set this to 3 - Request and Response so you can easily review requests and the output generated while debugging.

Summary

Overall 7.15 is a minor update. There are no code changes required and the only 'breaking' changes are updates to wwDotnetBridge.dll and making sure the wwRequestLog table is deleted and recreated with an updated structure.

The new Logging format and Request viewer should make settings much easier to control especially since you can now switch formats simply by setting the LogFormat configuration setting. The new Request Viewer is going to make it much easier to debug requests. I find this feature especially useful for REST services where it's often useful to see exactly what data is incoming from the server.

Enjoy...

Article 0

Workflow for using wwDotnetBridge to call .NET Components

$
0
0

Today there was a question on the message board on how to use wwDotnetBridge to access the .NET Regex classes. Although I've posted lots of information and a detailed white paper about how to use wwDotnetBridge in the past, if you've never done anything with .NET it can be daunting to use wwDotnetBridge as it requires that you understand at least some of how .NET works.

So in this post I'll take you through what I think is a sensible process of how to work a .NET problem from FoxPro.

wwDotnetBridge

For those of you that don't know: wwDotnetBridge lets you use .NET APIs/Components from FoxPro, without requiring you to register those components through COM. .NET provides access to a ton of useful functionality internally and there are a thousands of third party components for .NET that can all be integrated into FoxPro. And it can be done relatively easily using wwDotnetBridge.

.NET has a native mechanism for interfacing via COM with legacy technologies like FoxPro, using what's known as .NET COM Interop. It uses a custom COM registration process for .NET components that can then be used as COM objects. In addition to providing all the base features that COM Interop provides, wwDotnet doesn't require COM registration and it provides access to many features that COM Interop natively doesn't support: unsupported types (long, generics, collections, struct, guid and many, many more) calling methods and constructors with overloaded parameters, accessing static properties and methods, accessing generic components. wwDotnetBridge can do everything that COM interop provides but it provides many features on top of COM Interop.

To be clear wwDotnetBridge also uses COM Interop to actually pass data and objects back and forth, but wwDotnetBridge instantiates types directly through .NET without requiring COM registration which provides more flexibility. It also provides .NET based tooling to provide an optional invocation layer that provides the functionality that doesn't work with direct COM Interop, which happens to be quite a lot of functionality especially with modern .NET code.

If you're new to wwDotnetBridge, please check out this introduction:

Calling .NET Components from Visual FoxPro with wwDotnetBridge

Multiple Approaches

The main purpose of wwDotnetBrdige is to access .NET Components from FoxPro. This can mean using built-in .NET Framework features (like RegEx, SMTP Email, Zip compression, etc.) as well as accessing external .NET Components that are open source or from commercial third parties.

There are a couple of different ways you can interact with .NET when using an interop strategy, and it depends on how complex the code you are interfacing with is.

The two main approaches are:

  • Direct access of .NET APIs with wwDotnetBridge
    You can directly call into most .NET APIs directly using wwDotnetBridge. This works great for simple interface code where you need to make only a few .NET calls from FoxPro. But it can become cumbersome with lots of .NET code that needs to be accessed. The advantage of this approach is that it's self-contained - no extra DLL to distribute and you don't have to write any .NET code.

  • Create a Wrapper .NET Component and call with wwDotnetBridge
    For more complex code, you can create a small .NET class that provides an intermediate interface to .NET with the majority of the 'heavy lifting' code handled via more easily written native .NET code. You then call this small "Bridge Adapter" class from FoxPro using wwDotnetBridge. The advantage is that you're keeping the .NET centric code in .NET and only push inputs and results back and forth into FoxPro. As a bonus you can control the exact types that are passed back to FoxPro simplifying parameter and result type translations which can be tricky with native .NET types that can't be directly accessed in FoxPro. This is the preferred approach for complex logic that requires lots of .NET code access.

For any non-trivial code I actually would recommend the latter approach, especially if you have any sort of familiarity with .NET. It is much easier to create .NET code inside of .NET than in FoxPro. If you have a bunch of .NET functionality to call it'll also be much more efficient to do natively directly from .NET rather than than through repeated COM Interop calls.

But... for very simple tasks direct access is definitely an option. In this post I'll focus on the direct access approach, since that's what most people use wwDotnetBridge for.

Direct .NET API Access with wwDotnetBridge

Direct .NET access via wwDotnetBridge means that you:

  • Instantiate a type with wwDotnetBridge
  • Receive a COM instance of a .NET Object
  • You can call most methods and access properties directly (ie. o.Method())
  • For some props/methods you have to use InvokeMethod(), GetProperty() or SetProperty() to handle type translation

Alternately you can also access static methods or properties, via InvokeStaticMethod(), GetStaticProperty() or SetStaticProperty() which don't require a type instance but rather are executed on a static type definition.

Game Plan - Check the code in .NET

Unless your code is extremely simple, and just a few lines of code, the first thing I recommend before you even start writing FoxPro code is test the code you're trying to access with .NET - in .NET! This helps with a number of issues:

  • Identifying the exact type names you need to load
  • Ensuring that the code works as intended in .NET
  • See type information (props/method overloads/parameters)

In short having the code to reference in .NET will make it much easier to identify how it needs to be called from FoxPro. This is especially true if you don't know how .NET works because there are many idiosyncrasies in how types work and even more in how FoxPro can work with some of those types.

There are a couple of ways you can do this:

  • Use LinqPad (get LinqPad5)
  • Create a small .NET Project (Test projects work well)

I'll use LinqPad for the example here.

When you download LinqPad make sure you get the version that supports Full Framework (.NET 4.x) rather than .NET Core. Most components you'll interface with on Windows from FoxPro are for .NET 4.x.

LinqPad

LinqPad is an awesome little tool that provides immediate execution of .NET code without having to create a project. It's a little bit like the FoxPro command window that just lets you execute commands. Actually it's an interactive editor with a compiler that lets you run code as a single block. It's more powerful than that, but it's great for testing out little snippets of code.

Here's some simple sample code that I'm using to work through the RegEx example mentioned at the start of this post:

Here's the code in case you want to try it out:

var text = "This value {{GetThisValue}} is bogus and this {{Value2}} one too.";
var regEx = new Regex("{{.*?}}");
var matches = regEx.Matches(text);
matches.Dump();
matches.Count.Dump();
matches[0].Value.Dump();
matches[1].Value.Dump();

What's nice about using LinqPad (or a project in Visual Studio) is that you get IntelliSense and you can hover over a type or a method and see the full type information or method signature. In the screen shot above you can see me hover over the Regex type and it gives me the full type signature of System.Text.RegularExpressions.Regex which you need to use in a call to CreateInstance().

Reflector for Type Discovery

If LinqPad is too intimidating because you don't know any .NET code, you can use a simpler but less dynmamic approach of looking up the actual type and method signatures in a .NET disassembler. A disassembler basically lets you look at any .NET assembly, and it will give you detailed information on the types used, the method signatures and properties available.

In Web Connection and the Client Tools we ship an old version of .NET Reflector which provides this functionality in the /tools/Reflector directory.

When looking up the RegEx type in Reflector you'll see something like this:

Reflector shows you all the methods and properties of the class as well as the full type name which are typically the two things that you need. For methods you get detailed information on the parameter types that you need to pass.

Translating to FoxPro

So, once we know what needs to be called, we need to translate the .NET RegEx code to FoxPro.

The key items for calling this code with wwDotnetBridge are:

  • Instantiating the Regex type
  • Calling the Matches() method
  • Iterating over the result collection

Because Regex is a built-in core framework class no assembly loading is required, so the code is as simple as this:

do wwDotNetBridge   && load lib
loBridge = GetwwDotnetBridge()

lcString = "This value {{GetThisValue}} is bogus and this {{Value2}} one too."
lcPattern  = "{{.*?}}"

*** Use full .NET Type Name (namespace.type)
loRegEx = loBridge.CreateInstance("System.Text.RegularExpressions.Regex",lcPattern)

*** This method can be called directly - Match Collection result
loMatches = loRegEx.Matches(lcString)

? loMatches.Count && 2

** 0 based collection
FOR lnX = 0 TO loMatches.Count -1
   loValue = loMatches.Item(lnX)
   
    *** Value is overloaded so we have to use indirect access
   ? loBridge.GetProperty(loValue,"Value")
ENDFOR

It happens to be that the Regex class was designed by Microsoft to be COM friendly, so a lot of the properties and methods work with direct access. So calling Matches() and accessing the Count property on the result collection happens to just work with the raw instance.

To get the individual items of the collection we have to use the Item() method rather than using FOREACH or using something like loMatches[1]. Note that the index is zero-based so the count starts at 0. Finally accessing loMatch.Value also requires indirect access using GetProperty().

Some of this is obvious - others not so much, so there can be a bit of trial and error involved in determining whether you can access properties/method directly or whether you need to use the indirect methods.

As a general rule:

  • Try direct access first
  • If you get an error (unknown COM error most commonly or a type conversion error) then using indirect methods.

More than One Way To Do Things

Regex has both an instance class as used above or you can use a static method.

The instance class allows you to create the RegEx expression once and reuse it as there is some overhead in parsing and compiling the RegEx class each time it's instantiated. With an instance you can save and effectively cache the RegEx expression to re-use at a later time (ideally by wrapping it into a class).

Static methods and properties are non-instance direct access members meaning that they have no state. Methods are fully self-contained, and members that hold data are stored in an internal singleton instance that effectively gives you global state in .NET. Static instance data persists for the lifetime of an application.

We can do the following in .NET which has the same exact behavior of the previous implementation by using the static Regex.Matches() method:

// Static Regex.Matches() method
matches = Regex.Matches(text, "{{.*?}}");

matches.Dump();
matches.Count.Dump();
matches[0].Value.Dump();
matches[1].Value.Dump();

This uses a static instance of the Regex class, which means there's no type to instantiate. Rather you specify a type name and the method (or property) to access along with the parameters.

The difference between the first implementation and the second is simply that the first has state (the class instance) which you can reuse, while the second does not.

So what about the FoxPro code for for the static method? Here it is:

loMatches = loBridge.InvokeStaticMethod("System.Text.RegularExpressions.Regex","Matches", lcString, lcPattern)
? loMatches.Count

FOR lnX = 0 TO loMatches.Count -1
   loValue = loMatches.Item(lnX)
   ? loBridge.GetProperty(loValue,"Value")
ENDFOR

It's a little simpler than the first version. It's more compact, and the behavior is identical, but the instance version can potentially be cached by holding on to the instance and reusing it later.

You can use this same approach with other RegEx methods like .Match() or .Replace() for example. The same logic applies.

Summary

So there you have it... a walk-through how to access simple .NET functionality using wwDotnetBridge. I've been very explicit here to demonstrate some of the thought process that can help make calling .NET code easier without having to guess at what you need to call or pass.

It's a little more work to fire up LinqPad or Reflector or even a full copy of Visual Studio. But I find almost every time I build wwDotnetBridge code in .NET I need to dig into the type structures to figure out exactly what I have to pass and so testing the code first in .NET almost always makes this much easier.

West Wind Web Connection 7.20 has been released

$
0
0

I've just released an update to West Wind Web Connection. Version 7.20 is a maintenance release that brings a handful of new features and fixes a few small issues. The changes in this release center around logging improvements with a new way to specify log formats and a new Request Viewer that makes it easier to examine requests while debugging applications.

This is a maintenance release with a few small fixes, as well a few new banner features that I'll describe in this post:

  • Native Web Sockets Support
  • Consolidated Administration UI
  • wwProcess::OnRouting() Handler
  • .NET (Core) 5.0 Support for Web Connection Web Server
  • wwDotnetBridge .NET (Core) 5.0 Support
  • JSON serialization and parsing Improvements

You can find the full change log here:

Let's jump right in.

Web Socket Support

Over the years there have been many requests to provide server push features in Web Connection and in this release I've added basic Web Socket handling support in Web Connection.

You can use this functionality in a hub and spoke model where the Web Connection server is the Hub and any number of Web Socket clients - Web Browsers or Desktop applications - can publish requests to all attached listeners. The idea behind sockets is that you have a server that can either directly push client messages to other users or for the server to send messages based on events that occur on the server.

The key benefit is that the communication of Web Sockets allows for the server to push messages to the client.

How does this work?

FoxPro and Web Connection can't directly handle Web Socket processing as these operations are highly asynchronous and handled in core Web server processing in the Web Connection module handlers. Rather than directly handling the sockets Web Connection intercepts incoming socket requests and forwards them to a Web Connection server as special HTTP requests that can be handled just like a regular Web Connection HTTP request. Web Socket requests use a specific message format that essentially wraps a message payload in a message wrapper that describes the recipients, the action and the actual data which is simply a string. The string can contain complex data in the form of serialized JSON.

Here's what messages look like:

{
    // a routing action that allows the server or 
    // client to differentiate messages
    action: action,

    // actual message data as a string - can be JSON
    message: message,

    // GroupId for the current user
    groupId: groupId,
    
    // userId for the sending user
    userId: userId,

    // Recipient list - can be empty which goes to the 'default' empty group
    recipients: [
        { type: 'group', value: 'chatusers' }
        { type: 'allButUser', value: 'rstrahl' }
    ]
}

Web Connection provides both FoxPro and JavaScript helpers to create and broadcast these messages. In Web Connection this is handled via the wwWebSocketMessage class and on the client there's a westwind-websockets.js library that provides this functionality.

The idea is that the server has a few well known endpoints that allow for:

  • Socket initialization (__initializeSocket.wc)
  • Broadcasting a message (__broadcastsocket.wc)

InitalizeSocket is used by Web browsers to connect to the Web socket - this essentially connects the persistent Web socket and opens the socket connection. This happens on page load and while the page is active the WebSocket essentially stays open.

The connected client can then listen for incoming socket messages. Web Connection provides a small Chat sample application that allows users to send message to all other users.

On the browser end this looks something like this.

import {WebConnectionWebSocket} from '../scripts/web-connection-websocket.js'

// Create the Socket instance
var socket = new WebConnectionWebSocket();

// handle message object { action, message, groupId, userId } props
socket.onMessageHandler = (msg) => {
    // just for reference
    var action = message.action  // for routing
    var message = msg.message;   // string message
    var user = msg.userId;       // User that sent it
    var group = msg.groupId;     // Group that sent it
    // typically you can route on action
    if (action == "broadcastchatmessage") {
        var msg = message;   // plain text message
    }
    else if(action == "initialmessages") {
        var msgs = JSON.parse(message);   // JSON message:  array of messages
    }
    // recommend you 'route' any actions to separate methods to keep
    // this function from getting huge
}  
// events when sockets are connected and closed
socket.onOpenHandler =(ev) => {    // optional 
}
socket.onCloseHandler = (ev) => {  // optional 
}

var group = $("#group").val(); // from input field
var user = $("#user").val();   // from input field

// this actually creates the socket 
// pass group/user if you need to differentiate recipients
// if you broadcast to all this is not needed
socket.tryConnect(true, groupId, userId);

The code above connects the socket and allows to listen for incoming messages.

To send a message code like the following can be used:

btnSend$.on("click",function(e) {
    var userName = userName$.val();
    var group = group$.val();    
    var message = send$.val();

    // create a broadcast message object - action and message are ctor parms
    var msg = socket.createBroadcastMessage("broadcastchatmessage", message );  
    msg.userId = userName;
    msg.groupId = group;
    // specified group(s) to send to - if empty (goes to 'empty' group)
    if (group)
        msg.addRecipient(group, 'group')
    socket.send(msg);
    send$.val('');
    send$.focus();    
});

createBroadcastMessage creates a message instance with the correct properties that you can then populate. Basically you set the .message and .action properties to specify what action (if any) the server should take and the actual message data.

It's also possible to send a message to a socket from a FoxPro application:

DO wwWebSockets
loSocket = CREATEOBJECT("wwWebSockets")
loSocket.cBaseUrl = "http://localhost:5200/"

loMsg = loSocket.GetMessageObject()
loMsg.action = "broadcastchatmessage"  
loMsg.userId = "RickFox"
loMsg.groupId = "Web Connection Chat 03-10-2021"
loMsg.Message = "Hello from FoxPro " + TIME()

loSocket.BroadcastMessage(loMsg)

This allows a FoxPro application to essentially post a message to a Web application. This can be a server application, or a desktop application. This is similar to the JavaScript code, but the FoxPro code can't listen to incoming messages.

How does this work? The FoxPro code to send actually doesn't use Web Sockets at all, but rather uses an HTTP endpoint on the Web Connection module (__broadcastwebsocket.wc) to send a socket request. The message that is sent is then routed in the exact same way as messages sent from a JavaScript socket client. This makes it very easy to use Web sockets at least on the send side from FoxPro code. In the future if there's enough interest we may add proper client side Web Socket support via .NET integration.

Finally, Web Socket requests send from clients - JavaScript or FoxPro or anything that uses the correct format and protocol - can be handled by the Web Connection server. As mentioned above these requests are routed into Web Connection as HTTP requests (the module creates a local HTTP request with the original payload acting like a Proxy forwarder).

These HTTP request fire a specific URL in the Web Connection server which intercepts it and routes it to an OnWebSocket() handler in the Process class. The request receives the incoming message on which the server can act. In the case of the Chat action, the server code basically takes the client message that was sent, parses it for embedded Markdown using the built-in Markdown() function, and then broadcasts the message back out to all connected clients in the group the user was using.

Here's what an OnWebSocket handler looks like:

FUNCTION OnWebSocket
************************************************************************
*  OnWebSocket
****************************************
***  Function: Fired when a Web Socket request comes in.
***    Assume: loMsg.Message, loMsg.UserId, loMsg.GroupId
***      Pass: loMsg             - Incoming (loMsg.Message) from Socket
***            loSocketBroadcast - Use to broadcast message to others
***    Return: nothing
************************************************************************
LPARAMETERS loSocket as wwWebSocketMessage
LOCAL lcMarkdown, loSocketMsg, loMsg

*** This is the Socket payload
loMsg = loSocket.oMessage

*** Use Action to route to different operations
DO CASE

CASE loMsg.action == "broadcastchatmessage"	
	*** Let's modify the incoming message and use it
	*** to broadcast. Inbound and outbound Socket Messages
	*** are identical so it's easiest to just modify original.
	*** Change: action to "broadcast" and message to new/updated value
	* loMsg.action = "broadcastchatmessage"   && we're sending to same action, but you can change it
	*** Parse incoming message as Markdown
	lcMarkdown = Markdown(loMsg.message)
	lcMarkdown = ALLTRIM(lcMarkdown) && RTRIM(LTRIM(lcMarkdown,0,"<p>"),"</p>")	
	loMsg.message = lcMarkdown
	*** Broadcast the message
	loSocket.BroadcastMessage(loMsg)   && lomsg
	*** Alternately create a new message from scratch and send
	* loSend = loSocket.CreateMessageObject()
	* loSend.Action = "broadcastchatmessage"
	* loSend.Message = "<p>New <b>Message</b></p>"
	* loSend.GroupIp = loMsg.Groupid
	* loSend.UserId = loMsg.UserId
	* loSend.AddRecipient("MyGroup","group")
	* loSocket.BroadcastMessage(loSend)   && lomsg
ENDCASE

ENDFUNC
*   OnWebSocket

Web Connection can only have a single Web Socket handler per application at this time. You have to specify a specific scriptmap extension to which all Web Socket request are routed in the FoxPro server.

As you can see the code required to make Web Socket requests, and Web Socket handling in the browser, is not very complicated. There's very little code. The more complex bit is the conceptual ideas that are required in order to build two-way communication into applications. Web Sockets are highly asynchronous (ie. there's no confirmation of success or failure) and require separate messages for each direction of communication.

Finally a note of consideration: Web Sockets are stateful - you basically connect to a socket in a Web Page and the socket connection stays open. As such Web Sockets with huge numbers of users can cause significant load on servers so be aware of connection requirements. Don't overuse sockets when other messaging mechanisms are available. For example, sending data to the server is almost always easier and more efficiently handled by hitting an HTTP endpoint rather than using a Web Socket connection (unless the connection is already open).

I'll be curious to see how some of you might use this new technology integration. If you do end up using it, please leave a note on the message board.

Consolidated Administration Page: Administration.wc

Web Connection administration over the years has changed a bit and although I've tried to make things simpler it's been a long road to consolidate features and make them easy to administer through a single unified UI. This started in the 7.0 timeframe but it wasn't until this release that everything has been consolidated.

We now have a single Administration.wc page (it also still works with ModuleAdministration.wc) that contains all the administration links that previously were scattered on Maintenance.wc and Admin.aspx. The two pages have been feature merged and the actual interface has been cleaned up to more easily display the large number of settings that Web Connection exposes. Many settings can now also be set interactively, directly on the administration form.

Web Sockets

In this release there's a new section to show the status of Web Sockets whether they are enabled and which scriptmap is used to handle WebSocket requests.

Edit Configuration on Local Machine

The form now has an Edit button to allow you to edit the current configuration if you are running the Web Connection server as the interactive user. This means when using IIS Express or the Web Connection .NET Core Web Server you can immediately edit the configuration file. IIS likely will not work, unless you have the Application Pool set up to run as the INTERACTIVE user.

wwProcess :: OnRouting()

This new method allows you dynamically inject custom route handling into a wwProcess class. Web Connection has its own default routing mechanism that routes requests based on method name or physical file matches.

If you need to do something different you can now create your own custom route handler **without having to override the entire RouteRequest() method that handles the default routing.

The overridable wwProcess method looks like this:

************************************************************************
*  OnRouting
****************************************
***  Function: Method that can be used to override custom routing.
***    Return: .F. keep processing, 
***            .T. you've handled the full request  and have generated
***            a valid response.
************************************************************************
FUNCTION OnRouting(lcPhysical, lcScriptname, lcExtension)

* Totally bogus example
CASE lcScriptName = "bogusrequest.wc"
     Response.ContentType = "application/json"
     Response.Write([{ "bogus": true }])
     RETURN .T.   && I've handled the request

RETURN .F.
ENDFUNC
*   OnRouting

You're passed the physical path, script name and extension and based on that you can decide how to handle a request. You can also access the Request and Response objects here as you normally would.

The idea is that you look at the incoming URL - usually the scriptname - and determine whether you need to handle this request in this overload. If you do you process the request and generate standard output using the Response object - just like you would in a standard process method.

Some use cases for this might be for multi-tenant processing of host header based routes, or for running routes from a look up table rather than by method names or even for instantiation separate classes and routing to them instead of to the local class.

It's a specialty use case, but I've added this because I've run into several situations where I otherwise had to completely copy the RouteRequest() method to change one little thing. Using this overload I can just make my small behavior change without having to copy the entire base functionality.

Web Connection Web Server now uses .NET 5.0 (.NET Core 5.0)

If you haven't looked at the local Web Connection Web Server, it's a .NET Core based console application that ships with your Web Connection application and can be deployed with it. Assuming you have the appropriate .NET Core runtime installed you can use this server to run your application on any machine without any custom configuration. The server is setup by default to execute the Web application. This means you essentially have a portable Web application that you can just copy to a new machine and then run (as long as .NET Core is installed).

Here's the server running Web Connection requests:

You can launch this server with:

launch("WebConnectionWebServer")   && or just "WC"

or if you're running it standalone externally you can just launch the EXE in the \WebConnectionWebServer folder of your project.

In this release the server runtime has been updated to .NET 5.0 (.NET Core 5.0 which has been renamed to just .NET 5.0). By switching to .NET 5.0 from .NET Core 3.1 the Web Connection Web Server has much improved startup performance and significantly faster page processing latency.

In the last release we also added a server hostable version of this runtime, which can run in IIS and also on a Linux server - using standard .NET Core hosting mechanisms. That won't help with FoxPro requiring Windows, but it does allow you to run the module part on different platformns and pass file processing data for a Windows machine running your Web Connection server to process. A number of people over the years have asked for this sort of functionality and it is actually available now (better late than never). Be curious to see if anybody actually decides to use it in this non-standard way.

For IIS there's specific integration via the ASP.NET IIS Hosting Module, which allows .NET Core apps to run in process of IIS - much in the same way as classic ASP.NET ran in IIS. Performance of this mechanism is on par with classic ASP.NET but it's considerably less flexible in updating running components as the server needs to be shut down to swap any binaries.

The classic ASP.NET Handler and .NET Core middleware share the same codebase and so you can easily switch between the two. It's perfectly reasonable to use the .NET Core middleware for local development and deploy with classic ASP.NET on IIS for production or vice versa.

As far as versions go, going forward the Web Connection Server will always try to build to the latest release version of .NET Core to match what the currently latest SDK expects. .NET Core versions are forward compatible in the same versions and in most cases to the next major version so the current version - barring any major feature changes should also work in v6 which releases at the end of this year. The older 3.x version should also work on 5.x etc.

wwDotnet Bridge .NET 5.0 Support

In this latest update wwDotnetBridge now supports accessing of .NET 5.0 components. The last couple of updates have supported .NET Core 3.1 but due to some underlying changes in the runtime in 5.0 the original runtime hosting code failed to load .NET 5.0. This latest update now properly supports .NET 5.0.

Incidentally the integration code has been updated to use more recent hosting APIs which should hopefully future proof the loader for a bit going forward. The .NET Core runtime loaders have changed on several occasions which has been extremely annoying.

In this case the bug actually turned out to be a runtime switch (on the TLSModes specifically) that cause the wwDotnetBridge root object to fail loading. It was a very simple bug that was nigh impossible to debug as it happened in code before the runtime was properly hooked up to even debug the code.

This is a good lesson in feature compatibility. .NET 5.0 actually supports running full framework code, which is essentially what we do with wwDotnetBridge. The wwDotnetBridge assemblies are written for full framework, but they actually work in .NET Core because they are only using mostly very low level semantics.

At some point we probably need to re-target wwDotnetBridge as a .NET Standard component, but currently there are a few Windows specific features there that will cause problems. I leave that for another day.

In the meantime though - testing out functionality in various libraries, exercising a good chunk of the framework all works well. I actually set up running the Web Connection components using wwDotnetCoreBridge and that all worked without a hitch.

Still there's potential for code to not work if full framework code is executed resulting in runtime errors that compiled correctly on full framework but wouldn't on Core. The TLS settings are an example of that. Buyer beware. Luckily it's likely that if you're using wwDotnetCorebridge you are going to be calling .NET Core APIs so that should be safe and behave as expected.

JSON Improvements

There have been a few JSON fixes that related to number precision errors due to floating point calculation differences in FoxPro and JavaScript. Specifically JavaScript numeric values with decimals would in some situations round incorrectly. Numbers are now rounded to the SET DECIMAL setting which ensures the values are using the system defaults correctly rather than just free form picking a decimal scope.

Additionally there have been updates to the free standing JsonSerialize() and JsonDeserialize() methods which are shortcut wrappers around the full object instantiation.

Summary

Phew. Quite a bit of functionality in this update. There are no breaking changes in this release except for the change to .NET 5.0 runtime for the Web Connection Web Server for local development.

I hope some of these features are useful to you. As always if you have any comments or questions regarding these features please post a message on the message board.

this post created and published with the Markdown Monster Editor

Should we add Bootstrap 5.0 Support to Web Connection?

$
0
0

Over the weekend spent some time updating the support site to run on Bootstrap 5.0 as an excercise to see what's involved in updating from v4 to the latest v5 version. In case you missed it Bootstrap a while back rev'd to version 5.0 and while overall most functionality is maintained compatible with previous versions, there are a handful of nice improvements and a few breaking changes.

I'll go over some of the changes required below, but the reason for this post is to gather a little information on whether Web Connection should update to this latest version of Bootstrap. Given that the upgrade of this site took a few hours to find and cleanup all the little issues (and this site is pretty simple), it's not just a drop in replacement.

For Web Connection rev'ing to a new version would mean updating a bunch of the HtmlHelper components as well as potentially a few small breaking changes for older versions.

My questions are:

  • Are you using Bootstrap with Web Connection today?
  • How important is it to run on the latest version?
  • Are you use HtmlHelpers (in wwHtmlHelpers.prg) extensively?

A few other things to consider along these lines:

It's totally possible to run a Bootstrap 5.0 application with the current Web Connection Bootstrap 4.0 tools. While manual changes have to be made overall the process to do this is pretty straight forward (notes below). So nothing is procluding from using Bootstrap 5.0 today with Web Connection existing setup.

The main consideration from my end is - potentially breaking some components that depend on Bootstrap features. This might include the date picker and some of more complex HtmlHelpers that inject some Bootstrap specific features (minimal but there are a few). Currently Web Connection can deal with v3 and v4 versions with specific bracketing for them, but the prospect of adding additional brackets is not something that I'm looking forward to.

So while I'm more than happy to make the changes for Bootstrap 5.0, realize that there might be a small bit of pain for people that are not upgrading and staying with older versions... and regardless upgrading from an older version will require some work for those making the journey.

Bootstrap 5 - Noteworthy Enhancements

The first question should always be: Is it worth upgrading in the first place?

Compatibility is good overall

Overall Bootstrap 5.0 maintains the same old Bootstrap concepts of layout and control management. Most things continue to work as they did before, although this version has a lot of nice improvements under the hood on how the controls are rendered using the latest CSS feature. This results in better performance of layouts.

Render and Behavior Improvements

There's also been a nice touch up on how controls render and overall there are lots of little UI improvements that just look better than in previous versions. This is subtle, but there are both visual improvements as well as subtle behavior adjustments.

Floating Labels

There's support for a new floating label form group, which you can see on the Message board here. The idea is that you have a single line text boxes with labels that automatically 'float' above the text once text is entered. This provides some space-saving for busy forms and also makes it much easier to line up multi-column field layouts as the label and input are rendered as a single block element by default.

Notice how the Email field is empty and just shows the label. As soon as you start putting text in the small label floats above the user input. Also notice how the two passwords align easily with both the label and input.

It's a trendy feature and you see that on a lot of sites these days, but for once I agree in that this is good looking and useful way to present input fields in many situations.

Easy FlexBox Classes

There are now built-in FlexBox CSS classes that you let you quickly specify d-flex align-items-top to group elements like an alert box to automatically align content side by side for example. I used to use custom classes for this, but with these built-in class it's much more generic. This is documented in a few 'features' like the Icons in Alert Boxes feature for example which just uses the FlexBox functionality.

On the downside there appear to be a few issues with this control:

  • Placeholders don't work on the input fields (presumably because the label serves that purpose until you start entering text).
  • TextAreas have problems with labels under scrolling the label - not sure if that's by design or what but it looks bad. (hence the label on the actual text area in the figure).

Bootstrap 5.0 also adds a bunch new CSS helpers to allow you to express common tasks like padding, margins, position, visibility etc. via small CSS class helpers that easy and consistent to use. This expands on these features a lot of these that were introduced in 4.0 and have been expanded. It pays to take a read through the CSS Helpers section in the docs on all the good stuff available there.

Upgrade Notes to Bootstrap 5

So if you do decide to upgrade what sort of things are you going to run into? This list is by no means comprehensive but this is what I've found in multiple updates.

As mentioned I updated this message board, and if you're interested you can look at the upgrade Git commit that shows all the changes here.

No IE Support

We need to get this out of the way: Bootstrap 5 drops all support for Internet Explorer. So once you start using Bootstrap 5 you can no longer use IE. For new applications IE should definitely no longer be used and I sincerely hope nobody is still running IE as a their primary browser for anything but specific apps that require IE specific feature support.

While I welcome ditching all things IE, I am a little bummed about this because this means that I can't use Bootstrap 5.0 with Help Builder or any other application that uses the Web Browser control. ??adface:

-start and -end instead of -left and -right

Bootstrap 5 introduces support for Right to Left (RTL) display and because of it the meaning of -left and -right in various helper names became ambiguous and end up getting changed to the -start and -end.

I use float-right and float-left quite a bit. Mostly the former for things like item specific menus or option bars at the top of a group. These need to be renamed to the float-end and float-start respectively. This is a very specific naming change so it's pretty easy to do this with a Replace in Files feature. If you're using Visual Studio code you can open your Web Connection project and use shift-ctrl-H or to bring up the Replace in Files feature and just let it run.

Dropped jQuery Dependency

Bootstrap 5 drops the requirement to use jQuery for custom components and by default requires that raw DOM access is used to manipulate the JavaScript bootstrap components such as the modal dialog, popups, accordion etc. The changes over the jQuery code are relatively minor, but the biggest problem is digging them up and finding all of them.

On the flip side, extending the trend that they used in v4 to make most operations triggerable using data- attributes has been expanded and it's quite possible to do most operations (like triggering a modal to pop open or class) via attributes. That is the preferred way to do it.

For example (data-bs-dismiss):

<button id="btnPasteCode" type="button" class="btn btn-primary"
        data-bs-dismiss="modal" aria-label="Close"><i class="fa fa-code"></i>
    Paste Code</button>

Unfortunately for me on this site quite a bit of the interactivity is handled through script code so I had to convert each of the dialogs explicitly.

The new, non-jQuery code looks like this - in this case to show and dis

object interface

// $("#HrefDialog").modal();

var modal = new bootstrap.Modal(document.getElementById('HrefDialog'));
modal.show();

event handler notification when shown

// $("#HrefDialog").on('shown.bs.modal', function () {...});

document.getElementById("HrefDialog")
        .addEventListener('shown.bs.modal', function () {...});

Again, nothing difficult about this, but unfortunately it's not a plain search and replace operation that makes this work, so you have to manually find all the code points where anything script related happens.

I'd already moved most of my code to use attribute based activation whenever possible, but for the dialogs in the editor in particular they were all code based and required manual updates like this.

Input Group Changes

Another component that has change slightly is the input-group component which creates a single row icon/text and input control. Input groups are great for very small dialogs like login controls, or for 'most important' items in a form. They're also useful for self contained forms like a search box where the right control is a button to start the search.

Here's an example of two input-groups in the login box:

Changes here are:

<div class="input-group "><div class="input-group-prepend"><span class="input-group-text"><i class="far fa-fw fa-envelope"></i></span></div><input type="text" name="WebLogin_txtUsername" id="WebLogin_txtUsername"
           class="form-control" placeholder="Enter your email address"
           value="<%=  pcUserName %>"
           autocapitalize="off"
           autocomplete="off"
           spellcheck="false"
           autocorrect="off" /></div>

to:

<div class="input-group mb-2"><span class="input-group-text"><i class="far fa-fw fa-envelope"></i></span>                        <input type="text" name="WebLogin_txtUsername" id="WebLogin_txtUsername"
            class="form-control" placeholder="Enter your email address"
            value="<%=  pcUserName %>"
            autocapitalize="off"
            autocomplete="off"
            spellcheck="false"
            autocorrect="off" /></div>

It's a small change but it's a definite usability improvement as it drops the wrapper required around the input-group-text.

For this you can easily search for all input-group-text in documents and just remove the extra wrapping input-group-prepend or input-group-append.

Floating Labels Conversions

As mentioned one of the reasons I wanted to use Bootstrap 5 is the floating labels implementation. I've been using a custom version of this for some time in some apps, but because it's custom it doesn't quite works the same as other Bootstrap components, plus there were a few quirks.

Converting from the old Form group to floating labels is pretty straightfoward:

<div class="form-group"><label class="control-label" for="Name">Name</label><input type="text" class="form-control" id="Name" name="Name" placeholder="Your display name on messages."
           value="<%= Request.FormOrValue([Name],poUser.Name) %>"></div>

to:

<div class="form-floating mb-2">            <input type="text" class="form-control" id="Name" name="Name" 
           value="<%= Request.FormOrValue([Name],poUser.Name) %>"><label class="control-label" for="Name">Your Name</label></div>

One additional advantage with the floating label is that the label is very small, so you can use longer labels - that double as placeholders which don't get replaced - than you might normally use and you don't have to worry about horizontal labels ever.

Full List of Changes in Bootstrap 5

Here's a link to the full migration documentation for Bootstrap 5:

Migrating to Boostrap 5

There's a lot more than what I've covered here, and you may run into more or less of the issues that I covered here.

But while this list looks long, I've found that overall compatibility is excellent.

As another happy aside - it looks like the Bootstrap DatePicker component Web Connection uses still works with Bootstrap 5 even though it's specifically for v4.

Summary

Upgrading to Bootstrap 5 in a Web Connection application is not difficult, but be prepared to do quite a bit search and replace if you plan on going down this path. I hope some of the things I've gone over here make your life easier if you are going ahead with a migration.

So is it worth doing all of this? To me it depends on the application. I certainly think some of the improvements in Bootstrap are worthwhile both in terms of new functionality (floating labels in particular) as well as the more consistent CSS functionality that the latest version provides.

And it's always a good idea to keep up with versions to some degree lest you get left behind at a point where upgrading becomes essentially rewrite ??

But if I had a complex application with tons of screens and controls I would probably think long and hard whether it's worth the effort to upgrade. Aside from the very visible floating labels feature, most other features are minor and don't provide a big usability improvement.

So your mileage may vary.

this post created and published with the Markdown Monster Editor

Updating Launch.prg to Latest Version in Web Connection

$
0
0

In v6 and later of Web Connection, the launch.prg is a nice easy way to launch your Web Connection application on the local machine, and get all the moving parts started at once without having to individually launch them all:

launch.prg is generated as part of a new project creation using the Web Connection new Project Wizard. It does the following:

  • Starts up the Web Server (IIS Express, Dotnet Core Server)
  • Starts up Web Connection FoxPro Server application (from the FoxPro IDE)
  • Opens a browser and navigates to default page

Here's what this looks like:

Here I'm using the .NET Core based local Web Connection Web Server as the default server, but the launch command can launch any of the supported Web servers by explicitly specifying a Web Server name:

  • launch() - default project config
  • launch("IISEXPRESS")
  • launch("WEBCONNECTIONWEBSERVER") or launch("DOTNETCORE")
  • launch("IIS")

If you run launch() without parameters as I do in the screen capture, the default is used. The default is the server you configured your project for when you ran the New Project Wizard, but it's easy to change this later.

It's a PRG File: Customize it

Because launch.prg is merely a PRG file you can customize the file easily after initial installation. In fact, all the configurable values are defined at the top of launch.prg and you can easily change these values to change the default behavior.

The values that you can change are at the top of the file.

Specifically you can change these values:

*** Changable Project Launch Settings
lcServerType = "WEBCONNECTIONWEBSERVER"  && default if not passed
lcVirtual = "wwThreads"     && used only for IIS
lcAppName = "wwThreads"     && used to launch FoxPro server
llUseSsl = .F.   &&  hard-code. Web Connection Web Server only
lcIisDomain = "localhost"

*** These you usually don't change
lnIISExpressPort = 7000
lnWebConnectionWebServerPort = 5200

The lcServerType is the main thing that you might change in an already created launch.prg file and if you decide to run a different server as your default server. The lcVirtual value is used for IIS if you are running on localhost and specifies the virtual directory such as http://localhost/wwthreads. If you are running IIS at the root folder, leave this value as an "" empty string. The lcAppName is used to launch the FoxPro server with DO wwThreadsMain. If you prefer to run an EXE, you can change the logic at the very bottom of launch.prg to remove the Main from the following commands:

? "Server executed:"
? "DO " + lcAppName + "Main.prg"

*** Start Web Connection Server
DO ( lcAppName + "Main.prg")

lUseSsl applies only to the .NET Core Web Connection Web Server which can easily run under the https protocol. IISEXPRESS can also run under SSL but it has to be configured at the server level which is not done by default.

The lcIisDomain lets you specify a custom domain or IP Address for your server if you don't want to run on localhost. This will allow you to access multiple sites with host headered names when using IIS which is useful if you run with IIS.

The IISEXPRESS and .NET Core Web Connection Web Server can also choose a specific port to run under when started and specifying the port will launch on that port and then launch the browser on that port. Typically you don't need to change this port unless you work on multiple Web Connection applications at the very same time. Note that if you re-use the same port with multiple sites, you may have to do a hard browser refresh (ctrl-shift-r) to force the browser to refresh all cached resources to show the appropriate site resources.

Trick: If you often switch Servers use Intellisense Shortcuts

I use a few Intellisense shortcuts for various launch operations:

  • LI - Launch IISExpress
  • LN - Launch None (doesn't launch a Web Server but everything else)
  • LW - Launch the Dotnet Core Web Connection Web Server

Don't have a Launch.prg or an old version?

If you don't have a launch.prg in your project because you have a really old project, or you have an old out of date version, you can still take advantage of this functionality by essentially creating a new launch.prg file as part of a new project and then copying the file.

You should be able to use launch.prg with any project that is v6 or later, and it might even work with older projects although you'll have to stick with IIS and IIS Express for those.

The easiest way update a project with a new and current launch.prg file is:

  • Create a new Project in the New Project Wizard
  • Choose IIS Express or Web Connection Server for lowest install impact
  • Go through the Wizard
  • Go to the project's folder
  • Copy launch.prg
  • Paste into your projects Deploy folder
  • Update the configurable variables at the top of launch.prg
  • If you want delete the newly created project folder

Projects by default are created in \WebConnectionProject\YourProject and with v6 and later projects are fully self contained in that folder structure. If you didn't configure for IIS, you can simply delete the folder and everything related to the project is gone - there are no other resources used on the machine. This of course is one benefit of the new project system in that provides a single, fully portable directory hierarchy that you can easily move to a new location.

As far as launch.prg is concerned, it's pretty much a generic program file that can just be copied verbatim from the generated project into another location. You can then use the configuration settings mentioned above to customize for your specific application. Typically you'll only need to change the lcServerType and lcAppName and lcVirtual values.

Summary

To me launch.prg is a very simple, but extremely time saving utility in Web Connection. It makes it easy for new users to get started, makes it easier to not forget to launch one part of the application, and most importantly can save a lot of time to start up an application consistently. You can use the same command for each application, which makes it convenient and easy to shortcut the commands via Intellisense to make it even easier.

this post created and published with the Markdown Monster Editor

Building and Consuming REST API Services with FoxPro

$
0
0

by Rick Strahl
prepared for Virtual FoxFest, 2021
Session Example Code on GitHub

REST APIs, or Web Services that use plain HTTP requests and JSON, have largely become the replacement for more complex SOAP based service architectures of the past. Most modern APIs available on the Web — from Credit Card Processors, to eCommerce back ends, to mail services, Cloud Provider APIs and Social Media data access — all use REST services or variants thereof to make remote data available for remote interaction.

REST services tend to be much simpler to build and consume than SOAP, because they don't require any custom tooling as SOAP/WSDL services did. They use the HTTP protocol for sending requests over the Web, and typically use JSON as their serialization format. JSON's simple type structure is inherently easier to create and parse into object structures, especially from languages like FoxPro. REST's clear separation between the message (JSON) and the protocol layers (HTTP Headers/Protocol) reduces the amount of infrastructure that is required in order to use the technology.

Because of its simplicity REST can also be directly consumed by Web applications rather than going through a server proxy. JSON is a JavaScript native format (essentially an object literal) and so any JavaScript applications can easily consume REST services directly. Most languages or platforms also have efficient JSON serializers that make it easy to create and parse JSON from native data structures.

This makes REST useful for double duty both as a remote data service API as well as a backend for internal SPA Web applications. Often these two tasks can overlap, with applications exposing both the Web application for interactive Web and App use, and a service for remote data API access. Many big services like Twitter, Facebook and Cloud Providers like Azure use APIs to drive their front ends while also exposing those same APIs for remote access.

Simple, Distributed Concepts

One of the big reasons of REST's popularity and success in recent years is its simplicity: All you need to consume a REST Service is an HTTP Client and a JSON parser. On the server too no special tools are required beyond a Web Server and the ability to capture HTTP requests and write HTTP responses which means that its easy to create REST service endpoints manually, and there are lots of support frameworks to choose from to provide automated REST service integrations.

And because the technology is inherently distributed, you can swap the front end and backend independently of each other: The backend doesn't care that the front is not written in the same language, so you can have a .NET backend and FoxPro or JavaScript front end. In fact you can use many different kinds of applications to connect to a single back end. Desktop applications, phone apps, browsers may all use completely separate front ends and technologies to connect to the same API.

Client and Server

For this article and the FoxPro relevant focus, there are two scenarios that I'm going to focus on when it comes to REST Services:

  • Consuming REST Services using FoxPro
  • Creating Server APIs using REST Services with FoxPro

I'll talk about both of these scenarios in the context of Visual FoxPro. We'll start with retrieving some data from an HTTP service and consuming it in FoxPro, and then jump to the other end and create a REST JSON service on the server side using Web Connection.

But before jumping into the code examples, let's talk about what REST is and what makes it unique related to what came before.

So what is REST?

REST is not a specific standard

It's not a specification and it doesn't have a formal definition. There's no Web site that you can go to to look up how to specifically architect your HTTP Service.

Rather it's a set of common recommendations or a style of building HTTP based Web Services based on the semantics of the HTTP protocol.

Officially REST stands for Representational State Transfer which is a fairly cryptic term to describe what amounts to Web based APIs. The idea behind the term is that you have fixed URLs from which you can transfer state - or data - back and forth between a client and server.

Since there isn't a fixed standard you can look at, here's Wikipidia's broad definition:

Representational state transfer (REST) is a software architectural style that was created to guide the design and development of the architecture for the World Wide Web. REST defines a set of constraints for how the architecture of an Internet-scale distributed hypermedia system, such as the Web, should behave. The REST architectural style emphasizes the scalability of interactions between components, uniform interfaces, independent deployment of components, and the creation of a layered architecture to facilitate caching components to reduce user-perceived latency, enforce security, and encapsulate legacy systems.

This is pretty vague and open to interpretation with words like architectual style and general set of constraints. There's nothing specific about this 'recommendation', other than it uses the HTTP protocol and its semantics to access and send data using a few common sense recommendations.

If you want to dig into the origin of REST, the original was coined in 2000 by Roy Fielding's orginal dissertation that started off the REST movement. Be warned it's a dry and pretty non-comittal read.

REST is all about HTTP

REST is all about taking maximum advantage of the HTTP Web protocol.

HTTP is the protocol used to communicate on the Web. HTTP traditionally has been the protocol of Web Browsers, but more recently the use of Web APIs increasingly sees HTTP used by applications using native HTTP client software either built into languages, frameworks or tools.

HTTP is very prominently used in today's modern applications even outside of the context of traditional Web applications: You see APIs used heavily in native Mobile apps and many desktop applications.

HTTP: Same as it ever was

The HTTP protocol is used to send and retrieve data in a simple, one-way transactional manner: A request is made with headers and content, and a response is returned also with headers and content. It's still the nearly same stateless, distributed protocol that was originally created in the early 1990's.

Requests only go one way from the client to the server. While the server can return data from in response to a request, it cannot independently call back to the client. There are other ways to do this namely using Web Sockets that are built on top of HTTP, but that's a separate protocol and not applicable to REST.

It's important to remember that HTTP is inherently stateless - each request has to provide its own context to the server as each request opens and closes a connection to the server. There's no explicit persistent state across requests unless some mechanism like HTTP Cookies or custom headers are used between requests. It's unusual though to use these mechanisms for APIs - API clients tend to keep state in the context of the application and then send it as part of the request or the request headers which most commonly includes authentication in the form of auth tokens.

Request and Response

Here's what the HTTP Request and Response are made up of:

Request

  • HTTP Host and Path (Url)
  • HTTP Verb (GET, POST, PUT, DELETE, OPTIONS)
  • HTTP Request Headers
  • Request Body (for POST and PUT)
  • Request Body is usually JSON
    but can be any other raw data (xml, binary, form data)

Response

  • HTTP Response Headers
  • Response Body

Here's what a real HTTP request looks like. This first example is a simple GET request that only retrieves JSON data from a server:

GET describes the HTTP verb used against the URL which retrieves an Artist instance. GET is a retrieval only request and the server returns an HTTP response, which is a nested JSON object.

Any REST request lives at a fixed URL which is unique, and is accessed via an HTTP Verb - GET in this case. The combination of URL plus HTTP Verb make for a unique resource that can be easily linked to or bookmarked in browsers.

Commonly used verbs are GET, POST, PUT, DELETE, OPTIONS which describe an 'action' on the resource you are accessing. Multiple verbs are often overloaded on a single URL that have different behavior depending on using a GET to retrieve and Artist for example, or POST/PUT to add or update and DELETE to delete.

The response in this example returns the requested Artist as a JSON (application/json) response. The response consists of HTTP headers that describe protocol and content information from the server and can also be used to send non-data related meta-data from the application to the client.

The second example, uses a POST operation to add/update an Artist which looks similar but adds Request Content to send to the server:

This particular request is an update operation that updates an Artist in a music store application.

The POST operation is different in that it uses the POST verb, and provides a content body that contains the JSON request data. The data sent can be raw data like a JSON or XML document, but can also be urlencoded form data, a multi-part form upload, raw binary data like PDF or Zip file... it can be anything. Whenever you send data to the server you have to specify a Content-Type so that the server knows how to handle the incoming data. Here the data is JSON so Content-Type: application/json.

The HTTP Headers provide protocol instructions and information such as the calling browser, what type of content is requested or optionally sent, and so on. Additionally you can also handle security via the Authorization header. This example uses a Bearer Token that was previously retrieved via a Authentication API call. Headers basically provide meta data: Data that describes the request, or additional data that is separate from the data in the content of a request.

POST and PUT requests like also have a request body, which is raw data sent to the server. The data sent is serialized JSON of an Artist object to update the server with.

HTTP Advantages

HTTP is a great mechanism for applications because it provides many features as part of the protocol, that don't have to be implemented for each tool or application.

  • API Routing via URL
  • Unique Resource Access via URL
  • API Operations via HTTP Verbs
  • Data Encryption via HTTPS (TLS)
  • Caching via built-in HTTP Resource Caching
  • Authorization via HTTP Authorization (+server auth support)
  • Meta Data via HTTP Headers

HTTP Routing plus HTTP Verbs

The Representative term in the REST moniker refers to the unique addressing mechanism of HTTP. A URL plus an HTTP Verb make for a **unique endpoint for a given HTTP request.

HTTP has an innate built-in unique routing mechanism based on URLs. Any URL by its nature is a unique identifier, so each endpoint you create via an HTTP API is always unique in combination with an HTTP Verb.

A url like:

https://albumviewer.west-wind.com/api/artists  GET

is 100% unique.

So are these even though they point at the same URL:

https://albumviewer.west-wind.com/api/artists  POST
https://albumviewer.west-wind.com/api/artists  DELETE

Same URL different action, but different actions that are interpreted separately in the server application.

There are quite a few Verbs available and each has a 'suggested' meaning.

  • GET: Retrieve data
  • POST: Add data
  • PUT: Update data
  • DELETE: Delete data
  • OPTIONS: Return headers only
  • PATCH: Partial Update

Of these POST and PUT are the only ones that support a content body to send data to the server. All others are either data retrieval or operation commands.

These verbs are suggestions. Requests are not going to fail if you update data via a POST operation instead of using the suggested PUT unless the server applications explicitly checks and rejects requests based on a verb. However, it's a good idea to follow these suggestions as best as possible for consistency, and easy understanding of your API and when necessary make them flexible so they just work. It'll make your API easier to use.

Encrypted Content via HTTPS

HTTP has built in support for https:// which uses certificate based security keys for encrypting content between client and server. This encryption ensures that content on the wire is encrypted and can't be spied upon without access to the keys of the certificates on both sides of the connection. This avoids man in the middle attacks. To use https:// encryption a server secure certificate is required but these days you can set up free LetsEncrypt Certificates on most Web servers in minutes. For Windows Server and IIS look at Win-Acme to set up Lets Encrypt certificates on IIS for free.

The nice thing with https:// is that it's part of the server infrastructure. As long as the server has a certificate, both client and server can use the https:// protocol to securely access requests.

Resource Caching

Each URL + Verb on an API endpoint is unique in the eyes of the browser and if you access the same resource using a read (ie. GET) operation, requests are cached on subsequent access by default. By default requests are expected to be idempotent which means that sending a request in the same way twice should always produce the same result. HTTP provides this functionality by default, but it can be overridden with specific HTTP headers that force the client to refresh data. This makes sense in some cases where data changes frequently.

Authorization and Authentication

HTTP doesn't have direct support for authentication besides the Authorization header that is commonly used by server frameworks to handle Authorization and Authentication. Most server frameworks today have some basic mechanisms for handling security built-in. Most Web Servers have support for Basic Authentication out of the box, IIS additionally has support for Windows Auth, and if you use an application framework like ASP.NET MVC or ASP.NET Core they also have built-in support for handling Cookie and Bearer token authentication as well as various federated frameworks.

Meta Data in HTTP Headers

Unlike SOAP, REST clearly separates the content from meta data that describes the request or response. So the content sent and returned tends to be truly application specific while anything that involves the request processing or tracking generally is handled in the headers of the request.

Every request has a handful of required headers that are always sent by the client and are always returned by the server. These describe the basics of the request or response and include things like the content type, content-length, the accepted types of content, browser and so on.

But beyond the auto-generated headers, you can also add custom headers of your own to both the client request and the server response. You should use headers to return data that is important to the application, but not directly part of the data. This could be cached state (similar to cookies) that you carry from request to request, or identifying information.

Calling REST APIs from FoxPro

Enough theory, let's kick the tires and consume some RESTful APIs from FoxPro.

Let's start with some of the tools that are required to call a REST service from Visual FoxPro:

Http Client

There are a lot of options for HTTP access. I'm biased towards the wwHttp library, as that's what I usually use and as it provides full featured HTTP support for many different scenarios and that's what I'll use for the examples here. The support libraries are provided with the samples so you can run all the examples yourself.

A simple WinHttp Client

If you'd rather use a native tool without extra dependencies you can use WinHttp which is built into Windows. It has both Win32 and COM APIs. Using the COM API here's a very simplistic, generic HTTP client you can use instead of wwHttp:

************************************************************************
*  WinHttp
****************************************
FUNCTION WinHttp(lcUrl, lcVerb, lcPostData, lcContentType)
LOCAL lcResult, loHttp

IF EMPTY(lcUrl) 
   RETURN null
ENDIF
IF EMPTY(lcVerb)
   lcVerb = "GET"
   IF !EMPTY(lcPostData)
      lcVerb = "POST"
   ENDIF
ENDIF

*** Example of using simplistic WinHttp client to retreive HTTP content
LOCAL loHttp as WinHttp.WinHttpRequest.5.1, lcResult
loHTTP = CREATEOBJECT("WinHttp.WinHttpRequest.5.1")    

loHTTP.Open(lcVerb, lcUrl,.F.)

IF !EMPTY(lcContentType) AND lcVerb = "POST" OR lcVerb = "PUT" 
	loHttp.SetRequestHeader("Content-Type",lcContentType)
ENDIF	

*** If using POST you can post content as a parameter
IF !EMPTY(lcPostData)
	loHTTP.Send(lcPostData)
ELSE
   loHttp.Send()	
ENDIF

lcResult = loHttp.ResponseText

loHttp = NULL

RETURN lcResult

You can use it with very simple code like this:

SET PROCEDURE TO WinHttp ADDITIVE

*** GET Request
lcResult = WinHttp("https://albumviewer.west-wind.com/api/artist/1")
? PADR(lcResult,1000)

*** POST Request
TEXT TO lcJson NOSHOW
{
  "username": "test","password": "test"
}
ENDTEXT
lcResult = WinHttp("https://albumviewer.west-wind.com/api/authenticate","POST",;
                   lcJson,"application/json")
? lcResult   

This is a pretty basic implementation. It needs additional error handling, dealing with binary data, progress handling and a few other things, but for starters it's a workable solution.

wwHttp - A little Extra

The wwHttp provides a lot more functionality out of the box. It supports a number of convenience helpers to make it easy to parse both content and headers, encode and decode content, progress events, handle Gzip/Deflate compression, binary content, status updates, consistent error handling and more. A compiled version of wwHttp is provided with the samples.

Using the same service as above using wwHttp looks something like this:

DO wwHttp  && load libraries

loHttp = CREATEOBJECT("wwHttp")

*** GET Request
lcResult = loHttp.Get("https://albumviewer.west-wind.com/api/artist/1")
? PADR(lcResult,1200)

*** POST Request
TEXT TO lcJson NOSHOW
{
  "username": "test","password": "test"
}
ENDTEXT

loHttp = CREATEOBJECT("wwHttp")
loHttp.cContentType = "application/json"
lcResult = loHttp.Post("https://albumviewer.west-wind.com/api/authenticate",lcJson)

IF loHttp.nError # 0
   ? loHttp.cErrorMsg
   RETURN
ENDIF
IF loHttp.cResultcode # "200"
   ? "Invalid HTTP response code: " + loHttp.cResultCode
ENDIF   

? lcResult  

JSON Serialization and Parsing

Next you need a JSON serializer that can turn your FoxPro objects into JSON, and turn JSON back into FoxPro objects, values or collections. I'm going to use wwJsonSerializer here that's all I use, but there are other open source libraries available as well. The logic is similar.

Objects, Values and Collections

Using wwJsonSerializer to turn a FoxPro object into a JSON looks something like this:

DO wwJsonSerializer && Load libs

*** Create a complex object
loCust = CREATEOBJECT("Empty")
ADDPROPERTY(loCust,"Name","Rick")
ADDPROPERTY(loCust,"Entered",DATETIME())

*** Create a nested object
ADDPROPERTY(loCust,"Address", CREATEOBJECT("Empty"))
ADDPROPERTY(loCust.Address,"Street","17 Aluui Place")
ADDPROPERTY(loCust.Address,"City","Paia")
ADDPROPERTY(loCust,"Number",32)

loSer = CREATEOBJECT("wwJsonSerializer")

*** Serialize into JSON
lcJson =  loSer.Serialize(loCust)

? lcJson

*** read back from JSON into an object
loCust2 = loSer.DeserializeJson(lcJson)

? loCust2.Name
    ? loCust2.Entered
? loCust2.Address.Street 
? loCust2.Number

This creates JSON like this:

{ "address": {"city": "Paia","street": "17 Aluui Place"
  }, "entered": "2021-09-25T01:07:05Z","name": "Rick","number": 32
}

Simple Values

JSON has literal values for simple types and you can serialize and deserialize these simple values.

? loSer.Serialize("One" + CHR(10) + "Two" +;    && "One\nTwo\nThree"
                  Chr(10) + "Three") 
? loSer.Serialize(1.22)                         && 1.22
? loSer.Serialize(.T.)                          && true
? loSer.Serialize(DateTime())                   && "2020-10-01T01:22:15Z"

*** Binary Values as base64
? loSer.Serialize( CAST("Hello World" as Blob)) && "SGVsbG8gV29ybGQ="

One of the big reasons why JSON works so well is that it has only a few limited base types which can be represented easily by most languages - including FoxPro. Type variations was one of the big stumbling blocks with SOAP, as XML had to confirm to strict schemas. JSON's simple base structure avoids most of type conversion issues.

Collections and Arrays

Single dimension arrays and collections are supported for serialization. This is common for serializing object arrays or database cursor rows as objects for example.

loSer = CREATEOBJECT("wwJsonSerializer")

loCol = CREATEOBJECT("Collection")

loCust = CREATEOBJECT("Empty")
ADDPROPERTY(loCust,"Name","Rick")
ADDPROPERTY(loCust,"Company","West Wind Technologies")
ADDPROPERTY(loCust,"Entered",DATETIME())

loCol.Add(loCust)

loCust = CREATEOBJECT("Empty")
ADDPROPERTY(loCust,"Name","Kevin")
ADDPROPERTY(loCust,"Company","OakLeaf")
ADDPROPERTY(loCust,"Entered",DATETIME())
loCol.Add(loCust)

? loSer.Serialize(loCol, .T.)

The result is a top level JSON array of objects:

[
  {"company": "West Wind Technologies","entered": "2021-09-25T05:12:55Z","name": "Rick"
  },
  {"company": "OakLeaf","entered": "2021-09-25T05:12:55Z","name": "Kevin"
  }
]

Cursors

You can also serialize Cursors which are serialized as JSON object arrays similar to the last example. wwJsonSerializer uses a special string syntax to pull in a cursor or table by alias name using cursor:TCustomers syntax.

This first example is a top level cursor serialization:

loSer = CREATEOBJECT("wwJsonSerializer")

SELECT * FROM CUSTOMERS ORDER BY LastName INTO CURSOR TQUery

*** Serialize a top level cursor to a JSON Collection
lcJson =  loSer.Serialize("cursor:TQuery")
? PADR(lcJson,1000)

This produces a top level array:

[
    {"id": "_4FG12Y7TK","firstname": "Pat","lastname": "@ Accounting","company": "Windsurf Warehouse SF","address": "405 South Airport Blvd.  \r\nSouth San Francisco, CA 94080","entered": "2014-11-02T10:46:40Z","state": "OR"
    },
    {"id": "_4FG12Y7U7","firstname": "Frank","lastname": "Green","company": "Greenbay Lawns","address": "12 North  Street\r\nSF CA 94122","entered": "2014-06-02T09:46:40Z","state": "CA"
    },
    ...
]

The second example, creates a cursor as a nested object collection in a top level object as property and setting the to cursor:TCustomers:

*** Cursor as a Property of a complex object
loCust = CREATEOBJECT("Empty")
ADDPROPERTY(loCust,"Name","Rick")
ADDPROPERTY(loCust,"Company","West Wind Technologies")
ADDPROPERTY(loCust,"Entered",DATETIME())

*** Cursor as collection property of Customer obj
SELECT TOP 2 * FROM CUSTOMERS ORDER BY LastName INTO CURSOR TQUery
ADDPROPERTY(loCust,"CustomerList", "cursor:TQuery")

lcJson =  loSer.Serialize(loCust)

Here the .CustomerList property is created as a property of the loCust object:

{"company": "West Wind Technologies","customerlist": [
    {"id": "_4FG12Y7TK","firstname": "Pat","lastname": "@ Accounting","company": "Windsurf Warehouse SF","address": "405 South Airport Blvd.\nSan Francisco, CA 94080","entered": "2014-11-02T10:46:40Z","state": "OR"
    },
    {"id": "_4FG12Y7U7","firstname": "Frank","lastname": "Green","company": "Greenbay Lawns","address": "12 North  Street\r\nSF CA 94122","entered": "2014-06-02T09:46:40Z","state": "CA"
    }
  ],"entered": "2021-09-25T04:49:02Z","name": "Rick"
}

Field Casing and Name Overrides

One thing you might notice in all the examples above is that serialization causes all property names to be lower case. Most commonly JSON APIs return values in camel case which is lower case first word and captilized sub-words. For example, a First Name field should be firstName using camel case.

Unfortunately FoxPro has no way to preserve case for field information in AMEMBERS() and AFIELDS() by default. Yeah, yeah I know you can use DBC field overrides or class name overrides, but these are not universally available and they don't work on things like EMPTY objects or properties added with ADDPROPERTY().

So wwJsonSerializer provides an override for field names via the cPropertyNameOverrides which is provided as a comma delimited list of names like this:

loSer.PropertyNameOverrides = "firstName,lastName,customerList"

Note that I'm not naming all fields in this list - only the fields I actually need to override that have multipart names. With this in place the names are overridden in the JSON output here for the customer list embedded into an object from the last example:

{"company": "West Wind Technologies","customerList": [
    {"id": "_4FG12Y7TK","firstName": "Pat","lastName": "@ Accounting","company": "Windsurf Warehouse SF","address": "405 South Airport Blvd.\nSan Francisco, CA 94080","entered": "2014-11-02T10:46:40Z","state": "OR"
    },
    {"id": "_4FG12Y7U7","firstname": "Frank","lastname": "Green","company": "Greenbay Lawns","address": "12 North  Street\r\nSF CA 94122","entered": "2014-06-02T09:46:40Z","state": "CA"
    }
  ],"entered": "2021-09-25T04:49:02Z","name": "Rick"
}

The PropertyNameOverrides property is immensely useful in ensuring that properties have the correct, case sensitive name. Since JSON is case sensitive many services require that property names match case exactly to update data.

Putting HTTP and JSON Together

At this point you have all the tools you need to:

  • Serialize any data you need to send as JSON
  • Call the server and send the data (if any)
  • Get back a JSON Response
  • Deserialize the JSON Response

So, let's put it all together on a live service!

I'm going to use my AlbumViewer sample application on the West Wind Web Site that is publicly accessible so we can play with the data. This happens to be a .NET API service, but I'll show you how to create a subset using a FoxPro service later in this article.

We don't really care how the data is created, only what shape it comes back as.

HTTP == Technology Independence

Because REST is HTTP based, any type of application can access it. It doesn't matter whether the service was built with .NET, Java, Rust or Turtle Basic. All that matters is what the API output is in order to consume it.

You can also flip this concept around, and switch out the backend technology without affecting the client. So you can create the same interface in FoxPro or .NET. To access one or the other simply switch URLs. This can be a great migration path when updating to new technologies.

Compare that to something technology specific like COM or .NET or JAVA specific APIs, which require platform specific tools/languages to interface with their respective APIs. With REST none of that matters because all we need is an HTTP client and a JSON serializer to access the data.

Retrieving a Collection of Simple Objects

Let's start with an album list. This request retrieves an array of album objects that looks like this:

[
    {"AlbumCount": 5,"Id": 25,"ArtistName": "AC/DC","Description": "AC/DC's mammoth power chord roar became one of the most influential hard rock sounds of the '70s. In its own way...","ImageUrl": "https://cps-static.rovicorp.com/3/JPG_400/MI0003/090/MI0003090436.jpg?partner=allrovi.com","AmazonUrl": "http://www.amazon.com/AC-DC/e/B000AQU2YI/?_encoding=UTF8&camp=1789&creative=390957&linkCode=ur2&qid=1412245004&sr=8-1&tag=westwindtechn-20&linkId=SSZOE52V3EG4M4SW"
    },
    {"AlbumCount": 3,"Id": 12,"ArtistName": "Accept","Description": "With their brutal, simple riffs and aggressive, fast tempos, Accept were one of the top metal bands of the early '80s...","ImageUrl": "https://cps-static.rovicorp.com/3/JPG_400/MI0001/389/MI0001389322.jpg?partner=allrovi.com","AmazonUrl": "http://www.amazon.com/Accept/e/B000APZ8S4/?_encoding=UTF8&camp=1789&creative=390957&linkCode=ur2&qid=1412245037&sr=8-3&tag=westwindtechn-20&linkId=KM4RZR3ECUXWBJ6E"
    },
    ...
] 

To use this data in FoxPro we'll download the JSON and deserialize it using the following code:

DO wwhttp
DO wwJsonSerializer

loHttp = CREATEOBJECT("wwHttp")
loSer = CREATEOBJECT("wwJsonSerializer")

*** Retrieve JSON Artist Array from Server
lcJson = loHttp.Get("https://albumviewer.west-wind.com/api/artists")

*** Turn Array into FoxPro collection
loArtists = loSer.Deserialize(lcJson)

FOR	EACH loArtist IN loArtists FoxObject
	? loArtist.ArtistName + " (" +  TRANSFORM(loArtist.AlbumCount) + ")"
ENDFOR

The loHttp.Get() call makes an HTTP GET request to retrieve data from the server. The captured JSON Array string is deserialized into a FoxPro collection and then displayed.

No rocket science here.

A more Complex Object

The artist list is a simple collection of a flat object, but the data can be more much more complex. For example, here's the code that retrieves a single artist, along with its related albums and tracks:

{"Artist": {"Id": 33,"ArtistName": "Anti-Trust","Description": "Anti-Trust is a side project by ex-Attitude Adjustment members Chris Kontos, Rick Strahl and Andy Andersen. This collaboration produced....","ImageUrl": "https://anti-trust.rocks/images/Photo6.jpg""AmazonUrl": "https://anti-trust.rocks"
    },"Albums": [
        {"Id": 37,"Title": "Guilty","Description": "Old school hardcore punk with metal roots, kicked out in good old garage style. Garage recorded by ex-Attitude Adjustment members Rick Strahl and Chris Kontos early in 2001-2002...","Year": 2020,"ImageUrl": "https://anti-trust.rocks/Guilty-Cover.png","AmazonUrl": "https://store.west-wind.com/product/order/antitrust_guilty","SpotifyUrl": "https://anti-trust.rocks","ArtistId": 33,"Tracks": [
                {"Id": 191,"AlbumId": 37,"SongName": "No Privacy","Length": "2:22"
                },
                {"Id": 194,"AlbumId": 37,"SongName": "Anti-social","Length": "2:25"
                },
                {"Id": 184,"AlbumId": 37,"SongName": "Fear Factory","Length": "2.50"
                },
                ...
            ]
        }
    ]
}

This object is a 'container object' that contains two top level objects Artist and Albums. You can capture this structure in FoxPro easily. The code to retrieve and parse this JSON looks like this:

loHttp = CREATEOBJECT("wwhttp")
lcJson = loHttp.Get("https://albumviewer.west-wind.com/api/Artist/33")

loSer = CREATEOBJECT("wwJsonSerializer")
loArtist = loSer.Deserialize(lcJson)

? loArtist.Artist.ArtistName
? loArtist.Artist.Description

FOR EACH loAlbum in loArtist.Albums FOXOBJECT
    ? " -- " + loAlbum.Title  + " (" + TRANSFORM(loAlbum.Year) + ")"
    FOR EACH loTrack IN loAlbum.Tracks FOXOBJECT
      ? "    -- " + loTrack.SongName
    ENDFOR
ENDFOR

As you can see it's quite easy to transport very complex structures over JSON back into a FoxPro object structure.

Updating an Object

Next let's look at sending data to the server in order to update an artist. To do this we'll need to create JSON, and send it to the server via a POST operation. The next thing we want to do is update an Artist.

It turns out that's actually a two step process:

  • You need to authenticate to retrieve a Bearer Token
  • Update the artist and provide the Bearer Token

So lets start with the authorization.

Web Request Testing Tools

The first thing I recommend when you're working with APIs that have more than a few requests, is to use a URL testing tool to set up and play API requests separately from the application. This makes it easier to figure out exactly what you need to send to server and what it's sending back exactly.

A couple of common URL Testing tools are:

Either of these tools let you create and save requests and then play them back to test requests and see the results. You can also share requests with others, so multiple users can work with the same test data. WebSurge can also do performance load testing on the URLs in a session.

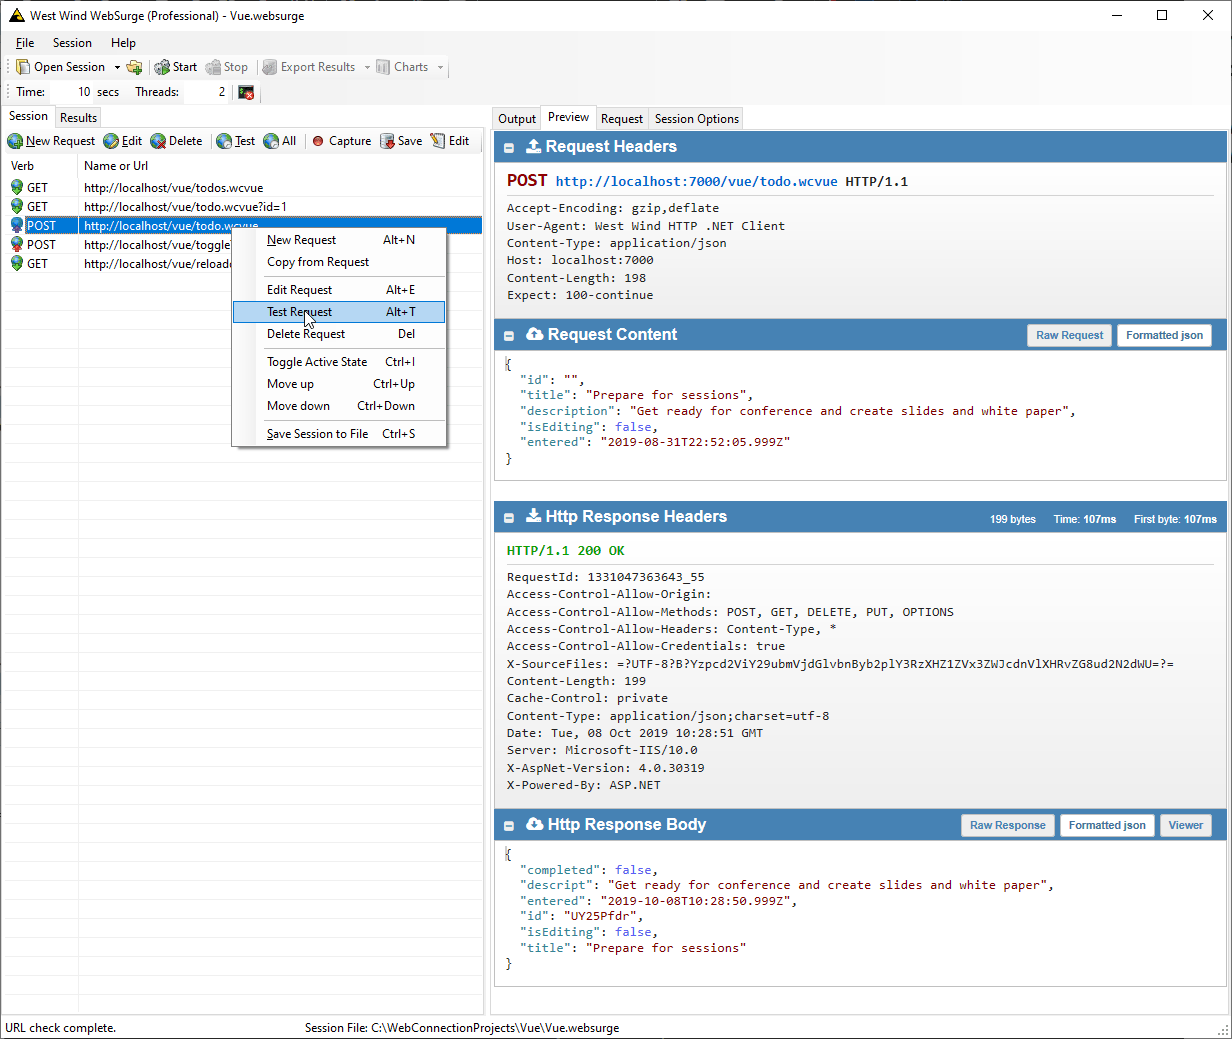
Here's what WebSurge looks like with the request and response for the Authenticate request:

This request requires that you send a username and password in an object and receive back a Token that can then be used in an Authorization header as a bearer token. I'll break this down into two sections, but the two operations happen in a single sequence. Here's the Authentication bit.

LOCAL loHttp as wwHttp, loSer as wwJsonSerializer
loSer = CREATEOBJECT("wwJsonSerializer")
loHttp = CREATEOBJECT("wwhttp")

*** Create the User Info object
loUser = CREATEOBJECT("EMPTY")
ADDPROPERTY(loUser,"Username", "test")
ADDPROPERTY(loUser, "Password", "test")
lcJson = loSer.Serialize(loUser)

*** We're sending JSON to the server and retrieve JSON back
loHttp.cContentType = "application/json"
lcJson = loHttp.Post("https://albumviewer.west-wind.com/api/Authenticate", lcJson)

*** Deserialize the returned Object
loAuth = loSer.Deserialize(lcJson)

IF EMPTY(loAuth.Token)
   ? "Authentication failed. Invalid token."
   RETURN
ENDIF

lcToken = loAuth.Token && YAY!

Here I use a POST operation to send the username and password serialized from an object. Notice I added some basic error checking for failure of the HTTP request (if the connection can't be made or the server is down etc.) and checking the result code for the request. If auth fails the result code will be 401 and we have invalid credentials. The server actually returns an error message and we could peel that out of the data, but in this case the only failure is likely to be authentication failure (either way).

Ok, so now we have the token we need to use it with the follow-on request and pass it along with the updated (or new) Artist information to send to the server. Here's what the Artist request looks like in WebSurge (truncated data for brevity):

You can see that we send a simple flat artist object, which updates matching properties on the server. The server then returns a fully populated Artist object which includes related albums.

*** Our token from the code above - continuing on
lcToken = loAuth.Token

*** Create an Artist object - could also come from cursor SCATTER NAME etc.
loArtist = CREATEOBJECT("EMPTY")
ADDPROPERTY(loArtist, "Id", 33)
ADDPROPERTY(loArtist, "ArtistName", "Anti-Trust")
ADDPROPERTY(loArtist, "Description",;"Anti-Trust is a side project by ex-Attitude Adjustment members " +;"Chris Kontos, Rick Strahl and Andy Andersen. This collaboration " +;"produced a handful of songs that were garage recorded in " +;"Oakland, CA and Maui, HI in 2001 and 2002 by Rick and Chris. " +;"Several additional songs were recorded in late 2020 and early 2021 " +;"which resulted in a the songs being officially put out and released " + ;"online and in album form." + CHR(10) + CHR(10) + ;"Anti-Trust's music features diverse influences from old school hardcore punk, " +;"metal cross over and NWOFBHM, all driven by heavy guitar rhythms " +;"and catchy choruses with a unique and edgy sound.")
ADDPROPERTY(loArtist, "ImageUrl", "https://anti-trust.rocks/images/Photo6.jpg")
ADDPROPERTY(loArtist, "AmazonUrl",  "https://amzn.to/3ucZlPk")
ADDPROPERTY(loArtist, "SpotifyUrl", "https://anti-trust.rocks")


lcJson = loSer.Serialize(loArtist)

*** Now add the Token in Bearer Authentication
lohttp.AddHeader("Authorization", "Bearer " + lcToken)

*** Must specify we're sending JSON 
loHttp.cContentType = "application/json"

*** Update existing record with POST or PUT 
lcJson = loHttp.Post("https://albumviewer.west-wind.com/api/Artist", lcJson)

*** Error Handling
IF loHttp.nError # 0
   ? "Failed: " + loHttp.cErrorMsg
ENDIF
IF loHttp.cResultCode # "200"
   ? "Failed: " + loHttp.cResultCode + "  " + loHttp.cResultCodeMessage
   RETURN
ENDIF   

*** Retrieve artist object from server (overwrites old object!)
loArtist = loSer.Deserialize(lcJson)

*** for new records we might want to know the new id
lnId = loArtist.Id

*** Just for (not very practical) kicks print out Artist, Albums, Tracks
? loArtist.Artist.ArtistName
? loArtist.Artist.Description

FOR EACH loAlbum in loArtist.Albums FOXOBJECT
    ? " -- " + loAlbum.Title  + " (" + TRANSFORM(loAlbum.Year) + ")"
    FOR EACH loTrack IN loAlbum.Tracks FOXOBJECT
      ? "    -- " + loTrack.SongName
    ENDFOR
ENDFOR

Again - this should all look pretty familiar by now - the process is the same: Take an object to send and serialize into JSON, send it, retrieve the result, check for errors, deserialize from JSON. Rinse and repeat for other requests. The structure can be much deeper.

In this example (PostArtist.prg) I do both the authentication and artist update in the same bit of code. Realistically you'd want to separate the Authentication code into an easily reusable function/method that you can call more easily. Also, if you're consuming this data, you'd likely call Authenticate once and then cache the Token in a global variable or other state, and simply reuse it.

Deleting an Object

Deleting an object is as simple as using the DELETE HTTP verb on the /api/artist URL. Note that the URL is overloaded for POST, PUT and DELETE operations which have different behavior even though they point at the same URL.

The delete operation looks like this:

I'm not going to show a code example here since this code won't work repeatedly as items disappear once deleted. The key feature is to use loHttp.Delete(lcUrl) to execute the request. In this case the API simply returns a single boolean value of true or false. Actually it'll always return true or an error response.

I'll talk more about error handling when we look at Server code later on in this article.

Removing Repetitive Code with wwJsonServiceClient

If you look at the above examples you're probably noticing that a lot of that code is repeated over and over. Creating a serializer, and HTTP object, setting up the data to send and receive, checking for errors etc. There's a lot of boilerplate code in there that can actually be abstracted away.

If using West Wind Tools you can use the wwJsonService class which is basically a JSON client that combines the features of wwHttp and wwJsonSerializer into a simpler abstraction. The service client abstracts and handles:

  • JSON Serialization in and out
  • The HTTP Call
  • Error Handling

It basically lets you boil a REST client call down to a single line of code, plus configuration (if any). So rather than manually serializing, you pass in your raw FoxPro values, objects, cursors and the client makes the HTTP call and returns the deserialized result back to you as a FoxPro value, object or collection. If something goes wrong, the client provides a simple way to check for errors using lError and cErrorMsg properties.

You can use the service in two ways:

  • Directly as a generic REST Service client
  • Subclassed as a Service Wrapper Class

Generic REST Service Client

The raw service client class can be used to make calls against a service directly. You use the CallService() method to provide inputs and it goes out and makes the call and returns the result, all using standard FoxPro values, objects, collections and cursors.

Let's do the simple Artist list retrieval first:

loClient = CREATEOBJECT("wwJsonServiceClient")
loArtists = loClient.CallService("https://albumviewer.west-wind.com/api/artists")

FOR	EACH loArtist IN loArtists FoxObject
	? loArtist.ArtistName + " (" +  TRANSFORM(loArtist.AlbumCount) + ")"
ENDFOR

Simple right? This defaults to a GET request against the server with no data sent.

To demonstrate sending data, let's review the previous dual request Artist update example. If you recall in that example I first authenticated then sent the updated Artist to server via a POST. Here's that code with the service client:

*** Create an object
loUser = CREATEOBJECT("EMPTY")
ADDPROPERTY(loUser,"Username", "test")
ADDPROPERTY(loUser, "Password", "test")

loClient = CREATEOBJECT("wwJsonServiceClient")

*** Pass the object for POST and return Auth Object
loAuth = loClient.Callservice("https://albumviewer.west-wind.com/api/Authenticate", loUser, "POST")

IF loClient.lError
   ? "Failed: " + loClient.cErrorMsg
   RETURN
ENDIF

*** Yay we got a token!
lcToken = loAuth.Token
IF EMPTY(lcToken)
   ? "Authentication failed. Invalid token."
   RETURN
ENDIF

loArtist = CREATEOBJECT("EMPTY")
ADDPROPERTY(loArtist, "Id", 33)
ADDPROPERTY(loArtist, "ArtistName", "Anti-Trust")
... && more ADDPROPERTY() calls as before

*** Create clean client instance
loClient = CREATEOBJECT("wwJsonServiceClient")
loClient.oHttp.AddHeader("Authorization", "Bearer " + lcToken)

*** Pass loArtist directly get updated Artist instance
loUpdated = loClient.CallService("https://albumviewer.west-wind.com/api/Artist", loArtist,"POST")

IF loClient.lError
   ? "Failed to update: " + loClient.cErrorMsg
   RETURN
ENDIF

? loUpdated.Artist.ArtistName
? loUpdated.Artist.Description

FOR EACH loAlbum in loUpdated.Albums FOXOBJECT
    ? " -- " + loAlbum.Title  + " (" + TRANSFORM(loAlbum.Year) + ")"
    FOR EACH loTrack IN loAlbum.Tracks FOXOBJECT
      ? "    -- " + loTrack.SongName
    ENDFOR
ENDFOR

The key pieces here are the two CallService() calls that call the server with data. This one sends the auth information and returns a server auth object with a token on success:

loAuth = loClient.Callservice("https://albumviewer.west-wind.com/api/Authenticate", loUser, "POST")

Notice that you specify a raw FoxPro object (loUser) and specify the HTTP Verb and the object (or value, collection or cursor using cursor:TUser syntax) to send to the server. No explicit serialization required. As with the Auth request, the result also comes back as a FoxPro object, that can be walked through and in this case displayed.

Creating a REST Service Client SubClass

The generic wwJsonServiceClient works great to reduce busy work when making service calls, but I recommend taking this one step further by creating specific Service classes that inherit from wwJsonServiceClient in order to provide a business level abstraction, similar to a business object.

So rather than using wwJsonServiceClient directly you subclass and then create methods for each service call using the methods of this class. Given the examples I've shown here we might have methods like:

  • GetArtists()
  • GetArtist(lnId)
  • UpdateArtist(loArtist)
  • DeleteArtist()

I'm going to start out with the two GET operation because they are the simplest:

DO wwhttp
DO wwJsonSerializer
SET PROCEDURE TO artistService ADDITIVE

*************************************************************
DEFINE CLASS ArtistService AS wwJsonServiceClient
*************************************************************

*** Always abstract the base path so you can switch sites
*** easily. Useful for debugging, local, live, staging etc.
cServiceBaseUrl = "https://albumviewer.west-wind.com/"

************************************************************************
*  GetArtists
****************************************
FUNCTION GetArtists()
LOCAL loArtists
  
loArtists =  this.CallService( this.cServiceBaseurl + "api/artists")
IF this.lError
   RETURN NULL
ENDIF
RETURN loArtists
ENDFUNC
*   GetArtists

************************************************************************
*  GetArtist
****************************************
FUNCTION GetArtist(lnId)
LOCAL loArtist

loArtist = this.CallService( this.cServiceBaseUrl + "api/artist/" + TRANSFORM(lnId) )
IF THIS.lError
   RETURN NULL
ENDIF   

RETURN loArtist
ENDFUNC
*   GetArtist

ENDDEFINE

I start by subclassing wwJsonServiceClient and adding a cServiceBaseUrl property. I highly recommend to never hardcode server paths because it's almost certain that you will need to switch servers at some point. Whether it's for dev vs. live or staging, or because you're changing to a new server or adding a second domain. Never hardcode server paths.

The actual service methods then tend to be super simple delegating most of the work to the CallService method. You can do more in these methods if you want - like validate incoming data, or combine multiple service calls into single methods. More on these in a minute.

But one thing that you always want to do is provide application specific error handling. Personally I like to handle errors in my operations and return a value from the function that's easy to check. When returning objects, a failure typically ends up returning null. For strings, perhaps and empty string (or NULL) etc. This makes it more natural to check for errors with just a return value.

To use the ArtistService is now a piece of cake with code that at the application level doesn't directly interact with HTTP or JSON or even a service client. For all intents and purposes this code looks more like calling a business object:

DO ArtistService

LOCAL loService as AristService 
loService = CREATEOBJECT("ArtistService")

CLEAR 
? "*** ARTIST LIST"
? 

loArtists = loService.GetArtists()

FOR	EACH loArtist IN loArtists FoxObject
	? loArtist.ArtistName + " (" +  TRANSFORM(loArtist.AlbumCount) + ")"
ENDFOR

WAIT WINDOW TIMEOUT 10

CLEAR 
? "*** SINGLE ARTIST"
?

loArtist = loService.GetArtist(33)

? loArtist.Artist.ArtistName 
? PADR(loArtist.Artist.Description,1000)

FOR EACH loAlbum in loArtist.Albums FOXOBJECT
    ? " -- " + loAlbum.Title  + " (" + TRANSFORM(loAlbum.Year) + ")"
    FOR EACH loTrack IN loAlbum.Tracks FOXOBJECT
      ? "    -- " + loTrack.SongName
    ENDFOR
ENDFOR

WAIT WINDOW TIMEOUT 10

Next lets look at Authenticate and UpdateArtist. To make things a little more interesting I'll add a little more logic to these to make them more useful here rather than just exposing the service calls. I'll aggregate Authenticate() inside of UpdateArtist() and provide rudimentary auto-authentication.

I'm going to add three more properties to the class:

DEFINE CLASS ArtistService AS wwJsonServiceClient

cServiceBaseUrl = ""

cBearerToken = ""
cUsername = ""
cPassword = ""

FUNCTION Init(lcBaseUrl, lcUsername, lcPassword)

IF !EMPTY(lcBaseUrl)   
   this.cServiceBaseUrl = RTRIM(lcBaseUrl,"/") + "/"
ENDIF
IF !EMPTY(lcUserName)
   this.cUsername = lcUsername
ENDIF
IF !EMPTY(lcPassword)
  this.cPassword = lcPassword
ENDIF

ENDFUNC
*   Init

And then add the Authenticate method. Rather than return the raw service result, a success request sets the cBearerToken property which can then be used on later requests.

************************************************************************
FUNCTION Authenticate(lcUsername, lcPassword)
****************************************

IF EMPTY(lcUsername) AND EMPTY(lcPassword)
   lcUsername = this.cUsername
   lcPassword = this.cPassword
ENDIF
IF EMPTY(lcUsername) AND EMPTY(lcPassword)
   this.cErrorMsg = "Username and password cannot be empty."
   RETURN .F.
ENDIF

loLogin = CREATEOBJECT("EMPTY")
ADDPROPERTY(loLogin, "userName", lcUsername)
ADDPROPERTY(loLogin, "password", lcPassword)

loAuth = this.CallService(this.cServiceBaseUrl + "api/authenticate",loLogin,"POST")
IF this.lError
   RETURN .F.
ENDIF

THIS.cBearerToken = loAuth.Token
RETURN .T.
ENDFUNC
*   Authenticate

This method shows why it can be useful to abstract service functionality into a class as you can add additional wrapping logic to the service call logic. Here the input data is validated prior to calling the service method. Also notice than rather than requiring an object to be passed in, I simply use parameters to create an object on the fly to use for the service call.

Then CallService() is used and the on the fly created loLogin record is posted to the service. If the call succeeds the .cBearerToken property is set with the returned token value and the method returns .T. If validation or the service call fail .F. is returned.

In short, this method signature looks very different than the underlying service call, and provides some additional functionality that the service call alone does not have.

To build on this logic, the UpdateArtist() can then actually use Authenticate() as part of its logic:

************************************************************************
FUNCTION UpdateArtist(loArtist)
****************************************
LOCAL loUpdated  

IF EMPTY(THIS.cBearerToken)
  IF !this.Authenticate()
     RETURN NULL
  ENDIF
ENDIF

IF THIS.lError
   RETURN NULL
ENDIF

*** Add the auth header
THIS.oHttp.Addheader("Authorization", "Bearer " + this.cBearerToken)
loUpdated = THIS.CallService( THIS.cServiceBaseUrl + "api/artist", loArtist, "POST")
IF this.lError 
   RETURN NULL
ENDIF   

RETURN loUpdated
ENDFUNC
*   UpdateArtist

Notice the first block of code that checks the cBearerToken and if not set calls to Authenticate(). If authentication fails the error from it's failure will show up as the error message. If the Update fails it will get its own error message.

The update service call is then just another - by now boring - CallService() call that posts an object to the server. Easy peasy.

To use this method becomes now very simple:

? "*** UPDATE ARTIST"
?

*** Create service and pass url, uid/pwd
loService = CREATEOBJECT("ArtistService","","test","test")

loArtist = CREATEOBJECT("EMPTY")
ADDPROPERTY(loArtist, "Id", 33)
ADDPROPERTY(loArtist, "ArtistName", "Anti-Trust")
ADDPROPERTY(loArtist, "Description",;"UPDATED! Anti-Trust is a side project by ex-Attitude Adjustment members " +;"...")
ADDPROPERTY(...)

*** Return new artist object from server
loArtist = loService.UpdateArtist(loArtist)

IF ISNULL(loArtist)
   ? loService.cErrorMsg
   RETURN
ENDIF

? loArtist.Artist.ArtistName
? loArtist.Artist.Description  && updated value here

Most of this code should look familiar from previous examples, but the key bits of this code are these two lines:

loService = CREATEOBJECT("ArtistService","","test","test")
loArtist = loService.UpdateArtist(loArtist)

We've come a long way from manually running HTTP requests and serializing and parsing JSON to making a simple business object like method call!

The code above handles both authentication and the artist update as part of a single operation. This is what aggregation is all about, and it lets you compose complex functionality from relatively simple service calls into coordinated logic that is handled in a central and easily maintainable, business-object-like class.

Whether you use wwJsonServiceClient or not, I highly recommend some mechanism like this for isolating your application code from the underlying service handling. Wrapper methods like this let your application use a natural interface, and push all the system level gunk either in the framework (via wwJsonServiceClient or if doing it by hand in the actual method code. This makes the code more re-usable, more maintainable and also in the future replaceable should you decide to change services.

Creating a REST Service with Web Connection

So far I've shown how to consume a REST service from Visual FoxPro using an online .NET based service and that works just fine. Clients consuming a Web API couldn't care less what technology the API is written in. That's one of the benefits of exposing functionality as a service in the first place.

Which brings us to the next topic, which is to talk about how to create a REST Web API using Visual FoxPro. Unlike SOAP Services which were super complex to set up and manage as they had to support all of the complex SOAP protocol parsing features, REST Services using JSON are very simple and can be implemented even manually with any Web framework. If you're using specialized tools, they likely have support for creating service in a more natural way such as an MVC framework where the V)iew is the JSON output.

In this article I use West Wind Web Connection which has both manual JSON support as part of the core framework, or native support for Web APIs via a special wwProcess class called wwRestProcess. You use either. Manual support is very similar to the code we used

Manual JSON Handling in Web Connection

Web Connection has rich support for REST services via a custom REST Service class, but if you have an old application and you have one or two API requests you need to serve you probably don't want to add a new process class to an existing project.

Manual processing is easy to do, but requires a few steps:

  • Capture the Request.Form() content for JSON inputs
  • Deserialize JSON to a FoxPro object/collection/value
  • Do your normal request processing
  • Create result in the form of a FoxPro Object or Cursor
  • Serialize result JSON

Keeping with the MusicStore examples I showed for the client let's accept a customer update request to demonstrate both receiving and sending of JSON data in a Web request:

FUNCTION UpdateArtist()
LOCAL lcJson, loSer, loArtistBus, loArtist

lcJson = Request.Form()  && Retrieve raw POST buffer

*** Deserialize the incoming JSON text
loSer = CREATEOBJECT("wwJsonSerializer")
loArtistEntity = loSer.Deserialize(lcJson)

*** Do our business logic using a Business object
loArtistBus = CREATEOBJECT("cArtist")

*** Load an entity into .oData property
IF !loArtistBus.Load(loArtistEntity.Id)
   loArtistBus.New()
ENDIF

loArtist = loArtistBus.oData && easier reference

*** update loaded data
loArtist.ArtistName = loArtistEntity.ArtistName
loArtist.Description = loArtistEntity.Description
...

IF !loArtistBus.Save()
    *** Always try to return JSON including for errors
    RETURN "{ isError: true, message: 'Couldn't save customer.' }";   
ENDIF

lcJson = loSer.Serialize(loArtistBus.oData)

*** Write the output into the Response stream as JSON
Response.ContentType = "application/json"
Response.Write(lcJson)

This code should be pretty self explanatory. Web Connection routes the request along with the JSON payload, which the method picks up and processes. The end result is an object, that is then serialized and pushed out via the Response.

Using a Web Connection REST Service Process

If you are building a Web application that is based around APIs or services you'll want to separate out your API Service into a separate class. Web Connection includes a custom wwRestProcess class that provides for standard Web Connection process that:

  • Routes requests to a Process Method
  • Deserializes a single JSON object/value and passes it as an Input Parameter
  • Serializes a single value returned into JSON

This class preserves all of Web Connection's functionality except it modifies how input is provided to the method and how output is returned. The biggest difference is that typically with wwRestProcess you don't use the Response object to send output, but rather just return a value.

Let's take a look at a setting up a REST service with Web Connection.

Creating a new REST API Service with Web Connection

The easiest way to create a new REST Service is to use the New Project (or new Process) Wizard which creates a new application for you. Start the Web Connection Console with DO CONSOLE and choose New Project.

First we'll create the new project called MusicStore with a process class called MusicStoreProcess and specify the Web Server we want to use locally:

Note all Web Servers require either configuration or installation of some tools

I'm using the local .NET Core based Web Connection Web Server here.

Next we get to specify where to create the project folder, and what virtual (if any and for IIS only) we want to use.

Web Connection creates a self-contained project folder which contains the Web files (Web), the FoxPro source files (Deploy) and an optional Data folder. The structure is self contained and fixed, so that the entire project can be easily moved and automatically be configured in a new location where all system files and folders are relative to each other in known locations.

We also need to specify a scriptmap - an extension for 'pages' that we access (ie. Artist.ms) - that tells IIS to route any request URLs with that extension (.ms) to our Process class:

Finally we need to specify that we want to create a JSON REST API Service Process class rather than a standard Web Connection process class for HTML applications.

When it's all said and done Web Connection launches:

  • The Web Server (for IIS Express and Web Connection Web Server)
  • The Web Connection Server (ie. MusicStoreMain.prg)
  • A Web Browser to the root Web Site (https://localhost:5200)

If you click the Hello World link on the sample site you should now see a JSON result returned from the TestPage.ms request.

Here's what all that looks like:

If you click on the Hello World request and the scripting link in this REST Service you get back JSON responses. Here's the Hello World response:

{
    Description: "This is a JSON API method that returns an object.",
    Entered: "2021-09-27T19:12:43Z",
    Name: "TestPage"
}

This is generated inside of the MusicStoreProcess.prg class where there is a method called TestPage that looks like this:

*********************************************************************
FUNCTION TestPage
***********************
LPARAMETERS lvParm   && any posted JSON object (not used here)

*** Simply create objects, collections, values and return them
*** they are automatically serialized to JSON
loObject = CREATEOBJECT("EMPTY")
ADDPROPERTY(loObject,"name","TestPage")
ADDPROPERTY(loObject,"description",;"This is a JSON API method that returns an object.")
ADDPROPERTY(loObject,"entered",DATETIME())

*** To get proper case you have to override property names
*** otherwise all properties are serialized as lower case in JSON
Serializer.PropertyNameOverrides = "Name,Description,Entered"

RETURN loObject

This simple method demonstrates the basics of how REST Endpoints work in Web Connection:

  • Single input parameter for a JSON Object POSTed (if POST/PUT)
  • Method body that creates a result object or cursor
  • RETURN a plain FoxPro object or Cursor (cursor:TCompany)

Pretty simple right?

Creating the API Artist EndPoints

Ok let's dive in then and create the service interface for:

  • Retrieving an Artist List
  • Retrieving an individual Artist
  • Updating an Artist
  • Deleting an Artist
Returning a list of Artists from a Cursor

The first request will be the Artist list that is returned as a cursor.

To create a new endpoint method in Web Connection all we need to do is add another method to the MusicStoreProcess class. I'm going to use a business object class for the Artist operations that work against a data set. You can find both of these with the sample data on GitHub.

Here's the Artists method which can be accessed with http://localhost:52000/Artists.ms:

************************************************************************
FUNCTION Artists()
****************************************

loArtistBus = CREATEOBJECT("cArtist")
lnArtistCount = loArtistBus.GetArtistList()

Serializer.PropertyNameOverrides = "artistName,imageUrl,amazonUrl,albumCount,"

RETURN "cursor:TArtists"
ENDFUNC

The code for this bit is very simple: The business object returns a list of all articles as a cursor named TArtists and we return that cursor as a result of the method via the same cursor:TArtists syntax that we used earlier when generating JSON on the client. No surprise there - the server framework is using the same serializer.

You can open this URL in the browser and if you have a JSON addin you can see nicely formatted JSON:

Notice that property names are returned in camelCase. By default FoxPro will serialize only lower case property names, but because I used the PropertyNameOverrides property I can explicitly specify field names with custom case.

While the browser works for looking at GET requests, I prefer to set up URLS for testing in a separate tool like Postman or WebSurge. This is especially useful if you need to POST data to the server since there's no easy way to do that repeatedly in the browser without creating a small app. Storing all the requests in one place is also a nice way to quickly see what operations are available on your API.

Here's the Artists request - and the others we'll create - in WebSurge:

A simple POST Request that Accepts data

The next example is another simple one that Authenticates a user. It takes a single object input with an object that provides the user's credentials for authentication:

************************************************************************
FUNCTION Authenticate(loUser)
****************************************
loAuthBus = CREATEOBJECT("cAuth")
loTokenResult = loAuthBus.AuthenticateAndIssueToken(loUser.Username, loUser.Password)
IF ISNULL(loTokenResult)
   this.ErrorResponse(loAuthBus.cErrorMsg,"401 Unauthorized")
   RETURN
ENDIF

RETURN loTokenResult

Object Composition: Retrieving an individual Artist

The previous request was a simple list result with flat objects. But you can also return much more complex structures that nest multiple objects and collections to createa

Returning an Artist returns a nested structure with Artist, albums and tracks. Lets see how this works.

The key to this is to use the business object to retrieve the base data and then composing a more complex object. Here's the Album method which responds to a URL like https://localhost/artist?id=1:

************************************************************************
FUNCTION Artist(loArtist)
****************************************
LOCAL lnId, lcVerb, loArtistBus

lnId = VAL(Request.QueryString("id"))
lcVerb = Request.GetHttpVerb()

if (lcVerb == "POST" or lcVerb == "PUT")
   RETURN this.UpdateArtist(loArtist)   
ENDIF   

IF lcVerb = "DELETE"
   loArtistBus = CREATEOBJECT("cArtist")   
   RETURN loArtistBus.Delete(lnId)  && .T. or .F.
ENDIF

*** GET Operation
IF lnId == 0
  RETURN this.ErrorResponse("Invalid Artist Id","404 Not Found")  
ENDIF

loArtistBus = CREATEOBJECT("cArtist")
IF !loArtistBus.Load(lnId)   
    RETURN this.ErrorResponse("Artist not found.","404 Not Found")
ENDIF 

*** Lazy load the albums
loArtistBus.LoadAlbums()

Serializer.PropertyNameOverrides = "artistName,imageUrl,amazonUrl,albumCount,albumPk, artistPk,songName,unitPrice,"

return loArtistBus.oData 
ENDFUNC

The result is a complex object that returns an album top level object with a contained albums collection, each of which in turn has a tracks collection:

{"pk": 2,"artistName": "Accept","descript": "With their brutal, simple riffs and aggressive...","amazonUrl": "http://www.amazon.com/Accept/e/B000APZ8S4&linkId=KM4RZR3ECUXWBJ6E","imageUrl": "http://cps-static.rovicorp.com/3/JPG_400/MI0001/389/M389322.jpg?partner=allrovi.com","albums": [
    {"amazonUrl": "http://www.amazon.com/gp/product/B00005NNMJ/&linkId=MQIHT543FNE5PNZU","artist": {"albums": null,"amazonUrl": "http://www.amazon.com/Accept/e/B000APZ8S4/&linkId=KM4RZR3ECUXWBJ6E","artistName": "Accept","descript": "With their brutal, simple riffs and aggressive...","imageUrl": "http://cps-static.rovicorp.com/3/JPG_40/MI01/389/M389322.jpg?partner=allrovi.com","pk": 2
      },"artistPk": 2,"descript": "As cheesey as some of the titles and lyrics on this record are...","imageUrl": "https://images-na.ssl-images-amazon.com/images/I/519J0xGWgaL._SL250_.jpg","pk": 2,"title": "Balls to the Wall","tracks": [
        {"albumPk": 2,"artistPk": 0,"bytes": 5510424,"length": "5:02","pk": 2,"songName": "Balls to the Wall","unitPrice": 0.99
        },
        {"albumPk": 2,"artistPk": 0,"bytes": 0,"length": "3:57","pk": 5090,"songName": "Fight it back","unitPrice": 0
        },
        ...
      ],"year": 1983
    },
    {"amazonUrl": "http://www.amazon.com/gp/product/B00138KM1U/ref=as_li_tl?ie=UTF8&camp=1789&creative=390957&creativeASIN=B00138KM1U&linkCode=as2&tag=westwindtechn-20&linkId=AQAYEWNVF5Z36AZB","artistPk": 2,"descript": "An all time classic. At the time Fast as a Shark was THE heaviest thing made to that date...","imageUrl": "https://images-na.ssl-images-amazon.com/images/I/51aInWlHfgL._SL250_.jpg","pk": 3,"title": "Restless and Wild","tracks": [
        {"albumPk": 3,"artistPk": 0,"bytes": 3990994,"length": "3:10","pk": 3,"songName": "Fast As a Shark","unitPrice": 0.99
        },
        ...
      ],"year": 1982
    }
  ]
}

So this object 'composed' by the business object using Foxpro code. How does that work? Lets take a look.

The first bit is the Load() method which loads up the Artist entity into an .oData member. The code in the core business object selects the record and uses SCATTER NAME to push the data into the .oData entity object:

FUNCTION Load(lvPk)

IF !DODEFAULT(lvPk)
  RETURN .F.
ENDIF

ADDPROPERTY(this.oData,"Albums",NULL)  

RETURN .T.

The code then dynamically adds an Albums property which initially is null. The property can be lazy loaded via a LoadAlbums method in the cAlbums class that returns a collection of albums and tracks for a given artist id:

FUNCTION LoadAlbums(lnArtistPk)
LOCAL loAlbum, loBusAlbum, loAlbums

loBusAlbum = CREATEOBJECT("cAlbum")
loAlbums = CREATEOBJECT("Collection")

*** Load Pks then load each item for detailed list
loBusAlbum.GetAlbumPkList(lnArtistPk)

SCAN 
    *** Load the top level album entity only
    loBusAlbum.Load(TAlbums.pk)
	
    *** compose the Track list for each album
    ADDPROPERTY(loBusAlbums.oData,"Tracks",NULL)
    loBusAlbums.oData.Tracks = loBusAlbums.LoadSongs(this.oData.Pk)

    loAlbums.Add( loBusAlbum.oData )
ENDSCAN

RETURN loAlbums

These two methods compose a complex nested object structure as an object graph using FoxPro objects and collections to indicate nesting and relationships. Because everything is an object, you can easily add one object or collection to another, dynamically creating any shape you need to represent to the client.

This is a powerful feature that goes a little against FoxPro's cursor centric mindset, but it allows you to express data more naturally than as flat table structures - which if you really want them can still be returned as well. Nothing is stopping you from returning separate artist collections for example (as the .NET server we used earlier does).

Update Request: Updating an Artist

So now lets look updating an article from the client. In update scnearios against a Web Connection server with the wwRestProcess, the endpoint can receive a single object or value that is translated into a parameter to the endpoint method.

Single Parameter Not Enough? Use Object Composition

While a single parameter may sound limiting, remember that you can compose JSON to represent multiple top level objects or values. For example if you wanted to pass 2 parameters you could do pass an object like this:

{ parm1: "value 1", parm2: { parm1Value: "value 1.1" } }

where parm1, parm2 etc. are your top level 'parameters'. Or you can use an array to represent multiple disparate parameters. Composition is the key!

Here's what the request should look like:

Here's what the code for the endpoint method looks like.

FUNCTION UpdateArtist(loArtist)

IF VARTYPE(loArtist) # "O"
	ERROR "Invalid data passed."
ENDIF

lnPk = loArtist.pk

loBusArtist = CREATEOBJECT("cArtist")
IF lnPk = 0
	loBusArtist.New()
ELSE
	IF !loBusArtist.Load(lnPk)
	   ERROR "Invalid Artist Id."
	ENDIF
ENDIF 

*** Update just the main properties
loArt = loBusArtist.oData
loArt.Descript = loArtist.Descript
loArt.ArtistName = loArtist.ArtistName
loArt.ImageUrl = loArtist.ImageUrl
loArt.AmazonUrl = loArtist.AmazonUrl

*** Items are not updated in this sample
*** Have to manually update each item or delete/add

IF !loBusArtist.Validate() OR ! loBusArtist.Save()
    ERROR loBusArtist.cErrorMsg
ENDIF

loBusArtist.LoadAlbums()

Serializer.PropertyNameOverrides = "artistName,imageUrl,amazonUrl,albumCount,albumPk, artistPk,songName,unitPrice,"

RETURN loArt
ENDFUNC

This method receives an loArtist parameter which is the deserialized JSON from the Artist passed in the request. The code checks and ensures that an object was passed and if so tries to the load up the business object's .oData from disk. If the Pk is 0 it's a new record, otherwise it's an existing one. If the artist can't be found we throw an ERROR which automatically triggers a JSON error response with the error message passed through to the client.

Once we have an Artist instance the object can be updated from the incoming Artist Update data. Once updated the data is validated and saved using the Business object's internal behavior.

Finally if all went well the object is filled out with albums, to send back to the client. The client can then use the returned object to update its state of the object on its own.

HTTP Verb Overloads

If you've been playing along with this sample, you may have noticed that I used a bit of hand waving in my last example. Can you spot the problem?

The problem is that I used the same endpoint for both the GET and POST operations and also the not yet discussed DELETE operation. All of these point at:

http://localhost:5200/Artist.ms

Web Connection routes requests based on the .ms extension and routes to the Artist() method, but how do we get to UpdateArtist()? The answer lies in a little bit of logic applied in the Artist() method itself that sub-routes requests to the appropriate handlers.

If you recall the Artist() method I showed earlier was used for the GET operation that returns a single artist. The code left out this extra routing, but I'm going to add it back in now:

FUNCTION Artist(loArtist)
LOCAL lnId, lcVerb, loArtistBus

lnId = VAL(Request.QueryString("id"))
lcVerb = Request.GetHttpVerb()

if (lcVerb == "POST" or lcVerb == "PUT")
   RETURN this.UpdateArtist(loArtist)   
ENDIF   

IF lcVerb = "DELETE"
   loArtistBus = CREATEOBJECT("cArtist")   
   RETURN loArtistBus.Delete(lnId)  && .T. or .F.
ENDIF

*** GET Operation code below

IF lnId == 0
  RETURN this.ErrorResponse("Invalid Artist Id","404 Not Found")  
ENDIF

loArtistBus = CREATEOBJECT("cArtist")
IF !loArtistBus.Load(lnId)   
    RETURN this.ErrorResponse("Artist not found.","404 Not Found")
ENDIF 

*** Lazy load the albums
loArtistBus.LoadAlbums()

Serializer.PropertyNameOverrides = "artistName,imageUrl,amazonUrl,albumCount,albumPk, artistPk,songName,unitPrice,"

return loArtistBus.oData 

So if the request is a GET request, the code on the bottom runs which retrieves and returns an Artist instance. On POST or PUT the UpdateArtist() method I showed in the last section is called.

Finally there's also inline logic for deleting an Artist using the DELETE verb.

HTTP Verb overloading is a common concept in REST - you use nouns (ie. Artist) in the URL to describe a thing or operation, and a verb (GET, POST) to describe what to do to it. The combination of the two - URL + HTTP Verb - make up the unique endpoint.

Server Error Handling

No discussion of services is complete without giving some thoughts to error handling. Incidentally this is one of my pet peeves because there are plenty of services out there that do a horrible job of error handling, not providing decent error information back to the client.

It's important that your application provides meaningful error information. There are a number of things that can be returned to let the client know what's going on:

  • HTTP Status Codes
    • 200's success
    • 300's forwarding
    • 400's Authorization, Not Found, Invalid etc.
    • 500's errors
  • Error Response JSON

Status codes should be the first line of response. If you have an authorization request that fails, a 401 Not Authorized response is appropriate. If a resource is not found a 404 Not Found should be returned. On the client these show as errors but offer a quick way to know what went wrong. If your application crashes while processing it should return a 500 Server Error response.

If you can it's also useful to return an error response from a request that provides error information in a consistent manner. I like to return a consistent error structure that includes an isError property, and a message property at minimum and then add additional fields as needed. For example, in debug I might want to send a stack trace so I can tell where the code failed.

Web Connection REST automatically handles a number error scenarios automatically in the wwRestProcess class. If you access an invalid URL it automatically returns a 404 Not Found error. If automatic authentication in Web Connection fails it automatically sends a 401 Unauthorized. And any hard failures in your method code that aren't trapped return a 500 Server Error result. All of these failures also return a JSON error object.

To check this out lets break some code. For this to work we have to make sure Web Connection's Server.lDebugMode = .F. (or via UI configuration) or else any error will break into the source code.

If I change the Artists() method to include an invalid method call which is a 'generic application error' like this:

FUNCTION Artists()

loArtistBus = CREATEOBJECT("cArtist")
lnArtistCount = loArtistBus.GetAArtistList()

Serializer.PropertyNameOverrides = "artistName,imageUrl,amazonUrl,albumCount,"

RETURN "cursor:TArtists"
ENDFUNC

I get the following error response:

Notice the response is 500 Server Error and I get the FoxPro error message in the JSON response. Any error that occurs in your method basically triggers a 500 response. This is a good way to ensure unhandled errors provide some feedback rather than just a server error page.

You can also explicitly force an error response. There are two ways to do this:

  • Simple call ERROR "<lcErrorMessage>"
  • THIS.ErrorResponse()

The ERROR call is handled the same way as an unhandled exception except it uses your error message. The ErrorResponse() method allows you to specify a message as well as a status code. So rather than always returning a generic 500 response you can be more specific about the result code. Many errors are of the 404 Not Found kind or 204 No Content. You can find HTTP status codes here.

With that in mid let's pretend we have a problem loading the Artist list and return an error to the client:

FUNCTION Artists()

loArtistBus = CREATEOBJECT("cArtist")
lnArtistCount = loArtistBus.GetArtistList()

IF  lnArtistCount < 0
    * ERROR "Couldn't retrieve artists"   && 500 error
    THIS.ErrorResponse("Couldn't retrieve artists","404 Not Found")
    RETURN
ENDIF

RETURN "cursor:TArtists"
ENDFUNC

CORS for Web Browser Access

If you're building Web Server APIs that are going to be accessed directly by a Web Browser, you need to set up CORS (Cross Origin Resource Sharing) on the server. CORS is a URL restriction protocol that the server provides and the client checks to see whether the server allows the client's origin domain to connect and retrieve data from the server. This is a crazy double blind backwards protocol, that is enforced solely by browsers and totally useless for any other HTTP client. However, browsers require a server CORS host policy in order to allow connecting to a non-local Web site for fetch or XHR requests.

In Web Connection CORS can be enabled with the following code in a wwProcess class' InitProcess() method:

FUNCTION OnProcessInit
LOCAL lcOrigin, lcVerb

*** Explicitly specify that pages should encode to UTF-8 
*** Assume all form and query request data is UTF-8
Response.Encoding = "UTF8"
Request.lUtf8Encoding = .T.

lcOrigin = Request.ServerVariables("HTTP_ORIGIN")
IF !EMPTY(lcOrigin)
	*!*	*** Add CORS header to allow cross-site access from other domains/mobile devices on Ajax calls
	*!*	Response.AppendHeader("Access-Control-Allow-Origin","*")   && all domains always
	Response.AppendHeader("Access-Control-Allow-Origin",lcOrigin)  && requested domain - effectively all
	Response.AppendHeader("Access-Control-Allow-Methods","POST, GET, DELETE, PUT, OPTIONS")
	Response.AppendHeader("Access-Control-Allow-Headers","Content-Type, *")
	*** Allow cookies and auth headers
	Response.AppendHeader("Access-Control-Allow-Credentials","true")
ENDIF

 
 *** CORS headers are requested with OPTION by XHR clients. OPTIONS returns no content
lcVerb = Request.GetHttpVerb()
IF (lcVerb == "OPTIONS")
   *** Just exit with CORS headers set
   *** Required to make CORS work from Mobile devices
   RETURN .F.
ENDIF   

RETURN .T.

This explicitly allows access to all 'origins' which are essentially domains. The 'origin' is a base URL from a source site that is typically sent by a client browser when making fetch() or XmlHttpRequest HTTP calls to a non-native domain. So if I'm running on west-wind.com and I want to call an API on foxcentral.net from a browser, CORS policy has to explicitly allow https://west-wind.com access. You can specify either a comma delimited list of domain, or a wildcard that allows all domains using * as I'm doing above.

Note that this policy is a browser security feature and only applies to Web browser calls to non-local domains. It has no effect on a FoxPro HTTP client for example, but the server has to send these headers regardless to ensure that Web clients can consume the data.

Summary

Alright, in this article I've shown you both how to call JSON REST services from FoxPro and how to create JSON REST services with FoxPro code. API Services are very powerful and give you a lot of options for publishing data in a fairly easy to create fashion. JSON as a message format is a great tool as it is relatively easy to create and parse in FoxPro. It has none of the complications that XML and SOAP suffered from - there's no ambiguity about the simple types that JSON provides.

HTTP tools on the client are available on just about any platforms - often with many options. On Windows you can use raw WinHttp() calls, use .NET for passthrough HTTP calls, or if you want more control a full featured library like wwHttp can offer a number of nice helper features to make it easy to send and receive content between client and server.

You can also create REST services fairly easily using any of the existing Web server solutions that you might already be using. Because JSON is a fairly simple format to create and parse, any existing solution can provide REST functionality with a little manual work, or you can use a ready made framework like the wwRestProcess class in Web Connection that abstracts the entire process for you and turns REST endpoints into simple methods with an input parameter and result value.

REST is no longer new technology, but it's had staying power and there doesn't appear to be anything set to replace it in the foreseeable future. Part of this is because the simplicity of the tech just works and easy to implement. There are many patterns like Micro Services, Serverless Computing, and countless Cloud Services that are all just slight variations of the REST service technology. These approaches are here to stay and building on them both provides benefits in usage, as well as

Resources

Tools and Libraries

JSON Serializers

HTTP Clients

this article created and published with the Markdown Monster Editor

Web Connection 7.26 has been released

$
0
0

Web Connection 7.26 is out and in this post I'll go over some of the new features of this post. As has been the norm for many of the recent updates, this is a relatively small update, with only small incremental feature updates.

Breaking Ch... Ch... Changes

Breaking changes in Web Connection are few these days, and it's not this different for that release. Breaking Code changes rarely occur and haven't since the major release of 7.0. However, we do have the occasional external dependency updates that require that applications and local development setups are updated.

There's one breaking dependency change and one more I pulled forward from the last release as a reminder. Remember to update your dependencies in your Web Connection projects (if you use new projects) and in live applications.

Here's a link to the documentation that addresses the updating of dependencies:

One Breaking Change: Web Connection Web Server requires .NET 6

There is one breaking change, namely that the new, local Web Connection Web Server now requires .NET 6.0 instead of .NET 5.0 in previous release. If you update to the latest version of the Web Server you'll need to make sure to install the .NET Runtime.

For the optional Web Connection Web Server you can download either:

  • .NET 6.0 SDK (x64)
  • Hosting Bundle (x64)

This new, self-contained and shippable Web Connection Web Server is of course optional, and you can use IIS Express, or full IIS instead if you choose, but if you're already using it you'll likely want to update.

If you're using the Web Connection Web Server for development or in production inside of IIS, you'll want to update the WebConnectionWebServer folder in your project folder and in the deployed application as well, as the server is not shared but rather distributed with each project/application. If you don't update your apps continue to work, but with the older version of .NET.

Note that .NET Core does not automatically update to newer major versions of .NET which means if you only have .NET 6 installed but you're running the older .NET 5.0 server, the server will not start. If you mix and match versions of the Web Connection Web Server you may have to have multiple .NET Runtimes installed, which is fully supported now.

One more breaking change: NewtonSoft.Json.dll needs to be Updated

This is actually breaking change from the last release but it's good to keep this one active as it affects deployed applications that update to Web Connection 7.25+.

We've updated the .NET JSON serializer which is NewtonSoft.Json.dll to the latest version 13.0.1. This DLL is used in conjunction with wwDotnetBridge and the wwJsonSerializer class and used for all JSON deserialization. As wwDotnetBridge has a dependency on 13.0.1 both files need to be synced. Other libraries that might require older versions can use assembly forwarding to get versions synced up to this latest version.

Bug Fixes

As has been the case for the last few release, the brunt of updates have been small bug fixes and performance tweaks. Web Connection has a lot of moving parts so you guys still find little nooks and crannies that break every once in a while.

There are a few bug fixes:

Fix: Issue with Live Reload Requests not Firing on IIS

Fixed issue where hitting a link on IIS/IISEXPRESS occasionally would not work when LiveReload was enabled. Fixed by ensuring the output stream is properly disposed before writing the injected reload script.

Fix wwSftp::OnFtpBufferUpdate() to allow Canceling Downloads and Uploads

Fix OnFtpBufferUpdate() for wwSftp so it now works to provide to check for the lDownloadCancelled flag on a passed in loSftp instance when set. Previously this flag was ignored.

Fix: ExpandTemplate with _Layout Pages not reading Base Path correctly

Fixed issue where wwPageResponse.ExpandTemplate() was not correctly setting the Web site base path resulting in empty layout pages to be rendered. This in turn resulted in empty pages. Fixed. Note this bug only applied to Templates, not Script pages.

So what's new?

Administration Updates

This release has a few updates, most of them centering around the administration interface. If you've upgraded recently you've probably noticed that there's a new Administration page at Administration.wc that consolidates both the 'module' handled operations and the FoxPro server operations into a single redesigned page. The idea of that change has been to provide a single page that lets you manage all Web Connection Administration settings and operations in one place.

This page has seen some additional tweaks to make it easier to work with and easier to see option settings. There are also a couple more toggles you can set now, like toggling Live Reload and Web Socket support.

JSON API for Server Status

The Web Connection Handler and Web Connection Web Server now have a dedicated AdministrationJson.wc link you can use to retrieve server configuration information as JSON. The result includes all the server configuration settings as well as information about the running server similar to the main Administration.wc page.

Here's what the JSON output looks like:

The real use case for this though is for monitoring applications that can get access to all these stats and perhaps automatically start and stop servers or reset servers if memory get to high etc. Lots of things you can do with this if you are creative in the admin space.

Add Performance Counters back to Web Connection Server

The .NET Core Web Server now displays CPU usage for server instances on the Middleware Administration page.

Live Reload Toggling now 'just works'

Live Reload mode toggling in the Admin interface has been a bit fiddly as there are a few moving parts. In this update Live Reload can now be more easily be toggled on the bottom of the configuration form:

More importantly though that change now works in real time for static and script resources, and it also attempts to update the FoxPro server app.iniLiveReload=on setting.

Previously LiveReload setting changes required a restart of both the Web Application in the Web COnnection Web Server, or recycling in IIS/IISExpress and a restart of the FoxPro Server. With these updates the Web server auto-refreshes for static and script files, and the FoxPro server in most cases will also update and auto-refresh.

Worst case scenario you may still have to restart the FoxPro server, in order to auto-refresh FoxPro server code changes.

LiveReload Disabled for running in IIS

Note by default when running inside of IIS, LiveReload is completely disabled at the middleware level by not loading up the file watcher or hooking up the HTML content interception. When disabled like this in IIS, toggling the configuration flag through the admin interface or the WebConnectionWebServerConfiguration.xml file has no effect.

You can override this behavior via the WEBCONNECTION_USELIVERELOAD flag in the web.config<aspNetCore> section. The default looks like this:

<aspNetCore>
	 ...<environmentVariables>
	 	...<environmentVariable name="WEBCONNECTION_USELIVERELOAD" value="False" /></environmentVariables></aspNetCore>

False here means LiveReload does not work, even if set in the toggle flag described above. True enables it so that the toggling works the same as in development

Miscellaneous Changes

The following are a few odds and end updates to Web Connection.

Better Error Handling for REST Service Invalid URLs

Invalid REST Routes - ie. referencing a missing method in a REST Service - now return an HTTP 404 error. In addition, the error message now also describes the error better as Missing endpoint method: MethodName.

wwJsonSerializer::MapPropertyName()

JSON Serialization with FoxPro requires some extra work for dealing with properly cased property names. FoxPro's internal Reflection APIs don't return property names in their proper case. So, Web Connection by default just lower cases all property names.

There's always been a loSerializer.PropertyNameOverrides property to allow you recast property names by essentially replacing them with proper case names in a comma separated list.

In addition to that there, now a helper method called MapPropertyName() on the serializer that allows you to map an individual property name to a new name.

This lets you completely transform a property name rather than just changing case as PropertyNameOverrides.

For example it allows you to map names to values that standard FoxPro property serialization would not normally allow for such as property names with spaces or special characters. Similar to PropertyNameOverrides in behavior but with much more control.

loSer = CREATEOBJECT("wwJsonSerializer")
loObj = CREATEOBJECT("EMPTY")
ADDPROPERTY(loObj,"LastName","Strahl")
ADDPROPERTY(loObj,"FirstName","Rick")

*** Create initial JSON
*** { "lastname": "Strahl", "firstname": "Rick" }
lcJson = loSer.Serialize(loObj)

*** Now update the property names
loSer.MapPropertyName(@lcJson, "lastName","Last Name")
loSer.MapPropertyName(@lcJson, "firstName","First Name")

*** { "Last Name": "Strahl", "First Name": "Rick" }
? lcJson

And yes those 'property names' (JavaScript folks would call that a 'Property Map' more likely) are legal in JavaScript.

Automatically clear wwSql Named Parameters before new command executes

The wwSQL class has support for running queries with Named Parameters that you can pass into the query. Parameterized query are the preferred way to write SQL statements because it avoids the potential of SQL Injection as parameters are passed are never assigned directly and sanitized before getting applied into a SQL statement.

One problem in the past was that running multiple successive commands would require explicitly clearing the parameter list before running the next command.

This has been changed so now the parameter list is cleared by default before a new command is executed. The sequence is:

  • Add parameters
  • Execute Statement
  • Add First parameter for second statement
  • Clear parameter list before first parameter is added
  • Add more parameters
  • Execute second statement

The list is cleared on the first AddParameter() call after a query was executed. This behavior can be overriden via the lNoParameterReset property which when set leaves the first parameter list intact.

The idea is that you usually want the list cleared before a new command is run. Previously you had to explcitly call loSql.AddParameter("CLEAR") to clear the list, which is no longer required now.

This may break code, in rare situations, if code depended on running the same parameters in multiple commands, but this should far and beyond be the exception.

Summary

There you have it. This is a small update, and it should be an easy one to update in production with minimal effect. Just make sure if you're using the Web Connection Web Server to update the server in your created projects.

Watch out for 64 bit Incompatibility using the Visual FoxPro OleDb Provider

$
0
0

Yesterday I ran into a problem in an application that has been using the the Visual FoxPro OleDb Provider. There dreaded error is:

'VFPOLEDB.1 provider is not registered on the local machine'

Old Driver, New Problems

The VFP OleDb driver is old, as is FoxPro and it hasn't been updated since FoxPro was last updated around 2009. The driver is also 32 bit which is the cause of most common problems you are likely to run into these days as host applications tend to be 64 bit by default.

There are a couple of common reasons for this error to come up:

  • Most obvious: Make sure the VFP OleDb Provider is actually installed
  • Make sure you are using a 32 bit version for the host application

Make sure the VFPOleDb Driver is installed

If you install a full version of Visual FoxPro on a machine, it automatically installs the VFPOleDb provider. But if you do a runtime install, or you have a machine that has no FoxPro installation at all, you need to explicitly install the Visual FoxPro OleDb provider in order to use it.

The last version of the provider is the VFP 9.0 version.

Download the last Visual FoxPro OleDb Driver

Digging up a download of the last VFP OleDb provider is tricky, because the various Microsoft links for the 9.0 versions no longer work.

However, thankfully you can download the VfpOleDb driver from the VFPX GitHub repo here (all support installers are here BTW!):

Microsoft OLE DB Provider for Visual FoxPro 9.0 (VFPX )

Make sure you install the driver and then also make sure you restart the host application that is using the driver, because the registration may not be visible until the application refreshes its environment. If you're running a Web application, you'll want to restart the Application Pool that hosts your site.

Make sure you're using the VFP OleDb Driver in a 32 bit Application

The Visual FoxPro OleDb driver is a 32 bit component and it only works inside of a 32 bit application. Most applications these days are 64 bit by default, and that simply won't work with the VFP OleDb driver.

The big issue with this is that when you try to use the VfpOleDb provider in a 64 bit application it fails with an error that suggests that the driver is not installed:

'VFPOLEDB provider is not registered on the local machine'

The reason you see this message even if the driver is installed is because it's not registered in the 64 bit registry where a 64 bit application looks for it. The error message is very misleading because the driver is installed, but the host application is not seeing it due to the bitness mismatch.

It's easy to go down the wrong rabbit hole trying to fix a non-existing driver install problem. Ask me how I know and how I wasted well over an hour in the wrong direction trying to check out the VFP OleDb installation. ??

But even if the driver could be found by the 64 bit application, it still wouldn't work as the VFP OleDb driver is a 32 bit InProcess COM component and you can't load a 32 bit COM component into a 64 bit process.

In summary, the error message is misleading but the result is the same:

You simply can't use the Visual FoxPro OleDb provider in a 64 bit application!

How this bit me recently with an IIS Application

To give you an idea how this might affect you, here's how I chased my tail yesterday...

I ran into this issue in my FoxPro WebLog application. It's a FoxPro Web Connection application, but it uses a small ASP.NET HttpHandler support component that I created to handle uploading of Weblog posts to the Web site using the MetaWebLog (WordPress) format. It's a component I use on my main WebLog Website and I adjusted it to capture the date into the FoxPro database via the VFP OleDb provider. Works great and is a nice usage of .NET and FoxPro working side by side in harmony.

The app had been running fine, and post uploads have been working just fine and dandy for years. But recently I updated my Web Server VPS machine, and ended up reinstalling IIS and manually re-creating all of the Web sites on the server.

I don't update posts on the blog much these days so it's been a while since the original upgrade, but yesterday I tried to upload a post and ran into this now familiar error from the server:

Upload Error

Ugh. The problem is that IIS Application Pools running .NET defaults to 64 bit, which is why I get the error message shown in the dialog. I forgot to toggle the Application Pool to 32 bit.

Fixing the Problem in IIS

To fix this I have to make sure that the IIS Application Pool for this application is configured as 32 bit explicitly:

In IIS the hosting is determined by the IIS Application Pool hosting process so the bitness is set by the IIS Application Pool which is the actual host process of the application. .NET Components loaded into the process then adjust to the host processes bitness (unless explcititly to something else which is unusual)

Making .NET Applications run 32 Bit

When you create your own .NET standalone applications - an EXE most likely - you have to specify what bitness the application should run in.

In .NET the bitness is determined by the Platform Target.

The default is Any CPU which means that the code is compiled so it can run in either 64 bit or 32 bit. In IIS this results in the component being able to run either 32 or 64 bit depending on what the host is running - it works either way.

For standalone EXEs that are built with Any CPU, the default for execution is 64 bit unless you explicitly provide a platform hint (the Prefer 32 bit checkbox when when Any CPU is set).

If you're building an application that uses the VFP OleDb driver, you probably want to explicitly mark it as 32 bit, since the OleDb provider won't work in any other mode.

32 Bit is a Dead End

The older software components like the VFP OleDb driver become, the more likely the 32 bit only use case becomes an issue as more and more software now runs as 64 bit applications. Already plugins and integrations often can't use the VFP OleDb driver because the host applications no longer support 32 bit interfaces. Unfortunately there's no good solution to that problem.

However, if the host application is under your control, or you're running under IIS, you may still be able to switch the application to 32 bit to make it work, but regardless it may be better to look for other interfacing solutions. Unfortunately you'll be no better off with the VFP ODBC driver which also exists only as a 32 bit driver.

Alternatives: Out of Process COM or Services

There aren't very good alternatives for FoxPro if you have to work with 64 bit applications.

One option is to build out of process COM components. Because the components are out of process they run separately from the host application in their own host and so allow you to use a 32 bit FoxPro server with a 64 bit application.

Another option is to build a Web service (including a local service) of some sort and share data that way.

Finally VFP 10 Advanced also offers options for compiling FoxPro code to 64 bit including creating COM objects, but that introduces its own set of problems if you depend on DLLs that FoxPro might be using (I do in most of my applications) because now the 64 bit FoxPro application can't use 32 bit DLLs. Heads you lose, tails you lose, huh?

It sucks being stuck in 32 bit, but unfortunately that's what happens eventually with legacy software that is far removed from modern development stacks.

Summary

32 bit technology is on its last leg and the VFP OleDb provider is one of the 32 bit only components that on the very end of that leg and so both the VFP OleDb and ODBC drivers are unlikely to be used in new development that needs to interface with modern applications.

But if you're already using this driver most likely you're using it in a legacy application that is 32 bit and it can probably stay that way. The key part is making sure that you remember to run the host application in 32 bit.

That means, for now we can keep the lights on at least on the old applications...

this post created and published with the Markdown Monster Editor

Delaying or Waiting Code in Web Connection Applications

$
0
0

Here's a question that comes up quite frequently:

How can I safely wait for a few seconds inside of Web Connection without running into problems in COM operation?

As you probably know if you use Web Connection, when you build a server application you are not supposed to have any UI interaction. So if you're used to using the following:

wait window timeout 2

or worse:

wait window "please hang on for a second..." timeout 2

to add a delay in your applications you are going to find that:

  • It works fine when running Web Connection in File Mode
  • It does not work when running Web Connection in COM Mode

When running in COM Mode you're likely to get an error like this one:

Not what you want...

The Problem: No UI Support in COM

UI support is one of the few things that behave differently in file and COM modes, and while COM mode can actually support UI operations if you don't have SYS(2335, 0) set, you typically want to enable that flag to avoid having your application hang on 'accidental' application or system dialogs that might trigger on file access or locking or other errors.

SYS(2335): Unattended COM Mode

Web Connection by default sets an UnattendedComMode=on flag in your application's yourApp.ini file, to enable unattended mode when running in COM. When enabled any operation that uses FoxPro's user interface whether explicit via things like WAIT WINDOW calling MESSAGEBOX or the file open dialog, or implicit such as an error that can't find a database file, or a file locking operation that normally pop up a user interface.

Instead when SYS(2335, 0) is set, the COM server throws an error when the UI operation occurs (shown above).

This is one of the few differences between file and COM modes, so be aware of this discrepancy. It's a good idea to test your application in COM while you're working on it occasionally to make sure you don't miss an issue like this.

Safely adding a Delay to your Code

So, WAIT WINDOW is not a good idea if you want your application to work both in file and COM modes.

What should you be using instead?

There are two easy ways to do this:

inkey(2)

INKEY() is an old FoxPro input command used to wait for any kind of keyboard input for a given number of seconds. Note that you provided fractional seconds, however, the minimum is somewhere around 120ms or so, so you can't do really short times beyond a value 0.1. Although this command relies on input features which are technically not present in a COM server, this command works where WAIT WINDOW TIMEOUT 2 fails.

The other command you can use is the Windows Sleep() which you can access quickly via:

WinApi_Sleep(2000)

WinApi_Sleep() is a global helper function in wwAPI.prg, which is always loaded in your WWWC apps so it should always be available to use. You specify a number of milliseconds and it basically pauses the active thread that your FoxPro COM server is using for the number of seconds.

Note that this effectively freezes the application/COM Server while its waiting. For a server app this is likely not a problem, but you shouldn't use this function for long wait operations as it will cause Windows to think the application is frozen and cause it to get force shut down. I would say anything longer than 10 seconds is too long - if you have any thing longer that you probably should run either of these commands in a loop with a DOEVENTS to allow the application thread to yield to Windows and let it know that the app is still alive.

Long Waits or Conditional Exits

If you have to wait for a long time, you should use a loop to wait along with DOEVENTS for yielding to Windows. But in addition to yielding and giving Windows time to breathe, you also can check for cancel or complete conditions that might be satisfied before the full wait cycle is up.

Here's what this looks like:

*** wait up to 20 seconds (20,000ms)
llCompleted = .F.
FOR lnX = 1 to 200 
    WinApi_Sleep(100)
    if (llSomeConditionIsSet)
       llCompleted = .T.
       EXIT  && allows checking and exiting
    ENDIF
    DOEVENTS
ENDFOR

** Go on processing regular code
IF llCompleted
   DoCompleted()
ELSE
   DoNonCompleted()
ENDIF

This is certainly a little more involved than a single line command, but it also allows for a lot more control over the wait process.

Avoid Waiting in Web Applications

Now a short lecture: It's a bad idea to wait in a Web application in general. If you have long running operations that require waiting you probably should consider making the operation asynchronous, where you submit the process for processing by an external process or another service, and then check back for the result. Making users wait for anything more than a few seconds (and I mean a few!!!) is bad Web etiquette and is likely to result in users thinking the operation failed and re-clicking the same link which then can cause the application to get bogged down.

In addition long running requests tie up Web Connection server instances that while waiting can't process other requests. This can also result in stalling your app, especially if users think the current operation failed and they are retrying - it can quickly becomes self-reinforcing problem.

For this reason you want to - as much as possible - avoid running requests that take more than a few seconds. My general guideline of a few seconds is max 5 seconds for end-user facing operations beyond which you should start thinking about offloading to some external background process using async operations.

Summary

Sometimes waiting on an external operation to complete is necessary, and I've shown you a few ways you can deal with waiting. But make sure you are not making the user think your request has failed so keep wait times short or provide some sort of update information that provides information to the user while the long running operation is running. This is a lot more complicated than a single step operation, but it'll ensure both that your server doesn't get bogged down by the long running requests, and that your end user knows that your application is doing what it's supposed to be doing while they wait for their response.

this post created and published with the Markdown Monster Editor

Web Connection 7.32 released

$
0
0

Web Connection 7.32 is out and in this post I'll go over some of the new features. This release is a small update, mostly with bug fixes and a few small adjustments to existing functionality. Some of these are quite productive if you use them, but all are relatively minor enhancements. There are no breaking changes.

wwDotnetBridge Enhancements

.NET integration is becoming ever more important for integration with Windows and third party tools and libraries. Web Connection internally is starting to use more and more .NET related features and wwDotnetBridge over the years has become a key feature of the Web Connection library to support helper and support functionality from features like JSON Serialization, to encryption, to the email service functionality as well as small features like Unicode string handling support, UTC date conversions, advanced formatting for dates and number and much more.

So it's no surprise that there are many improvements that are thrown onto this library to make it easier to use and make integration with .NET code easier.

Improved Collection Support

.NET makes extensive use of various collection types and in this release it gets a bit easier to access collection members and set collection values using simple loList.Add(loItem) (or AddItem()) functionality. Likewise you can also add new Dictionary items - lists are indexed lists, while dictionaries are key/value collections - using the loList.AddDictionaryItem(lvKey, loItem). There's also a new RemoveItem() method that matches the native dictionary methods.

All of this makes use of collections more natural and like you would see in .NET code examples thereby reducing some of the impedence mismatch between FoxPro and .NET. That isn't to say, wwDotnetBridge code works just like .NET but it makes things a little more transparent.

Auto-Instance Parameter Fix Ups

As you probably know .NET features many types that FoxPro and COM can't directly pass to or receive from .NET, and wwDotnetBridge provides a ComValue wrapper object that can be used to 'wrap' a .NET type in such a way that you can receive it in FoxPro, update the value and pass back the wrapper in lieu of the actual .NET value. This allows the type to stay in .NET and therefore work within the confines of FoxPro code via indirect reference.

Some work has been done to make these wrapper ComValue objects more transparent when they are passed to .NET using the intrinsic Invoke() and SetProperty() methods. ComValue are now automatically unwrapped and can be treated like an actual .NET value passed again making it more natural to some of the wwDotnetBridge abstractions. Previously you had to manually unwrap the value and pass the value explicitly which in some cases also would not work. In most cases this should now work transparently.

JSON Serializer Improvements

Another hot feature of Web Connection are REST Services and by extension the JSON Serialization support in the framework. JSON Serialization is what makes it possible to turn FoxPro objects into JSON and pass it to a remote service and Deserialization allows receiving of JSON data and turning it back into FoxPro objects for use in REST Service methods or for manual deserialization.

This update includes some updates that remove some of the naming restrictions for JSON objects based on the EMPTY class. By default the JSON Serializer has to exclude some property names from Serialization, because some property names are FoxPro reserved names. For example, Name, Classname, Class, Id etc. Every base object has some of these properties and by default Web Connection filters out these known base properties.

Well, it turns out that if you create an EMPTY object, it has no base properties at all, so these filters are not really required. In this update the serializer checks for EMPTY objects and if it is renders the objects as is without any property name filtering resulting both in a clean JSON export as well as improved performance as the filtering operation doesn't have to be performed.

As a recommendation: When generating JSON output for serialization, it's highly recommended that you create objects based on EMPTY (or SCATTER NAME MEMO) for serialization to ensure that your property names are preserved.

loPerson = CREATEOBJECT("EMPTY")
ADDPROPERTY(loPerson, "firstname", "Rick")
ADDPROPERTY(loPerson, "lastname", "Strahl")
ADDPROPERTY(loPerson, "address", CREATEOBJECT("EMPTY"))
ADDPROPERTY(loPerson.Address, "street", "123 North End")
ADDPROPERTY(loPerson.Address, "city", "Nowhere")

loSer = CREATEOBJECT("wwJsonSerializer")
loSer.PropertyNameOverrides = "lastName,firstName"  && force case
lcJson = loSer.Serialize(loPerson)

As an aside, wwJsonSerializer internally uses EMPTY objects when creating cursor and collection items so the optimization is already prevalent. The recommendation is primarily for top level objects that you expose to the serializer.

JSON UTC Date Conversion Fix

The wwJsonSerializer::AssumeUtcDates flag can be used to specify that dates that you are passing as input are already UTC dates, and are not converted to UTC when serialized.

By default the serializer assumes that dates are local dates, and when serializing turns the JSON dates into UTC dates (using the generic Z postfix to denote UTC date. Then when the date is deserialized it's turned back into a local date.

Although this flag has been around for quite some time, it wasn't actually working and some people had been reporting problems dealing with dates that shouldn't be converted.

Web Connection Framework Features

GetUrlEncodedCollection() to parse URL Encoded Lists

Web Connection has always included support for parsing form variables into collections using Request.GetFormVarCollection() and - prior to that the now deprecated Request.aFormVars(). But if you also wanted to get a collection of all the QueryString or ServerVariables you were out of luck, having to manually parse the string values and decoding.

In this release the Request.GetUrlEncodedCollection() function is a generic method that can be used to take any URL encoded string of key value pairs and parse it into a decoded collection of key\values.

loQueryStrings = Request.GetUrlEncodedCollection(Request.cQueryString)
FOR EACH loQuery in loQueryStrings FOXOBJECT
    ? loQuery.Key
    ? loQuery.Value
ENDFOR

Security is important and standards for cookie security have been changing a lot in recent years, so the latest releases of Web Connection make the default cookie configuration setting a bit more strict to ensure your sites are not flagged as insecure by even basic security scanning tools.

A couple of changes have been made in default Cookie policy:

  • Default is cookie is set to HttpOnly
    This ensures that cookies cannot be read and modified on the client side. They are sent as part of the request and applied, but the cookie is not available for capture and reuse in client side code which avoid drive-by capture of cookies for replay attacks.

  • Default is set to samesite=strict;
    Likewise same site cookie policy is recommdended by default to avoid bleeding out cookies for capture outside of the currrent site. In most cases samesite=strict; should work fine, unless you building a federated login system where cookies are shared across sites. The new value is the sensible default to use for any cookies created.

These cookies values are applied when:

  • Creating a new Cookie with CreateObject("wwCookie")
  • Using Response.AddCookie()
  • Using Session Cookies in Process.InitializeSession()

Note that you can always override the cookie - AddCookie() returns the cookie instance and you can override any values as needed if you manually create it. Likewise you can override Process.InitializeSession() to explicitly specify your own cookie policy.

Summary

There you have it - Web Connection 7.32 changes (and a couple of 7.30 changes as well) are essentially maintenance update features. Some of these are highly useful if you are using these feature as they make life a lot easier. The Cookie settings are a necessary security update, which is one of the reasons of why you should try to keep up with updates of the framework to ensure you have the latest fixes and security updates.

Until next update...

this post created and published with the Markdown Monster Editor
Viewing all 133 articles
Browse latest View live